5 Idee per Modelli di Cellula Animale Fai da Te per Progetti Scolastici (Classificate per Difficoltà)
Una guida completa alle migliori idee per progetti di biologia sulle cellule animali. Include istruzioni per la costruzione di modelli 3D con argilla, polistirolo e stampa 3D, oltre a consigli per presentazioni per la fiera della scienza capaci di impressionare i giudici della fiera.
20 luglio 2026
Il tuo docente ti ha appena dato un compito: realizzare un modello di cellula animale. Il tuo primo istinto è probabilmente una pallina di polistirolo e della vernice. Può andare bene. Ma non è l'unica opzione, e non è sempre la scelta migliore.
Questa guida illustra cinque modi per realizzare un modello di cellula animale, classificati dal metodo più semplice con la schiuma a un flusso di lavoro digitale completo alimentato dall'IA. Ogni metodo include una procedura dettagliata passo dopo passo, una stima del tempo necessario e una verifica dei costi, così puoi scegliere l'opzione più adatta alla tua scadenza e al tuo budget. Alla fine è inclusa una rubrica di valutazione perché sapere ciò che il tuo insegnante valuta effettivamente conta più di un modello carino.
Organelli della Cellula Animale: Elementi da Includere
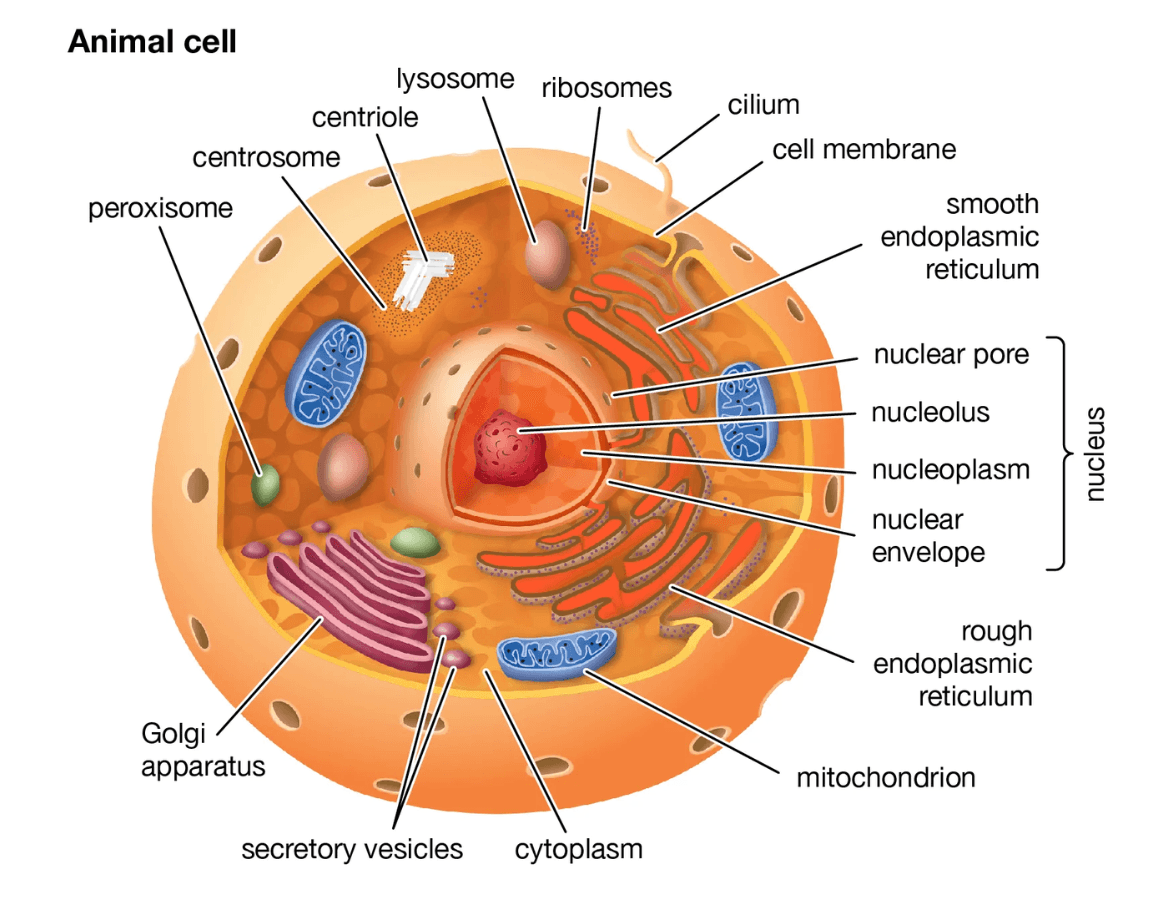
Ogni modello di cellula animale richiede queste strutture. Verifica il tuo foglio di assegnazione per l'elenco esatto, ma nella maggior parte dei casi sono necessari tutti i seguenti componenti:
- Membrana cellulare, confine esterno, regola ciò che entra e esce
- Citoplasma, matrice gelatinosa che mantiene in sede le strutture cellulari
- Il nucleo, il più grande organulo, contiene il DNA e controlla l'attività cellulare
- Il nucleolo, un piccolo punto all'interno del nucleo, produce i ribosomi
- Mitocondri, a forma di fagiolo, producono energia (ATP)
- I ribosomi, piccoli organelli, sintetizzano proteine
- Il RE rugoso, sacche appiattite con puntini (i puntini sono ribosomi)
- ER liscio, strisce ripiegate senza punti
- Apparato di Golgi, cisterne impilate, elabora, impacchetta e distribuisce materiali
- I lisosomi, piccoli cerchi scuri, degradano i materiali di scarto
- Centrioli, due piccoli cilindretti prossimi al nucleo, presenti esclusivamente nelle cellule animali
Gli organelli che gli studenti dimenticano più spesso sono i centrioli e i lisosomi. Entrambi sono unici delle cellule animali. I docenti li ricercano specificamente come prova che tu abbia appreso la differenza tra una cellula animale e una cellula vegetale.
Metodo 1. Cellula animale con sfere di polistirolo (Principiante)
- Tempo stimato: 1–2 ore
- Costo: $5–15
- Difficoltà: Facile
I modelli di cellule animali in schiuma sono la scelta classica. Si sfruttano le sfere di polistirolo per la loro forma predefinita. Una sezione a mezza sfera mostra chiaramente l'interno, rendendo l'applicazione delle etichette molto più facile rispetto a una sfera intera.
Occorrente:
- sfera di polistirolo espanso da 6–8 pollici di diametro
- Pitture acriliche o argilla liquida in 8 o più colori
- Stuzzicadenti e quadratini di carta per etichette
- Colla forte (colla a caldo o colla per bricolage)
- Fondo in cartone
Passo 1: Dividere la palla a metà
Un coltello seghettato o un robusto troncino sono l'ideale. Carteggia leggermente il bordo tagliato in modo che aderisca perfettamente alla base.
Passo 2: Forma la Membrana Cellulare
Dipingi o rivesti la superficie esterna curva. Usa uno strato sottile di argilla azzurro chiaro o giallo pallido come membrana cellulare. Mantienila flessibile. Le cellule animali non hanno una parete esterna rigida.
Passaggio 3: Colora il citoplasma
Dipingi la superficie di taglio piatta di citoplasma. Azzurro chiaro, giallo tenue o bianco rotto vanno tutti bene. Questo è l'interno della cellula.
Passo 4: Posizionare il Nucleo
Inizia aggiungendo il nucleo. Usa argilla viola scura o blu profondo. Rendi la struttura più grande, posizionata leggermente fuori centro in modo che il modello risulti naturale e non perfettamente simmetrico.
Passaggio 5: Aggiungi gli organelli rimanenti
Applica le piccole forme di argilla sulla superficie del citoplasma. Usa un diagramma di riferimento per posizionarle correttamente in via approssimativa. I mitocondri si trovano vicino alla periferia; il reticolo endoplasmatico e l'apparato di Golgi sono posizionati vicino al nucleo.
Passaggio 6: Applica l’etichetta e lascia riposare
Lasciate indurire il tutto per 24 ore. Quindi fissate le etichette con degli stuzzicadenti o posizionate una chiave numerata accanto al modello. Effettuate un ultimo controllo rispetto a un'immagine di riferimento: nessuna parete cellulare, nessun cloroplasto, nessun grande vacuolo centrale.
Un dettaglio che distingue un buon modello di cellula animale in schiuma da uno sciatto: la coerenza. Se il nucleo è viola nel tuo modello, la chiave di lettura dovrebbe mostrare lo stesso viola. La codifica colore rende il modello leggibile dall'altro lato della stanza.
Metodo 2. Cellula Animale in Argilla o Pasta per Modellare (Principiante–Intermedio)
- Durata stimata: 2–4 ore
- Prezzo: $15–25
- Difficoltà: bassa–media
Un modello di cellula animale in argilla ti dà più controllo rispetto alla schiuma. Piccole forme come ribosomi, apparato del Golgi e mitocondri dalla forma a fagiolo sono più facili da scolpire, e il modello finito è più resistente durante il trasporto.
L'argilla autoindurente è la scelta più sicura per l'uso scolastico. L'argilla polimerica ha un aspetto più liscio ma richiede un forno e la supervisione di un adulto. Entrambe sono adatte; la scelta dipende da cosa avete a casa.
Cosa ti serve:
- Argilla essiccata all'aria o argilla polimerica in 8 o più colori
- Base di cartoncino o cartone (10×10 pollici / 25.4×25.4 cm)
- Stuzzicadenti, quadretti di carta, pennarello a punta sottile per etichette
- Schema di riferimento (in stampa)
Fase 1: Preparare la membrana cellulare e il citoplasma
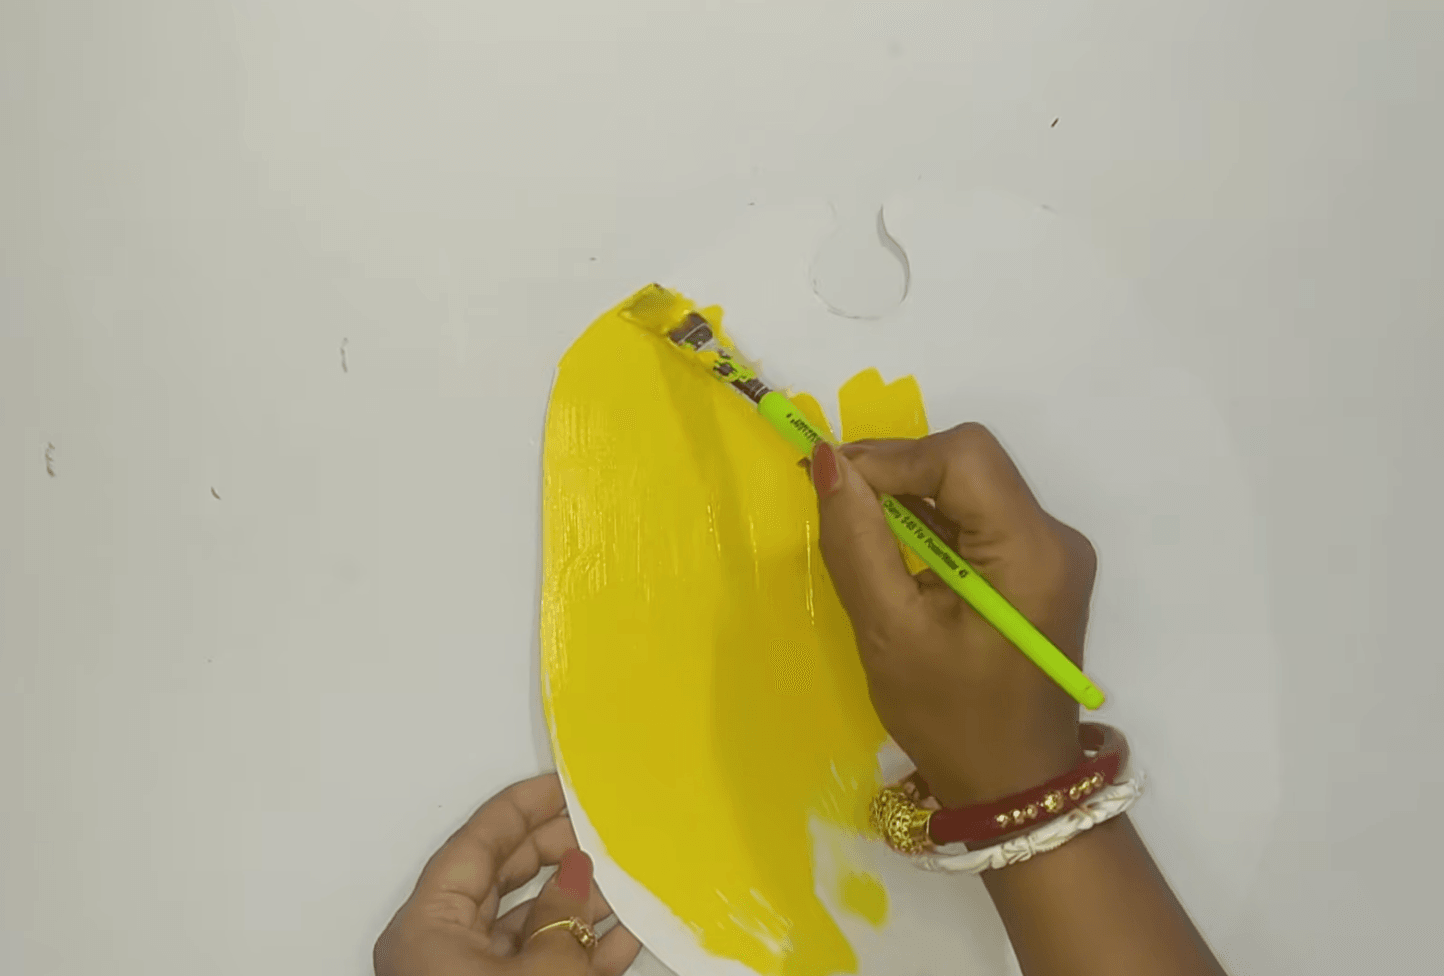
Disegna un contorno ovale arrotondato sul tuo pannello in gommapiuma. Stendi uno strato sottile di pasta modellabile di colore chiaro all'interno come citoplasma. Arrotola una striscia stretta e posizionala sul bordo esterno come membrana cellulare. Mantieni i due colori distinti senza mescolarli.
Passaggio 2: Aggiungi il nucleo e il nucleolo
Il nucleo viene inserito per primo, leggermente decentrato. Premi una piccola sfera di argilla contrastante sulla superficie del nucleo per formare il nucleolo.
Passaggio 3: Modellare e posizionare i mitocondri
Arrotola piccole forme a fagiolo in rosso o arancione. Aggiungi una linea curva all'interno di ognuna per mostrare la membrana interna ripiegata. Disponi 2-4 mitocondri sparsi nel citoplasma.
Passo 4: Costruire il Reticolo Endoplasmatico rugoso e quello liscio
Arrotola sottili cilindretti di argilla blu o viola per entrambi gli organelli. Il RER riceve piccoli puntini premuti sulla sua superficie, e questi puntini sono i ribosomi. Il RE liscio usa le stesse strisce senza puntini. Posiziona entrambi vicino al Nucleo.
Passaggio 5: Aggiungere apparato del Golgi, lisosomi e ribosomi
L'apparecchio di Golgi sembra un nastro curvato impilato, quindi usa dell'argilla gialla o arancione. I lisosomi sono piccoli cerchi verdi o marrone scuro, 2-3 sparsi nel citoplasma. I ribosomi sono puntini grandi come perline, alcuni sul reticolo endoplasmatico rugoso, e altri che fluttuano liberamente.
Etichettatura e Controllo
Numera ciascun organello. Scrivi il nome e una frase che descriva la funzione in una legenda pulita vicino al modello. Prima di finire, confronta il tuo modello con un'immagine di riferimento reale di una cellula animale e conferma: nessuna parete cellulare, nessun cloroplasto, nessun grande vacuolo centrale.
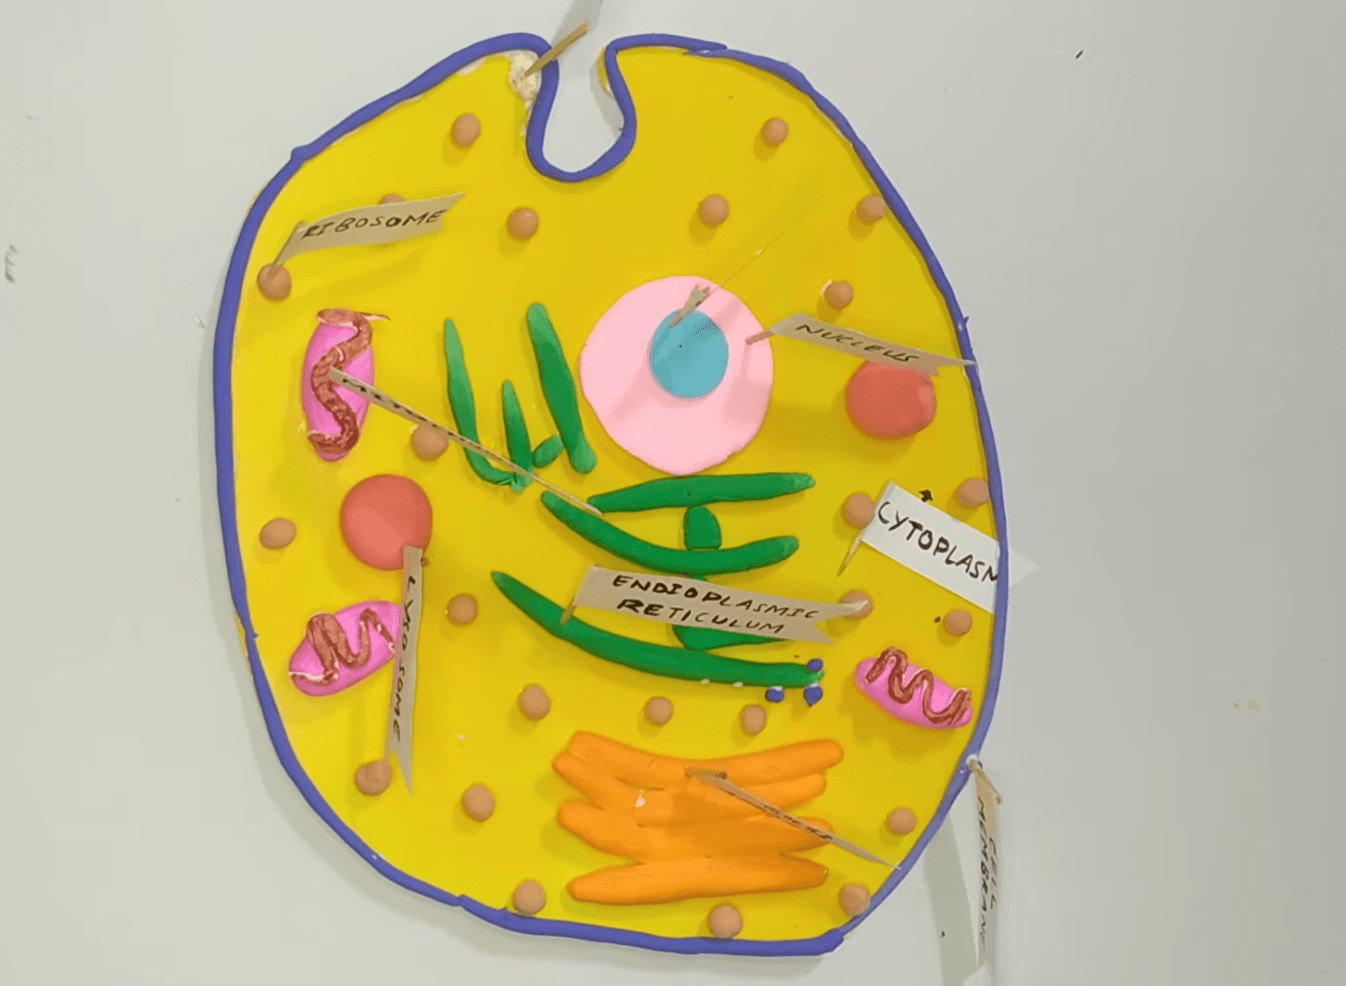
Scorciatoia per i materiali: se desideri saltare completamente la scultura in argilla, la tavola illustrativa degli organuli presente nelle risorse di biologia cellulare diKhan Academy offre immagini di riferimento nitide che puoi stampare e utilizzare come scala di riferimento.
Metodo 3. Modello di cellula animale edibile (Intermedio)
- Tempo stimato: 2–3 ore + tempo di asciugatura
- Costo: $10–20
- Difficoltà: Media
Un modello commestibile di cellula animale è memorabile e rende la biologia più facile da ricordare. I pezzi di caramella rappresentano letteralmente ogni organello, offrendo una connessione tattile con il materiale. Il compromesso è la fragilità: la gelatina si sposta, si scioglie in ambienti caldi e non resiste a essere trasportata in una borsa.
Cosa ti serve:
- Contenitore ampio e poco profondo o stampo (è adatta una teglia di dimensioni 9×13 pollici)
- Gelatina o glacatura di colore chiaro come citoplasma
- Dolci e piccoli snack per organuli (vedi la mappatura qui sotto)
- Film protettivo per il trasporto
- Chiave per etichetta stampata
Corrispondenza organelli–caramelle:
Organulo | Rappresentazione degli alimenti |
Membrana cellulare | Bordo di glassatura o striscia di pasta di frutta |
Nucleo | Uva o grossa caramella gommosa |
Mitocondrio | Caramelle gommose (rosse o arancioni) |
Ribosomi | Codette o semi di sesamo |
RER rugoso | Fetta di frutta con decorazioni a rilievo |
Reticolo endoplasmatico liscio | Striscia di frutta senza polpa |
Apparato di Golgi | Marshmallow o strati impilati di marshmallow o caramelle |
Lisosomi | Gocce di cioccolato fondente o mini M&Ms |
Centrioli | Due piccoli bastoncini di pretzel disposti ad angolo retto |
Passo 1: Prepara il Citoplasma di Gelatina
Prepara della gelatina di colore chiaro e versala in un contenitore poco profondo. Lasciala rapprendere finché risulta soda ma non completamente indurita. Dovrebbe sostenere le caramelle premute sulla superficie senza che queste affondino.
Passaggio 2: Aggiungere prima il nucleo
Premi un chicco d'uva o una caramella gelatina zuccherata nella parte centrale a sinistra. Questa rappresenta la struttura più grande.
Passaggio 3: Posiziona i mitocondri, il reticolo endoplasmatico e l'apparato di Golgi
Usa i fagioli di gelatina per i mitocondri, le strisce di frutta per il reticolo endoplasmatico e i marshmallow impilati per l'apparato del Golgi. Mantieni tutto distribuito anziché raggruppato.
Fase 4: Aggiungere lisosomi, ribosomi e centrioli
Le caramelle piccole vanno aggiunte per ultime. I ribosomi possono essere cosparsi sulla superficie del RE rugoso. Due bastoncini di pretzel a formare un angolo retto rappresentano i centrioli.
Passo 5: Crea il bordo della membrana cellulare
Applica la glassa con una sac à poche lungo il bordo della teglia o del contenitore, oppure posiziona una striscia di frutta essiccata come bordo divisorio.
Passo 6: Fotografa e Trasporta con Cura
Aggiungi un'etichetta e scatta subito una foto al modello. La gelatina si scioglie rapidamente. Scatta foto da più angolazioni prima del trasporto. Mantieni il modello freddo fino alla presentazione.
Una nota: i modelli commestibili non resistono in un'aula calda o durante un lungo tragitto. Se fa caldo a scuola o la tua presentazione è prevista nel tardo pomeriggio, un modello in argilla o polistirolo è una scelta più sicura.
Metodo 4. Modello di cellula animale stampato in 3D (avanzato)
- Tempo stimato: 1–2 ore di configurazione + tempo di stampa (3–6 ore)
- Costo: aproximadamente $3–10 en filamento
- Difficoltà: Da Media ad Alta
Un modello di cellula animale stampato in 3D è l'opzione più resistente e di più facile trasporto. Inoltre, risolve un problema tipico dei modelli in argilla e schiuma: piccoli organelli come i centrioli e i ribosomi tendono a staccarsi. Un modello stampato mantiene la sua forma e può essere ristampato in caso di problemi.
Dove trovare i file stampabili. Per informazioni su come gli scienziati reali utilizzano modelli 3D nella didattica della biologia cellulare, la risorsa Science Learning Hub sulla modellazione di cellule animali descrive l'approccio pedagogico seguito da molti insegnanti.
- Printables.com ha modelli già pronti di cellule animali in sezione trasversale con file di organuli separati in modo che ogni parte si stampi in un diverso colore di filamento
- MakerWorld offre file 3MF multi-materiale progettati per le stampanti multi-materiale Bambu Lab e Prusa
- Tinkercad offre modelli pubblici di cellule animali che puoi copiare e modificare
- Le risorse della sfida CREATE Education includono file STL gratuiti progettati per l'uso didattico
Cosa ti serve:
- Stampante 3D (FDM o a resina)
- Programmi di slicing (Cura, Bambu Studio, Orca Slicer, PrusaSlicer)
- Filamento in 3–5 colori (PLA o PETG)
Passo 1: Scegli o Crea il Tuo Modello 3D di Cellula Animale
Scarica un file predefinito o usa Tinkercad per crearne uno tuo partendo da un'immagine di riferimento. Se lo progetti da solo, modella ogni organulo come un elemento separato per poterli stampare in diversi colori.
Passaggio 2: Importa e verifica la scala
Importa i file nel tuo slicer. Controlla la scala. Un modello che sembra corretto sullo schermo potrebbe essere troppo piccolo o troppo grande per il piano di costruzione della tua stampante. Mira a 70–100mm nella dimensione più lunga in modo che i piccoli dettagli restino stampabili.
Passaggio 3: Imposta i parametri di stampa
Utilizza un'altezza di layer di 0,2 mm e un riempimento del 15%. Il corpo della cella non deve essere solido. Per il PLA, è sufficiente un profilo di temperatura standard. Per una maggiore resistenza all'uso in classe, consulta la nostra guida sui tipi di filamento per stampanti 3D per il confronto tra PETG e PLA.
Passaggio 4: Pianificazione dei supporti e dell'orientamento
Un modello con una faccia piatta rivolta verso l'alto richiede solitamente meno supporti rispetto a un modello sferico completo. Per una sfera completa, orientala in modo che la superficie più dettagliata sia rivolta verso il piatto di stampa.
Passo 5: Stampa e Assemblaggio
Rimuovere i supporti con cura. Effettuare una prova di montaggio di ciascun organello nel suo alloggiamento. Incollare i pezzi allentati con super colla o colla a caldo. Stampare piccole bandierine o etichette numerate se la stampante è in grado di gestire dettagli fini, oppure preparare uno schema di riferimento separato da stampare.
Passaggio 6: Verificare lo spessore della fetta prima dell'affettatura
Verifica l'anteprima in sezione per assicurarti che le aree sottili come i supporti delle etichette e gli spigoli degli organelli soddisfino i requisiti minimi di spessore di parete. La nostra guida allo spessore di parete per la stampa 3D illustra i valori minimi necessari per ciascun materiale.
Un vantaggio che la stampa 3D ha rispetto alla stampa in argilla: è possibile stampare in più colori con una stampante multimateriale. Questo elimina la necessità di dipingere e il risultato colorato a codice appare pulito e scientifico.
Metodo 5. Crea i tuoi propri con Triverse AI (Avanzato)
- Tempo previsto: 30 minuti + tempo di stampa
- Costo: ~$0,50 di crediti + filamento
- Difficoltà: Media
Questo metodo è l'opzione più recente e la più rilevante se desideri un modello 3D personalizzato di cellula animale che corrisponda a un tipo cellulare specifico. I modelli standard ti offrono una cellula animale generica. «Triverse AI» ti consente di generare una forma di partenza da un'immagine di riferimento, il che significa che puoi creare un modello che risponda esattamente alle esigenze del tuo progetto. Cellula muscolare, cellula nervosa o globulo funzionano tutti come riferimenti, non solo una cellula generica.
Il punto cruciale: l'IA crea una struttura di base. Spetta ancora a te effettuare la validazione biologica, l'etichettatura e la presentazione. Un modello con organelli errati o strutture mancanti perde comunque punti, indipendentemente da come è stato generato.
Cosa ti serve:
- Una chiara immagine di riferimento (schema o fotografia al microscopio)
- Account di Triverse (registrazione gratuita)
- Accesso a una stampante 3D o al software per presentazioni digitali
Fase 1: Prepara un'immagine di riferimento pulita
Un diagramma frontale di cellula animale con una chiara separazione degli organelli offre i risultati migliori. Evita schermate di schede didattiche affollate o foto a bassa risoluzione. Triverse supporta i formati PNG, JPG, JPEG e WEBP. Un diagramma con organelli distinti e ben separati produce un risultato 3D ottimale.
Passo 2: Generazione del modello
In Triverse Studio, avvia lo spazio di lavoro HD Mesh e scegli il workflow da immagine a 3D. Carica la tua immagine di riferimento, imposta i parametri e avvia la generazione. Per un progetto scolastico, utilizza un livello di dettaglio medio o elevato. Ispeziona la mesh grezza nel visualizzatore prima di procedere.
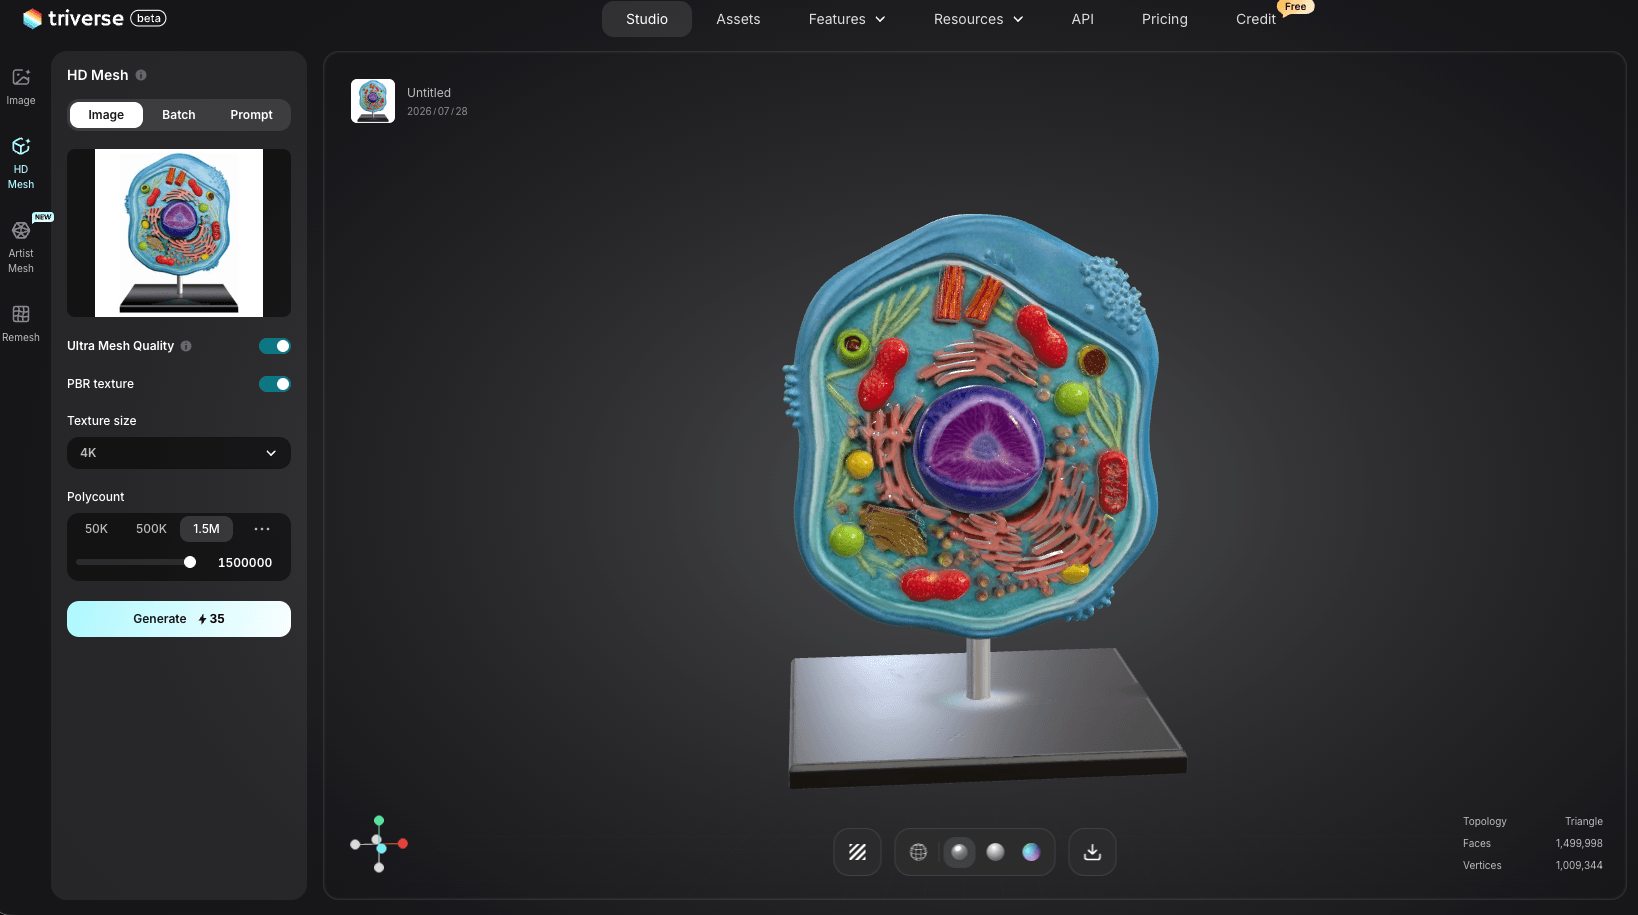
Fase 3: Verifica la biologia
Ruota il modello 3D da diverse angolazioni. Utilizza la vista wireframe per ispezionare la qualità della mesh. Verifica che siano presenti nucleo, mitocondri, reticolo endoplasmatico, apparato di Golgi e strutture di membrana. Rimuovi eventuali strutture simili a quelle vegetali se presenti. È in questo passaggio che avviene l'apprendimento vero e proprio.
Step 4: Regola i dettagli per la stampa
Le costole sottili, i perni per etichette e i bordi delle pareti sottili spesso necessitano di un ispessimento prima di sopravvivere alla stampa. Se il tuo modello ha parti sciolte, collegale alla base o ingrandiscile leggermente. Un modello che appare corretto nel visualizzatore potrebbe rivelare aree sottili nello slicer.
Passo 5: Esporta e Affetta
Triverse esporta in GLB, OBJ, STL, 3MF, FBX e USDZ. Per la stampa 3D, STL o 3MF è la scelta più pratica. Apri il file nel tuo software di slicing, imposta l'orientamento e i supporti, quindi stampa un piccolo pezzo di prova prima di stampare il modello completo.
Fase 6: Etichettatura e presentazione
Assegna un numero a ogni organello e prepara una legenda con il nome e la funzione descritta in una singola frase per ciascuno. Esercitati nella spiegazione in modo da poterla illustrare all'insegnante senza leggere direttamente dalle etichette.
Cellula animale vs cellula vegetale: Cosa deve includere il tuo modello
Prima di prendere qualsiasi materiale, controlla la tua scheda di compito. Le cellule animali e le cellule vegetali sono entrambe eucariotiche, ma i loro modelli per il progetto scolastico non dovrebbero essere uguali. Il modo più rapido per perdere punti è costruire per errore una cellula vegetale e chiamarla cellula animale.
La differenza fondamentale è la struttura. Le cellule animali non hanno una parete cellulare né cloroplasti. Hanno una membrana cellulare flessibile invece di una struttura esterna rigida e includono centrioli e lisosomi, che le cellule vegetali generalmente non contengono.
Funzionalità | Célula Animal | Cellula vegetale |
Limite esterno | Membrana cellulare (flessibile) | Parete cellulare e membrana cellulare |
Cloroplasti | Assente | Presente |
Centrioli | Presente | Generalmente assente |
Lisosomi | Tipico dei modelli di base | Meno in evidenza |
Forma | Rotondo, ovale o irregolare | Rettangolare o squadrato |
Vacuoli | Piccolo e sparso | Un unico grande vacuolo centrale |
La prova pratica: se il tuo modello appare rigido e squadrato, probabilmente ha una parete cellulare. Se appare morbido e arrotondato, sei sulla buona strada. Per un confronto completo dei modelli di cellule vegetali, consulta la nostra guida su come realizzare un modello 3D di cellula vegetale.
Come presentare il tuo progetto sulla cellula animale
Costruire il modello vale metà del punteggio. La presentazione vale l'altra metà. Ecco ciò che insegnanti e giudici delle fiere scientifiche valutano concretamente:
Identificazione degli organelli. Punta a ciascun organello e dine il nome senza consultare schede. Esercitati dalle tre alle cinque volte prima del giorno della presentazione.
Spiegazione delle funzioni. Per ogni organello, spiega cosa fa in una frase. "I mitocondri producono energia per la cellula" è meglio di "i mitocondri sono qui e sono importanti".
Contesto: tipo di cellula. Indica che questa è una cellula animale e specifica quali differenze presenterebbe una cellula vegetale. Questo dimostra una comprensione profonda, non solo memorizzazione.
Sintesi del processo. Spiega brevemente perché hai scelto il tuo metodo e cosa hai imparato nella costruzione del modello. Una descrizione di 30 secondi del tuo percorso aggiunge autenticità.
Una breve spiegazione: «Questa è una cellula animale, quindi ha una membrana cellulare flessibile invece di una parete cellulare. Il citoplasma contiene gli organelli. Il nucleo conserva il DNA e controlla la cellula. I mitocondri producono energia. I ribosomi e il reticolo endoplasmatico rugoso producono proteine, mentre l'apparato di Golgi impacchetta e spedisce i materiali. I lisosomi smaltiscono i rifiuti.»
Questo tipo di argomentazione sembra convincente e dimostra che comprendi come le parti interagiscono tra loro.
Criteri di valutazione per il progetto della cellula animale
La rubrica varia a seconda della scuola e dell'insegnante, ma la maggior parte valuta secondo le stesse categorie. Usa questo come verifica pre-invio:
Criterio | Peso típico |
Sono presenti tutti gli organelli richiesti | 25–30 % |
Il corretto posizionamento degli organuli | 20–25% |
Etichette chiare e leggibili | 15–20% |
Chiarezza espositiva | 15–20% |
Qualità visiva e creatività | 10–15% |
Consegna puntuale | 5–10% |
Si noti che completezza e accuratezza costituiscono circa la metà della valutazione finale. Se hai tutti gli organelli nelle posizioni più o meno corrette, hai già soddisfatto i requisiti minimi. Le altre categorie sono quelle in cui puoi guadagnare punti aggiuntivi.
Domande Frequenti sui Modelli 3D di Cellula Animale
Come Realizzare un Modello di Cellula Animale per un Progetto Scolastico
Il metodo della pallina di polistirolo è il metodo più semplice per iniziare. Richiede strumenti minimi, costa meno di 15 dollari e produce un risultato riconoscibile in meno di due ore. Se hai accesso all'argilla, quel metodo ti offre più dettagli per più o meno lo stesso investimento di tempo. Ciascuno dei cinque metodi in questa guida copre la stessa biologia. La differenza tra i cinque metodi è il materiale e il livello di dettaglio che puoi ottenere.
Quali Oggetti Domestici Possono Rappresentare gli Organelli della Cellula Animale?
Le perline funzionano per i ribosomi. Le caramelle a forma di fagiolo o piccole ovali funzionano per i mitocondri. Il filo o gli scovolini rappresentano il RE. Strisce di carta impilate o strati di caramelle funzionano per l'apparato di Golgi. Bottoni piccoli o gocce di cioccolato fondente possono rappresentare i lisosomi. Un acino d'uva o una grossa caramella gommosa forma un nucleo ben visibile. La consistenza è più importante dei materiali costosi.
Devo Includere Sia il RE Ruvido che il RE Liscio nel Mio Modello di Argilla?
Sì. Gli insegnanti controllano specificamente entrambi i tipi perché la distinzione mostra che comprendi le loro diverse funzioni. Il RE ruvido ha ribosomi sulla superficie. Rappresentali come piccoli punti impressi nell'argilla o nella caramella. Il RE liscio no. Usa lo stesso colore di argilla per entrambi ma aggiungi punti solo a uno.
Qual è l'Organello Più Comunemente Dimenticato in un Progetto di Cellula Animale?
I centrioli. Sono piccoli, facili da trascurare e si trovano solo nelle cellule animali. Gli insegnanti li cercano specificamente come prova che conosci la differenza tra una cellula animale e una cellula vegetale. I lisosomi sono il secondo organello più comunemente dimenticato.
Posso Usare l'IA per Creare un Modello 3D di Cellula Animale per la Scuola?
Strumenti di IA come Triverse possono generare una forma 3D di partenza da un'immagine di riferimento. Questo è utile se hai bisogno di un tipo specifico di cellula o desideri un modello 3D di cellula animale personalizzato che corrisponda ai requisiti del tuo compito. Lo studente deve comunque verificare la biologia, aggiungere etichette, controllare la stampabilità e preparare la presentazione. L'IA crea un punto di partenza, non un progetto scolastico finito.
Come Dovrei Conservare e Trasportare il Mio Progetto di Cellula Animale?
I modelli di argilla necessitano di una manipolazione delicata e non devono essere impilati. I modelli di cartone entrano in uno zaino standard se la scatola non è troppo grande. I modelli stampati in 3D sono i più durevoli per il trasporto. I modelli commestibili devono essere tenuti al fresco e fotografati immediatamente prima del trasporto.
Quale Dimensione Dovrebbe Avere il Mio Modello di Cellula Animale?
Da otto a dieci pollici nella dimensione più lunga è la misura ideale. Abbastanza grande per mostrare i dettagli, abbastanza piccolo da portare a scuola senza problemi. Se lavori con un piccolo piano di stampa, scala il modello al 70% e assicurati che gli organelli entrino ancora nei loro incavi.
In sintesi: Scegli il metodo per il tuo modello cellulare animale
Un progetto sulla cellula animale non deve per forza essere una pallina di polistirolo realizzata all'ultimo minuto. Scegli il metodo in base alla tua scadenza, al tuo budget e al livello di dettaglio richiesto dal compito. Un modello in schiuma o argilla soddisfa tutti i requisiti della rubrica per meno di 25$. Un modello di cellula animale stampato in 3D offre il risultato più pulito e un elemento espositivo più durevole. Un modello commestibile è memorabile ma fragile. E se hai bisogno di una forma personalizzata per un tipo specifico di cellula, Triverse AI ti permette di generare un modello di partenza da un'immagine di riferimento in pochi minuti.
L'unica regola che si applica a ogni metodo: verifica prima la biologia. Assenza di parete cellulare, cloroplasti e grande vacuolo centrale. Assicurati che ci siano i centrioli e i lisosomi. Etichetta tutte le strutture. Esercitati a esporre la spiegazione. È così che ottieni il voto che vuoi ottenere.