Réparer les maillages 3D pour l'impression 3D : Outils et techniques
La plupart des erreurs de maillage proviennent de trous, d'arêtes non-manifold, de normales inversées et de l'optimisation topologique. Ce guide identifie chacune d'entre elles et vous montre exactement comment les corriger à l'aide de logiciels tels que Meshmixer, Netfabb ou Blender.
13 mai 2026
L'impression 3D permet aux créateurs de transformer des conceptions numériques en objets réels, mais même le modèle le plus complexe ne garantit pas la réussite sans une préparation adéquate du maillage. Comprendre comment créer des modèles 3D imprimables pour l'impression 3D est la première étape pour éviter ces pièges, et la correction du maillage est nécessaire pour éviter une impression incorrecte de votre modèle, ce qui peut gaspiller du matériau et compromettre votre conception.
Nous abordons ici les problèmes courants de maillage et comment les identifier, les meilleurs outils de réparation, y compris les solutions assistées par IA comme Triverse Remesh, ainsi que les workflows pour rendre vos modèles prêts pour l'impression.
Pourquoi des erreurs de maillage surviennent
Avant de corriger quoi que ce soit, il est utile de comprendre la cause du problème.
STL (Stéréolithographie) est le standard pour l'impression 3D. Il décrit votre modèle à l'aide de milliers de petits triangles, formant un maillage de facettes planes qui approxime une surface lisse. Plus il y a de triangles, plus l'approximation est proche. Les logiciels de CAO fonctionnent différemment : ils stockent des courbes mathématiquement parfaites. Le STL stocke une approximation polygonale. C'est lors de cette conversion que les choses deviennent problématiques.
Lorsque vous convertissez d'un format à un autre, scannez un objet réel ou générez un modèle avec l'IA, ce processus de conversion introduit de petites imperfections. Les triangles se chevauchent. Les bords ne se rejoignent pas parfaitement. Les faces sont orientées dans le mauvais sens. Ce sont des erreurs de maillage.
Trois sources génèrent la quasi-totalité des erreurs de maillage :
Export CAD vers STL. Lorsque vous exportez un modèle Fusion 360 ou SketchUp au format STL, le triangulateur approxime la géométrie de chaque courbe. Les angles vifs, les parois fines et les courbures complexes présentent des artefacts en premier. De petits écarts et des normales inversées apparaissent.
Scan 3D. Les scanners portables capturent des millions de points de données et les triangulent en un maillage. Les scans d'objets sombres, de surfaces transparentes ou de matériaux brillants génèrent quasi systématiquement des maillages bruités et pleins de trous qui nécessitent un nettoyage avant d'être imprimables.
Génération de modèles IA. Les outils d'IA 3D génèrent des modèles en prédisant la géométrie à partir d'invites textuelles ou d'images de référence. Le résultat peut sembler remarquablement détaillé, mais contient souvent une densité de triangles irrégulière, des arêtes non variétés dues à une sur-génération, et des déploiements UV qui doivent être reconstruits avant les impressions multi-matériaux. Toute personne générant des modèles 3D avec des outils d'IA a été confrontée à ces problèmes.
Savoir à quelle catégorie votre fichier appartient vous permet de savoir où commencer et quels outils sont les plus à même de vous aider.
Les 5 erreurs de maillage les plus courantes : Guide de référence rapide
Cinq problèmes reviennent sans cesse :
1. Trous dans le maillage
L'erreur la plus courante. Des interstices apparaissent là où les triangles devraient se joindre.
Solution : Inspecteur Meshmixer → cliquez sur le marqueur rouge → Remplir le trou. Dans Blender, sélectionnez la boucle de bord et appuyez sur F. Dans Netfabb, la réparation automatique se charge elle-même de la plupart des trous.
2. Normales inversées
Les faces pointent vers l'intérieur au lieu de l'extérieur. Le trancheur ne peut pas déterminer où est située la surface.
Correction : Dans Meshmixer, Inspecteur → cliquez sur le marqueur bleu → Inverser la normale. Dans Blender, Shift+N recalcule les normales vers l'extérieur. Netfabb corrige les normales dans le cadre de sa réparation automatique standard.
3. Géométrie non manifold
Des arêtes partagées par plus de deux faces, ou des faces qui ne forment pas un volume fermé. Il s'agit du type d'erreur le plus critique.
Correction: Pour les arêtes non multiples simples, la réparation automatique de Meshmixer les corrige généralement. Pour les cas complexes, le remaillage (Meshmixer → Analyse → Remailler) est plus fiable que d'essayer de réparer manuellement chaque arête qui se superpose.
4. Séparer les coquilles
Le modèle contient plusieurs corps non connectés au sein d'un même fichier. Cela peut être intentionnel (un assemblage) ou résulter d'artefacts de numérisation.
Solution : Dans Meshmixer, utilisez Edit → Separate Shells pour afficher chaque corps, puis supprimez les fragments indésirables. Dans Blender, P → Séparer > Par éléments détachés produit le même résultat.
5. Trop de triangles
Les modèles comportant des centaines de milliers de triangles mettent du temps à se charger dans les slicers et peuvent provoquer un plantage de l'aperçu.
Correction : Meshmixer : Analyse → Remaillage → réduisez le nombre cible de triangles. Le modificateur Décimer de Blender vous offre un contrôle précis sur le taux de réduction. Commencez par 0,1 (réduction de 90 %) et augmentez progressivement jusqu'à trouver l'équilibre entre la qualité et le nombre de polygones.
La liste de vérification pour le diagnostic des erreurs de maillage
Maintenant que vous connaissez les cinq types d'erreurs, accordez-vous 60 secondes pour diagnostiquer le problème dans votre logiciel de tranchage. La plupart des logiciels de tranchage (Cura, PrusaSlicer, Bambu Studio) signalent exactement le problème.
Recherchez ces messages d'erreur :
- Maillage non varié indique que des arêtes ou des sommets sont partagés par un nombre impossible de faces. Votre modèle présente une géométrie qui ne peut pas exister dans le monde réel.
- « Non étanche / Maille ouverte » signifie qu'il y a des trous quelque part dans le modèle. Les trancheuses ont besoin d'un volume clos pour savoir où déposer la matière.
- « Normales inversées » indique que les faces triangulées sont orientées à l'envers. Le logiciel de tranchage ne peut pas distinguer l'intérieur de l'extérieur.
- « Visages dégénérés » signifie des triangles plats, de surface nulle, qui faussent les calculs.
- « Plusieurs solides détectés » indique plus d'un corps distinct dans le fichier. Parfois intentionnel ; parfois un artefact de scan.
Cette vérification de diagnostic prend 60 secondes et vous indique exactement quel est le problème. Inutile de réparer ce qui n'est pas en cause.
Comment prévenir les erreurs de maillage
La réparation est réactive, alors que la prévention économise du temps.
Vérifiez votre modèle avant de l'exporter. Dans votre logiciel de CAO, assurez-vous que le maillage est fermé avant de le convertir en STL. La plupart des outils de CAO modernes disposent d'une fonction « Vérifier la géométrie ». Pensez à l'utiliser.
Ajuster la résolution des triangles à l'exportation. Une résolution plus élevée permet d'obtenir des courbes plus lisses, mais engendre davantage d'artefacts de conversion. Pour l'impression 3D, les résolutions « standard » ou « moyenne » offrent le meilleur compromis : suffisamment fines pour des surfaces lisses, et suffisamment grossières pour éviter les erreurs de triangulation dans les angles vifs.
Validez avant le slicing. Chargez votre fichier STL dans Meshmixer ou Netfabb avant d'ouvrir votre logiciel de slicing. Corrigez les erreurs au préalable. Une habitude de 2 minutes qui évite des heures de frustration.
Concernant les modèles générés par IA : Lorsque la topologie semble trop désordonnée pour être réparée efficacement, régénérez-le avec des paramètres ajustés. Modifier le niveau de détail du prompt, la résolution de sortie ou la densité du maillage dans votre outil d'IA peut produire un résultat plus propre qu'un post-traitement. Et prêtez attention à l'orientation d'impression et aux paramètres de support. Même un maillage parfait s'imprime mal avec des paramètres inappropriés.
Comment réparer un maillage dans Meshmixer (Étape par étape)
Meshmixer est l'outil principal pour la plupart des travaux de réparation de maillages. C'est un logiciel gratuit d'Autodesk, qui fonctionne sur Mac et PC, et offre les outils d'inspection les plus intuitifs de toutes les options gratuites.
Étape 1 : Importer le modèle.
Ouvrez Meshmixer et faites glisser votre fichier STL sur la toile. Si le modèle apparaît partiellement transparent ou affiche des espaces vides immédiatement, cela vous donne un aperçu des problèmes potentiels.
Étape 2 : Lancez l'Inspecteur.
Appuyez sur Ctrl+I (ou sélectionnez Édition → Inspecteur). Meshmixer analyse le maillage et marque chaque problème qu'il trouve en rouge et bleu. Les marqueurs bleus indiquent des arêtes non variétales ; les marqueurs rouges indiquent les trous. Le compteur en haut à gauche vous indique le nombre de problèmes détectés.
Étape 3 : Corriger automatiquement les petites choses.
Cliquez sur « Auto Repair All » dans le panneau de l'inspecteur. Pour la plupart des fichiers STL importés, cela corrige 80 à 90 % des problèmes en moins de 5 secondes. Meshmixer comble les trous, supprime les faces dégénérées et résout automatiquement les superpositions simples.
Étape 4 : Traitez le reste manuellement.
S'il reste des marqueurs, cliquez sur chacun d'eux individuellement. Meshmixer propose des corrections contextuelles : « Remplir le trou », « Supprimer les pics », « Accepter » ou « Rejeter ». Pour les trous, « Remplir le trou » fonctionne bien jusqu'à une taille moyenne. Pour les vides plus importants, utilisez Modifier → Créer un solide pour remailler la section manquante.
Étape 5 : Remesh si nécessaire.
Sur les maillages générés par IA ou numérisés de manière intensive présentant une densité de triangles irrégulière, utilisez Analyse → Remesh pour régulariser le maillage. Ajustez le nombre de triangles cible pour équilibrer le niveau de détail et la taille du fichier.
Étape 6 : Exportation.
Allez dans Fichier > Exporter. Choisissez STL (binaire) pour obtenir la taille de fichier minimale et une compatibilité maximale avec les logiciels de tranchage.
Meshmixer prend en charge le plus large éventail de cas de réparation. Son seul bémol : la suite complète d'édition manuelle requiert une certaine pratique, mais l'Inspecteur et la Réparation automatique suffisent à résoudre la plupart des problèmes.
Comment réparer un maillage dans Blender
Blender est la solution la plus robuste. Il dispose des outils d'édition de maillage les plus complets parmi tous les logiciels gratuits, mais sa courbe d'apprentissage est plus abrupte que celle de Meshmixer pour la simple réparation.
Le workflow de réparation le plus rapide dans Blender :
Étape 1 : Importation. Allez dans Fichier → Importer → Stl (.stl) et chargez votre modèle. Passez en Mode Édition (Tab) et assurez-vous que la Sélection de faces est active.
Étape 2 : Fusionner les sommets en double. Pressez M → Fusionner selon la distance. Cela permet de regrouper les sommets qui se chevauchent, une cause fréquente d’erreurs de maillage dans les fichiers importés.
Étape 3 : Recalculer les normales. Appuyez sur Maj+N pour recalculer toutes les normales afin qu'elles pointent vers l'extérieur. Si le modèle semble être à l'envers après cette opération, essayez Maj+Ctrl+N pour l'inverse. L'indicateur de superposition de Blender (l'indicateur de couleur des faces orange/bleu) indique la direction des normales.
Étape 4 : Combler les trous. Avec tous les polygones sélectionnés, appuyez sur Alt+F pour combler les petits trous. Pour les espaces plus grands, sélectionnez manuellement la boucle d'arêtes de bord et créez des polygones avec F.
Étape 5 : Nettoyer via le menu Maille. Allez dans Maille → Nettoyer. « Fusionner les dégénérés » supprime les triangles plats de surface nulle. « Fusionner limité » simplifie la géométrie tout en préservant la forme. « Séparer les faces disjointes » isole les zones problématiques pour une réparation individuelle.
Étape 6 : Simplifiez si nécessaire. Sur les modèles à haute densité de polygones issus de la numérisation ou de la génération par IA, utilisez le modificateur Simplifier la géométrie pour réduire le nombre de triangles sans déformer la forme globale.
Blender brille lorsque la réparation automatique de Meshmixer ne résout pas entièrement les problèmes, ou lorsque vous devez retopologiser un modèle scanné. Pour la plupart des fichiers STL d'amateurs, les étapes 1–4 suffisent.
Comment réparer le maillage dans Netfabb
Netfabb Basic est l'option la plus rapide disponible, et elle est totalement gratuite.
Autodesk propose Netfabb Basic en téléchargement autonome, sans licence requise. Il excelle dans une tâche unique : la réparation automatique et rapide des fichiers STL.
Étape 1 : Ouvrez le fichier. Faites glisser le fichier STL dans la fenêtre Netfabb.
Étape 2 : Cliquez sur « Réparation automatique ». Voilà. Netfabb analyse le maillage, identifie toutes les erreurs et applique une séquence de réparation standard : combler les trous, corriger les normales et supprimer les chevauchements.
Étape 3 : Passez en revue les modifications. Netfabb vous montre une comparaison avant/après, et liste précisément ce qu'il a corrigé. Vous pouvez ajouter manuellement des opérations de correction si nécessaire.
Étape 4 : Exporter. Faites un clic droit sur le maillage réparé et exportez-le au format STL.
Netfabb est idéal lorsque vous disposez d'un lot de fichiers STL téléchargés et que vous avez simplement besoin de les slicer rapidement. Il ne possède pas les outils de visualisation de Meshmixer ni les capacités d'édition avancées de Blender, mais pour une réparation automatique en un clic, c'est la méthode la plus rapide.
Modèles générés par l'IA : des problèmes de maillage et des solutions spécifiques
Les modèles générés par des outils d'IA comme Meshy AI, présentent un ensemble spécifique de problèmes de maillage qui n'apparaissent pas dans les fichiers modélisés de manière traditionnelle:
- Densité d'un triangle quelconque. Certaines zones du maillage présentent des amas denses de triangles tandis que d'autres sont épars. Cela provoque un découpage irrégulier et des artefacts de surface.
- Arêtes non-manifold dues à une surgénération.Les modèles d’IA génèrent parfois une géométrie supplémentaire (coques minces, faces intérieures ou surfaces doubles) qui crée des conditions non-manifoldes.
- Cartes UV corrompues. Lors de l'impression avec des matériaux multiples ou des couleurs multiples, les mises en page UV générées par IA doivent souvent être reconstruites.
Comment traiter les problèmes de maillage d'IA :
- Exécutez d’abord Meshmixer Inspector. Il détecte les problèmes évidents (trous, normales inversées, arêtes non-manifold).
- Utilisez Analyse → Remesh dans Meshmixer pour régulariser la distribution des triangles. Cela corrige automatiquement la plupart des anomalies des maillages générés par IA.
- La gestion des UV nécessite Blender ou un éditeur UV dédié. Les outils d'IA ne produisent pas toujours des coutures UV nettes.
Parfois, la solution la plus rapide n'est pas la réparation. Un modèle généré par l'IA avec des centaines d'erreurs de maillage, ou une topologie si chaotique que chaque correction introduit deux nouveaux problèmes.
Il est plus rapide de régénérer en ajustant les paramètres que de réparer manuellement
Triverse AIgénère également des modèles dans six formats prêts à l'impression (.GLB, .OBJ, .STL, .3MF, .FBX, USDZ) avec une topologie propre, compatible avec votre trancheur. Dans Triverse, la fonction de remaillage convertit un modèle haute résolution en une version basse résolution propre (maillage en quadrilatères ou en triangles) sans quitter la plateforme.
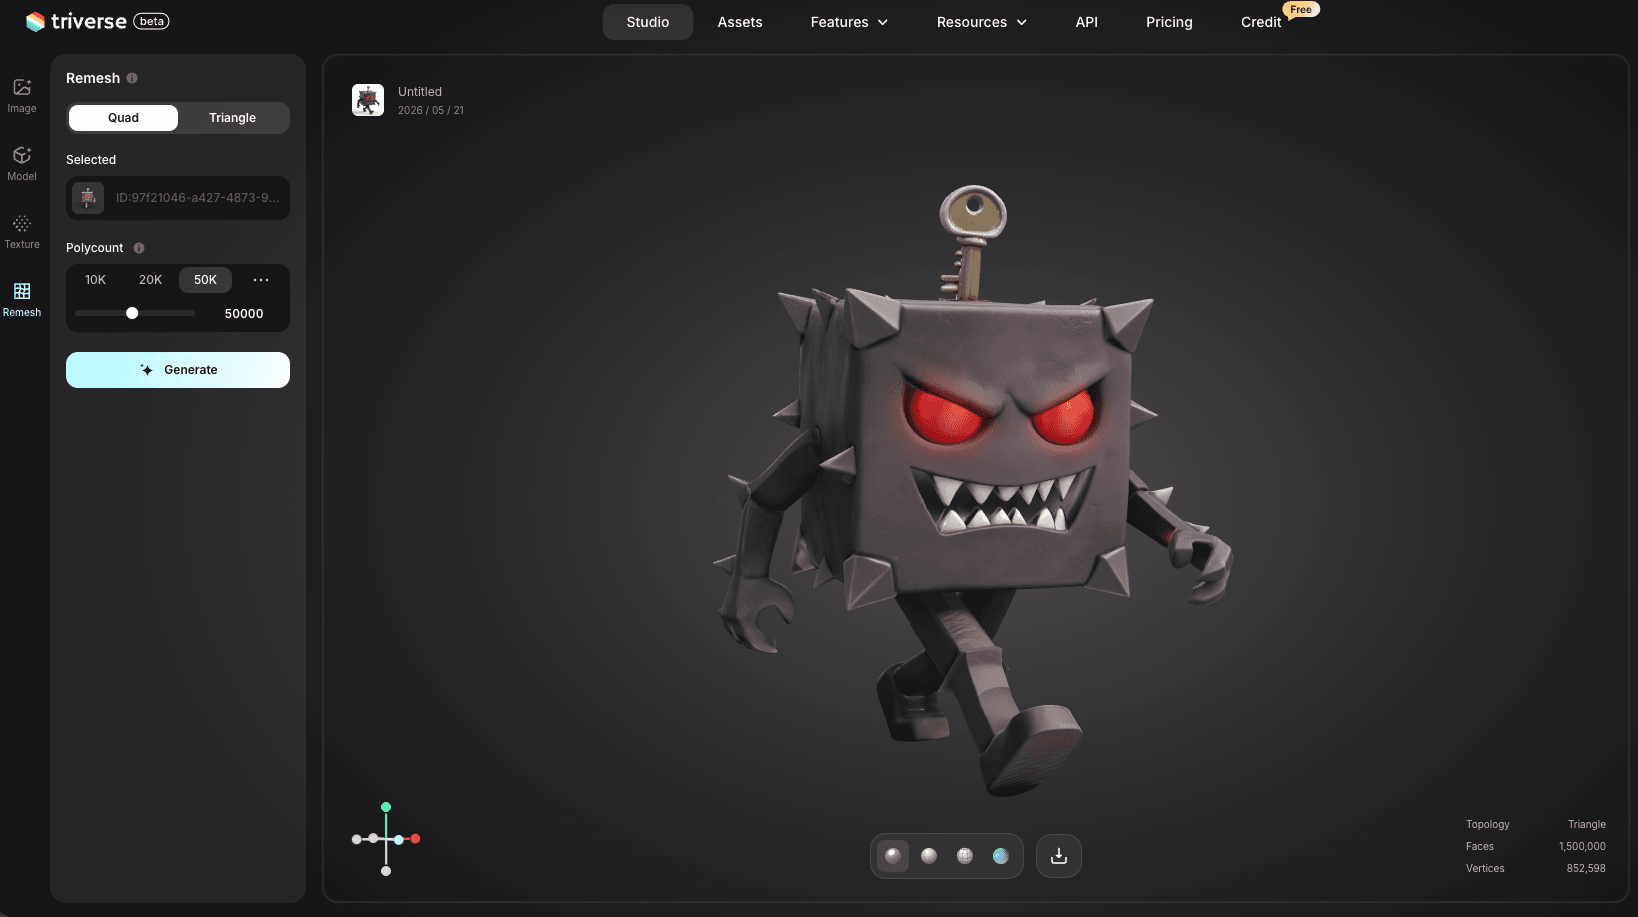
après remaillage :
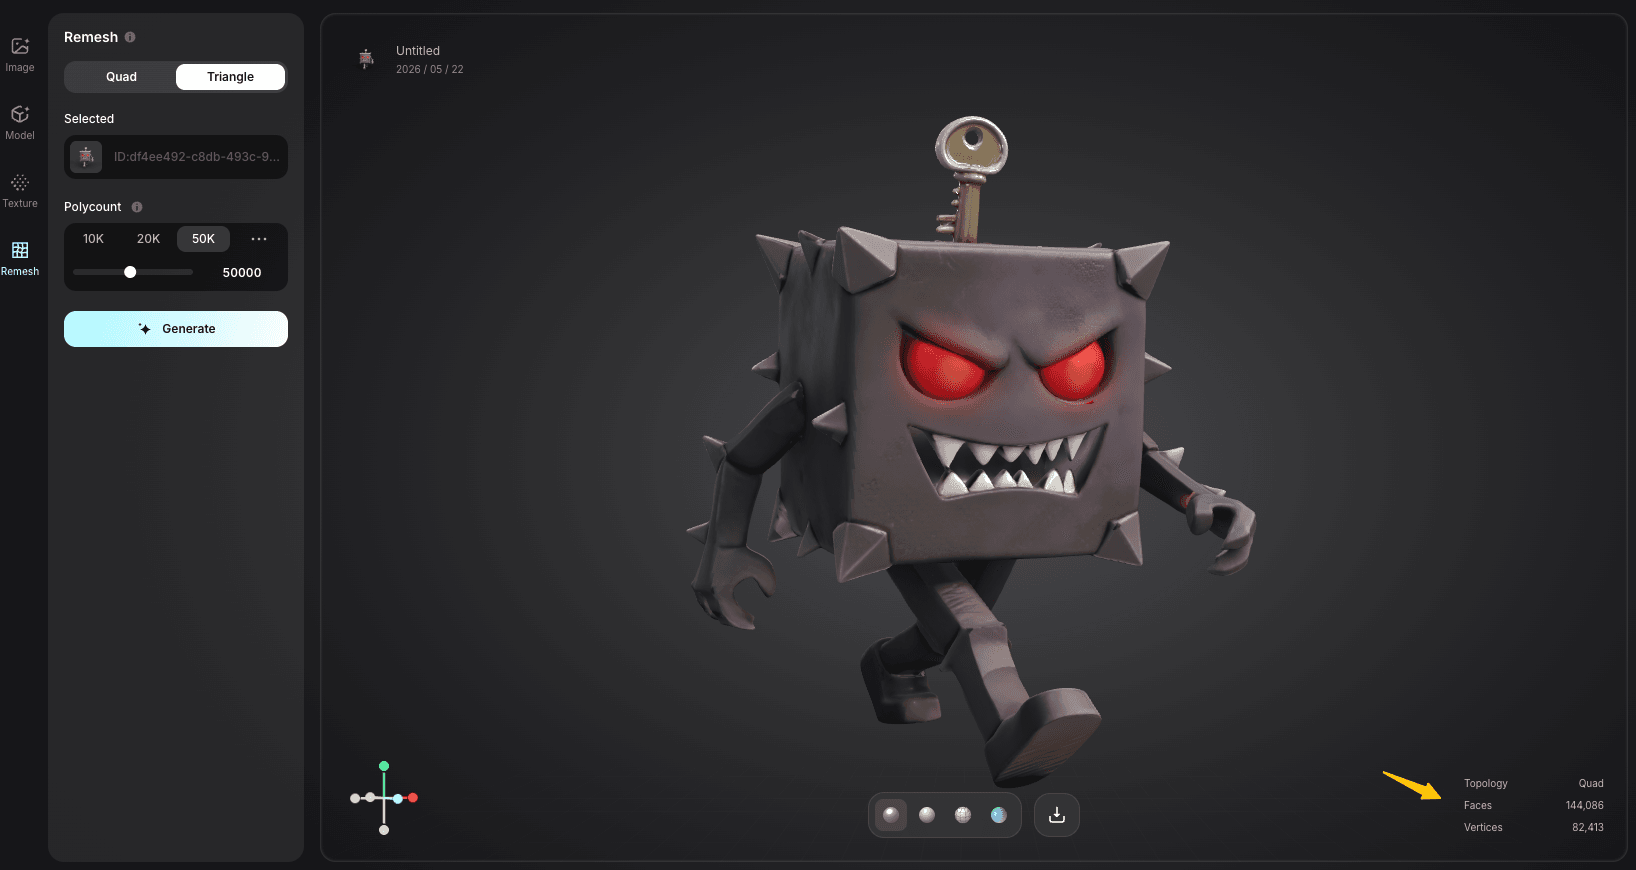
Cela ne corrigera pas les modèles externes, mais pour les ressources générées par Triverse, il contourne entièrement la boucle d'exportation -> réparation -> réimportation.
Quand reconstruire au lieu de réparer
La plupart des guides de réparation passent sous silence ce point, mais parfois la voie la plus rapide est de recommencer à zéro.
Un modèle comportant des centaines d'erreurs de maillage ou nécessitant une retopologie lourde peut prendre une heure à réparer, ou minutes à régénérer. Pour les modèles générés par IA, la régénération l'emporte presque toujours sur la réparation.
Vous avez téléchargé un fichier STL gratuit bourré d’erreurs ? Vérifiez si le même objet dispose d’une version de meilleure qualité. De nombreux modèles populaires sur Thingiverse ou Printables existent en plusieurs versions. Celle qui compte le plus de téléchargements et de « J’aime » est généralement la mieux corrigée.
Pour les modèles que vous créez à partir de rien,apprendre à créer des modèles 3D conçus spécifiquement pour l'impression 3Ddès le départ évite la plupart des problèmes de maillage.
Comparaison des logiciels de réparation de maillage
Outil | Idéal pour | Coût | Réparation automobile | Outils manuels | Courbe d’apprentissage |
Réparation, édition et remaillage complets | Gratuit | Oui | Excellent | Faible à Moyen | |
Corrections rapides STL en un-seul clic | Gratuit (version de base) | Fort | Limitée | Très faible | |
Workflow complet de modélisation et de réparation | Gratuit | Modéré | Excellent | Moyen à élevé | |
Nettoyage des scans, correctifs basés sur des filtres | Gratuit | Modéré(e) | Modéré | Taille moyenne |
Pour la plupart des utilisateurs : commencez par Netfabb pour des corrections rapides, passez à Meshmixer pour tout ce qui est plus complexe, et gardez Blender dans votre panoplie d'outils pour la retopologie et la modélisation avancée.
Questions fréquentes sur la réparation de maillage pour l'impression 3D
Tous les problèmes de maillage peuvent-ils être corrigés automatiquement ?
Non, pas toujours. Les intersections très complexes ou les conceptions artistiques peuvent nécessiter une intervention manuelle.
La réparation d'un maillage affecte-t-elle la qualité d'impression ?
Lorsqu'elle est effectuée correctement, la réparation du maillage améliore la qualité d'impression en garantissant des surfaces lisses, une géométrie précise et une meilleure adhérence entre les couches.
Que signifie « maillage non-manifold » ?
Un maillage non-manifold possède une géométrie qui ne peut pas exister dans le monde réel. Cela est causé par une arête partagée par plus de deux faces, une face de surface nulle ou un sommet qui ne se connecte pas correctement aux surfaces environnantes. Les logiciels de tranchage ne peuvent pas calculer les trajectoires d'impression à partir d'une géométrie non-manifold, car le modèle ne représente pas un objet solide.
Comment savoir si mon fichier STL est étanche ?
Importez-le dans Meshmixer et exécutez l'Inspecteur. Si l'Inspecteur n'affiche aucun marqueur rouge et que le modèle s'affiche avec un ombrage plein (sans transparence), il est fermé (watertight) et prêt pour le tranchage. Netfabb affiche une coche verte sur les modèles réparés qui passent le test d'étanchéité.
Pourquoi des erreurs de maillage surviennent-elles lors de l'exportation depuis un logiciel de CAO ?
Les logiciels de CAO utilisent des surfaces mathématiquement parfaites définies par des courbes NURBS. L'exportation en STL triangule ces surfaces, décomposant les courbes parfaites en milliers de triangles plats. Au niveau des angles serrés, des parois fines et des courbes composées, le processus de triangulation crée des lacunes, des chevauchements et des faces inversées. Il s'agit d'une différence fondamentale de format, et non d'un bogue logiciel.
Quelle est la méthode la plus rapide pour corriger un fichier STL ?
La fonction de réparation automatique de Netfabb. Pour la plupart des fichiers, elle résout 90 % des erreurs en un seul clic. Si Netfabb ne corrige pas entièrement le modèle, Meshmixer traite les problèmes restants avec son outil Inspecteur. Ensemble, ces deux outils gratuits résolvent la grande majorité des problèmes de STL en moins de 10 minutes.
Les modèles 3D générés par IA peuvent-ils être corrigés pour l'impression 3D ?
Oui, mais les modèles générés par IA nécessitent souvent plus de travail que les fichiers modélisés de manière traditionnelle. Problèmes typiques des maillages issus de l'IA : distribution irrégulière des triangles, arêtes non-manifold dues à une surgénération, et cartes UV manquantes ou endommagées. Les problèmes mineurs sont bien traités par le remaillage avec Meshmixer. Les problèmes majeurs sont plus rapidement résolus en régénérant le modèle avec des paramètres ajustés.
Dois-je remailler ou réparer ?
Des milliers d'erreurs de maillage ou une topologie si irrégulière que les outils de réparation introduisent continuellement de nouveaux problèmes ? Le remaillage est plus rapide et plus fiable. Il reconstruit le maillage avec des triangles propres et réguliers. Un modèle présentant seulement quelques trous ou des normales inversées bénéficie davantage d'une réparation, qui préserve la géométrie originale et les détails de surface.
Puis-je télécharger un fichier STL externe sur Triverse pour le remailler ?
Non. La fonction de remaillage de Triverse AI fonctionne uniquement sur les modèles générés au sein de la plateforme Triverse. Elle convertit une sortie Triverse hautement polygonale en une version faiblement polygonale propre (maillage quadrangulaire ou triangulaire). Vous avez un fichier STL externe à réparer ? Utilisez plutôt Meshmixer, Netfabb ou Blender. Triverse est idéal pour générer des modèles propres à partir de zéro, afin d'éviter complètement les erreurs de maillage.
Conclusion
Vous disposez désormais d'un processus complet de réparation de maillage à portée de main. La prochaine fois que votre logiciel de tranchage signale une erreur, vous n'aurez plus besoin de deviner. Exécutez la check-list de diagnostic, associez l'erreur à la correction appropriée et reprenez l'impression 3D.
Commencez simplement. Ouvrez Netfabb, cliquez sur réparation automatique, et voyez jusqu'où cela vous amène. La plupart des fichiers n'ont besoin de rien d'autre que ce simple clic. Quand cela ne suffit pas, l'inspecteur de Meshmixer vous guide pour la suite.
Et si vous en avez assez de corriger les erreurs de maillage des autres, générez vos propres modèles sur une plateforme qui produit d'emblée une géométrie propre. Triverse AI crée des maillages étanches et manifold qui s'importent parfaitement dans n'importe quel logiciel de tranchage, sans étape de réparation nécessaire. Passez votre temps à imprimer, pas à réparer.