Como criar uma animação de visualização de produto no Blender
Saiba como criar animações de visualização de produto no Blender com efeitos de rotação 360° e simulações de fluidos realistas. Inclui passo a passo para iniciantes.
11 de junho de 2026
Você já viu os anúncios. Uma lata de refrigerante gira lentamente em frente a um fundo branco, gotículas d'água se espalham pela sua superfície em câmera lenta impecável, e tudo parece ter custado US$ 20 mil para ser produzido. Provavelmente custou zero. Essa é a questão da visualização de produtos no Blender: o software é gratuito, e os resultados podem ser indistinguíveis de produções de estúdio profissional.
Este tutorial aborda os três aspectos mais importantes na animação de produtos. Configurar uma cena organizada com iluminação e câmera adequada. Animar uma rotação suave de 360 graus em uma plataforma giratória (turntable). E executar uma simulação de fluidos para lançar líquido ao redor do seu produto. O exemplo usa uma lata de cola, mas o processo funciona para garrafas, cosméticos, eletrônicos, qualquer item que você queira destacar.
Preparando a Cena para Renderização
Antes de animar qualquer coisa, você precisa de uma cena com aparência boa. A iluminação e a câmera são o que separam uma renderização medíocre de algo que parece digno de um painel publicitário. Se você errar nisso, nenhum pós-processamento será capaz de resolver o problema.
Configurações da Câmera e Composição
A câmera é seu resultado final. O que ela vê é o que seu público recebe, então dedique um minuto para enquadrar o produto adequadamente.
- Mudar para o Vista Y, então
Shift+Apara adicionar um Câmera.
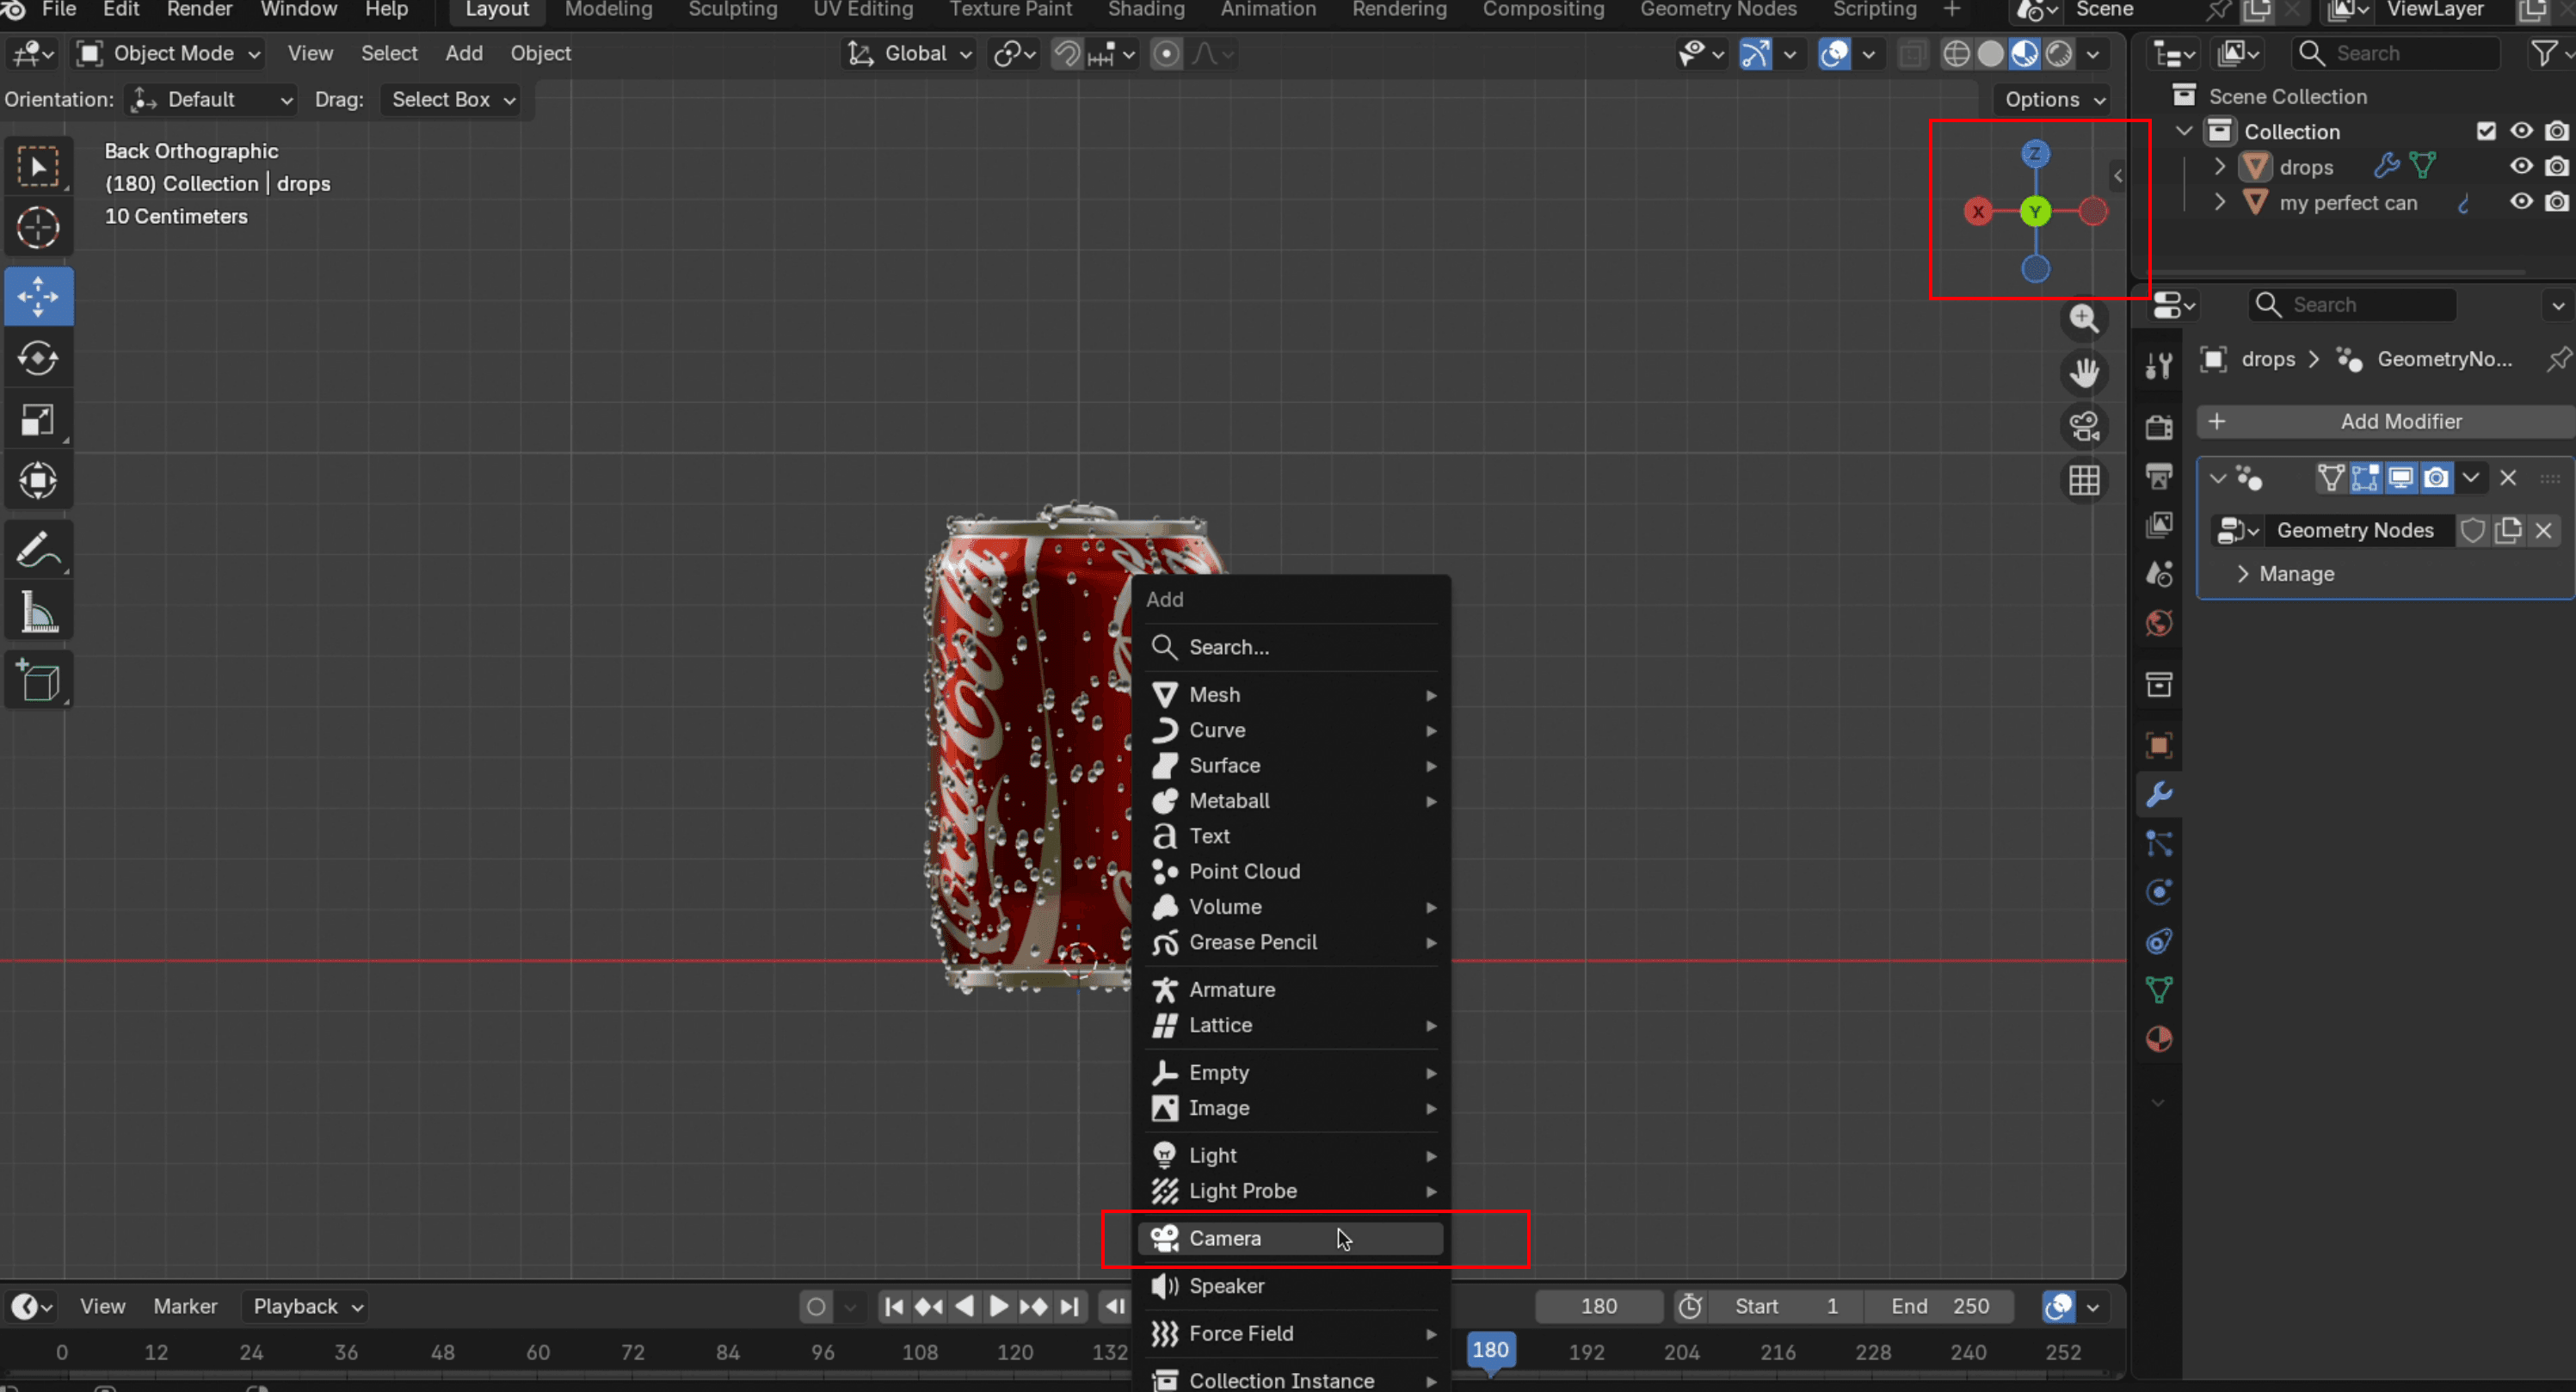
- Imprensa
G+Ypara movimentar a câmera para a vista frontal do objeto.
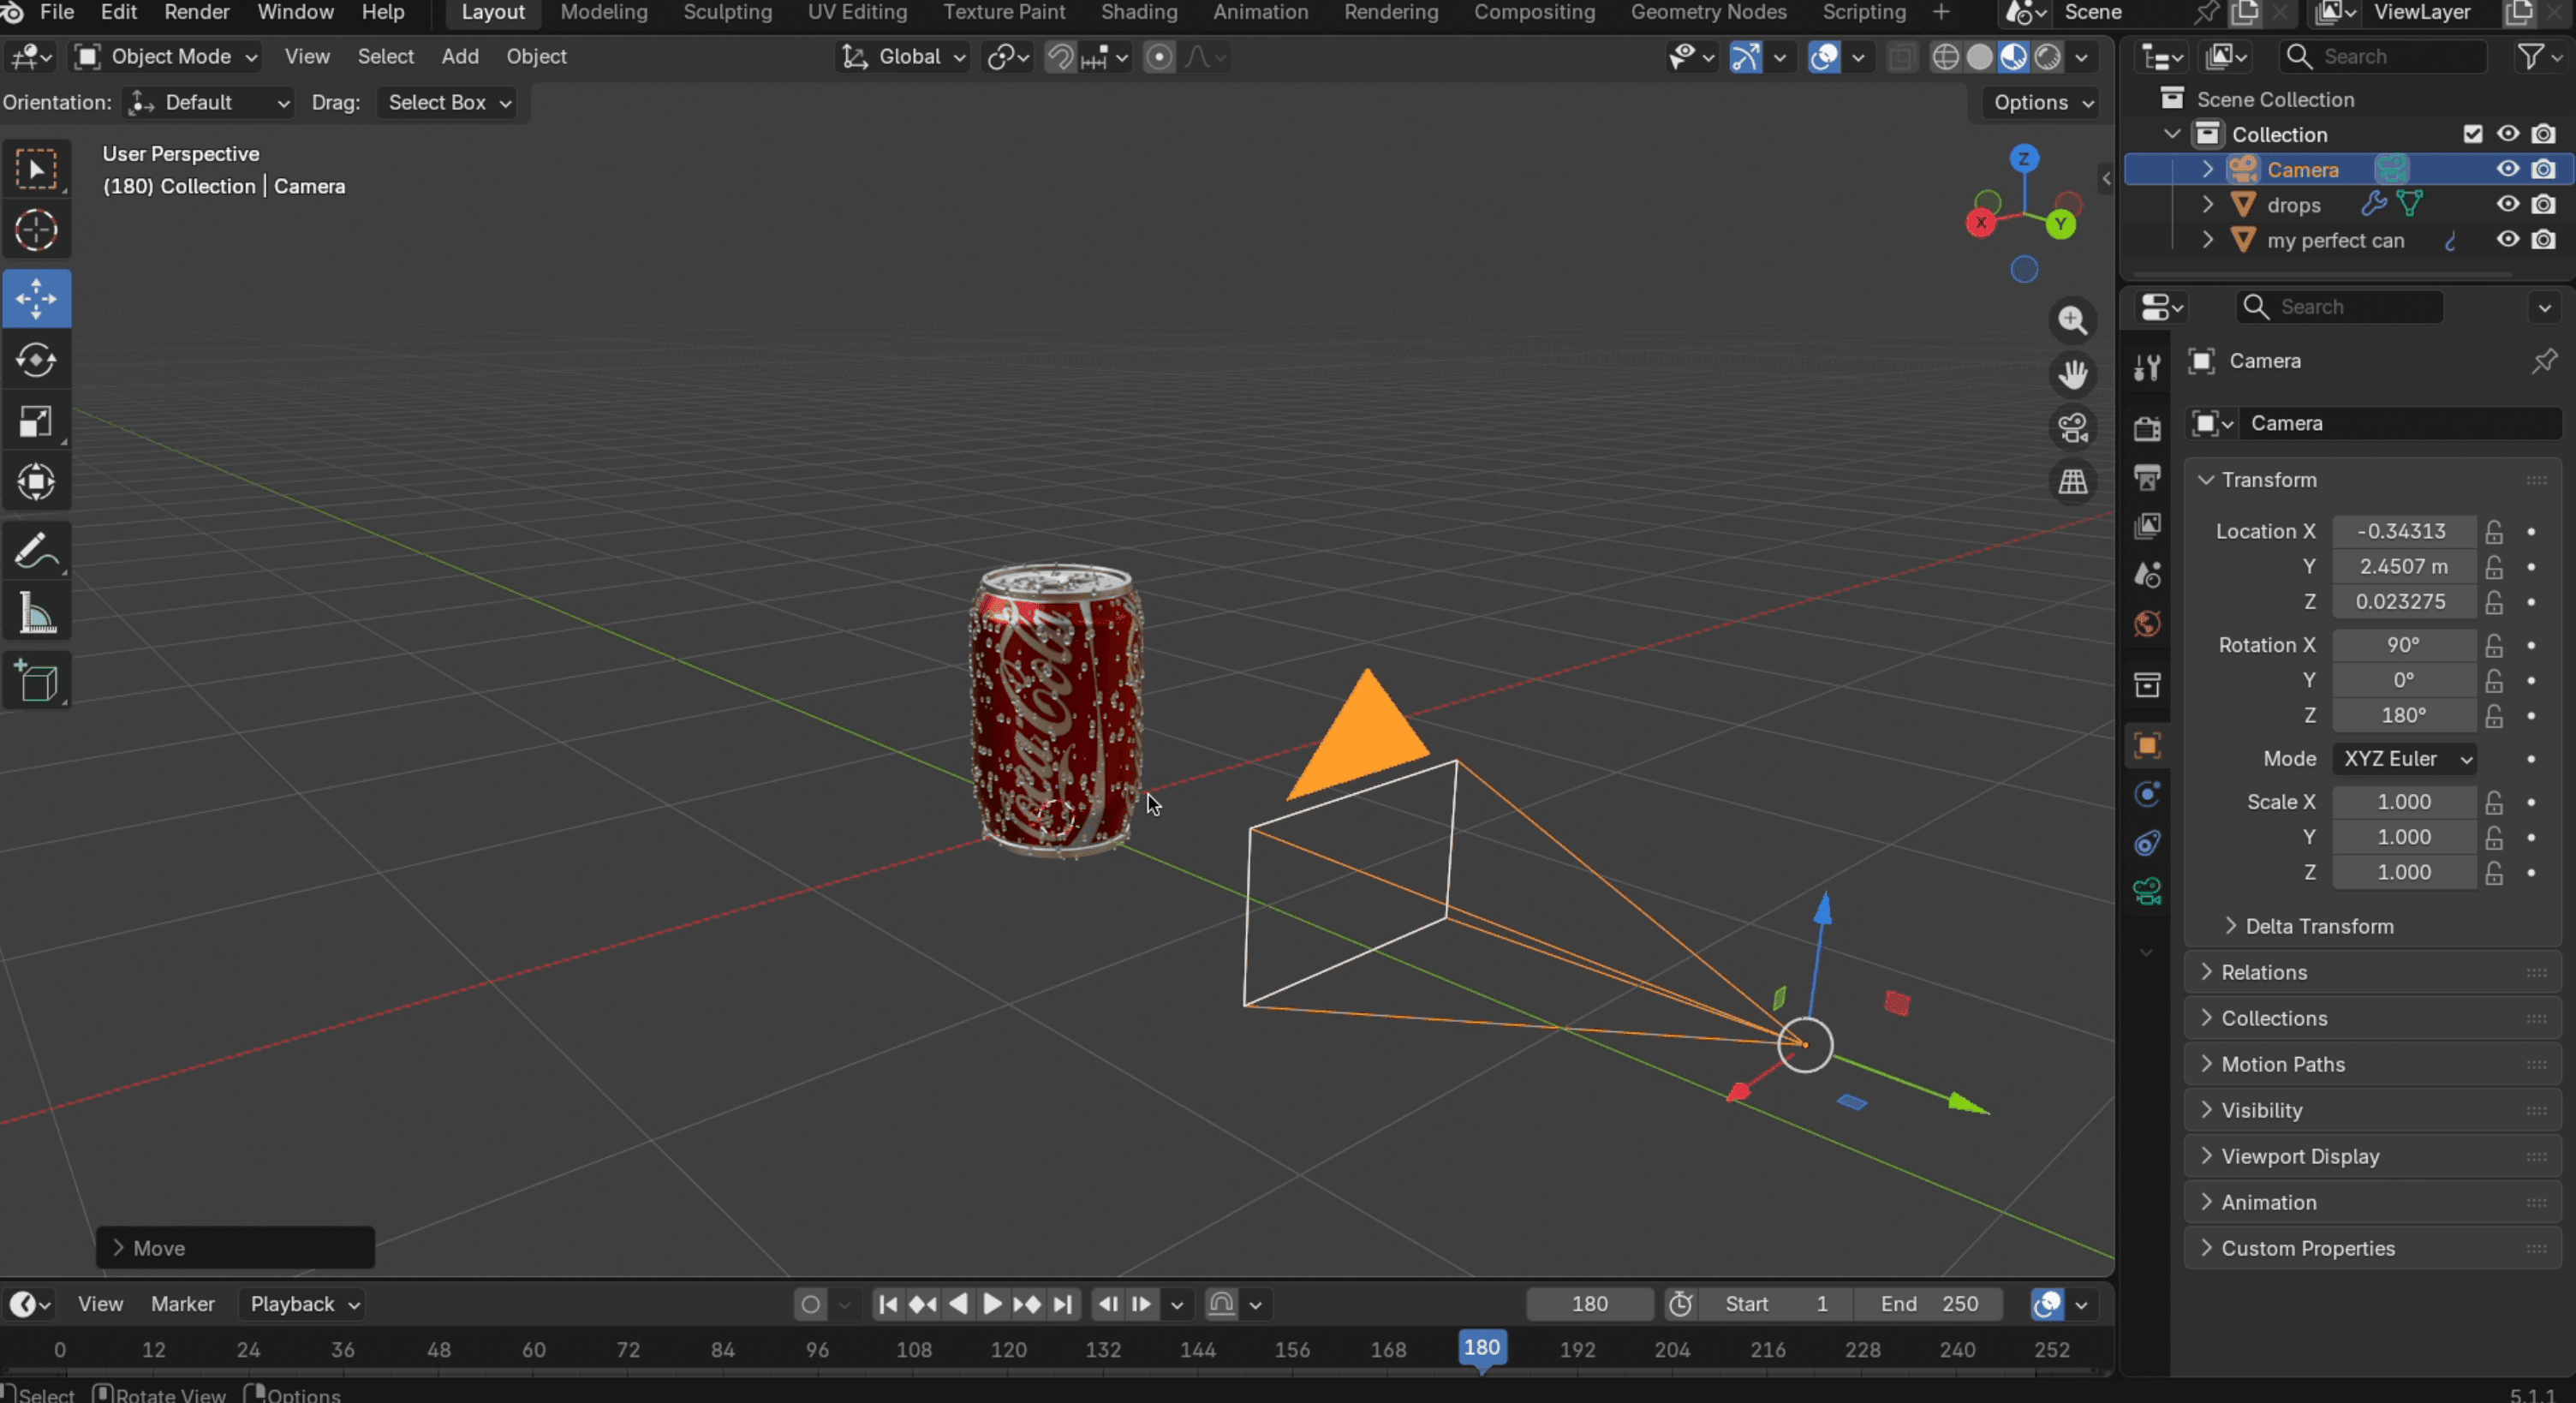
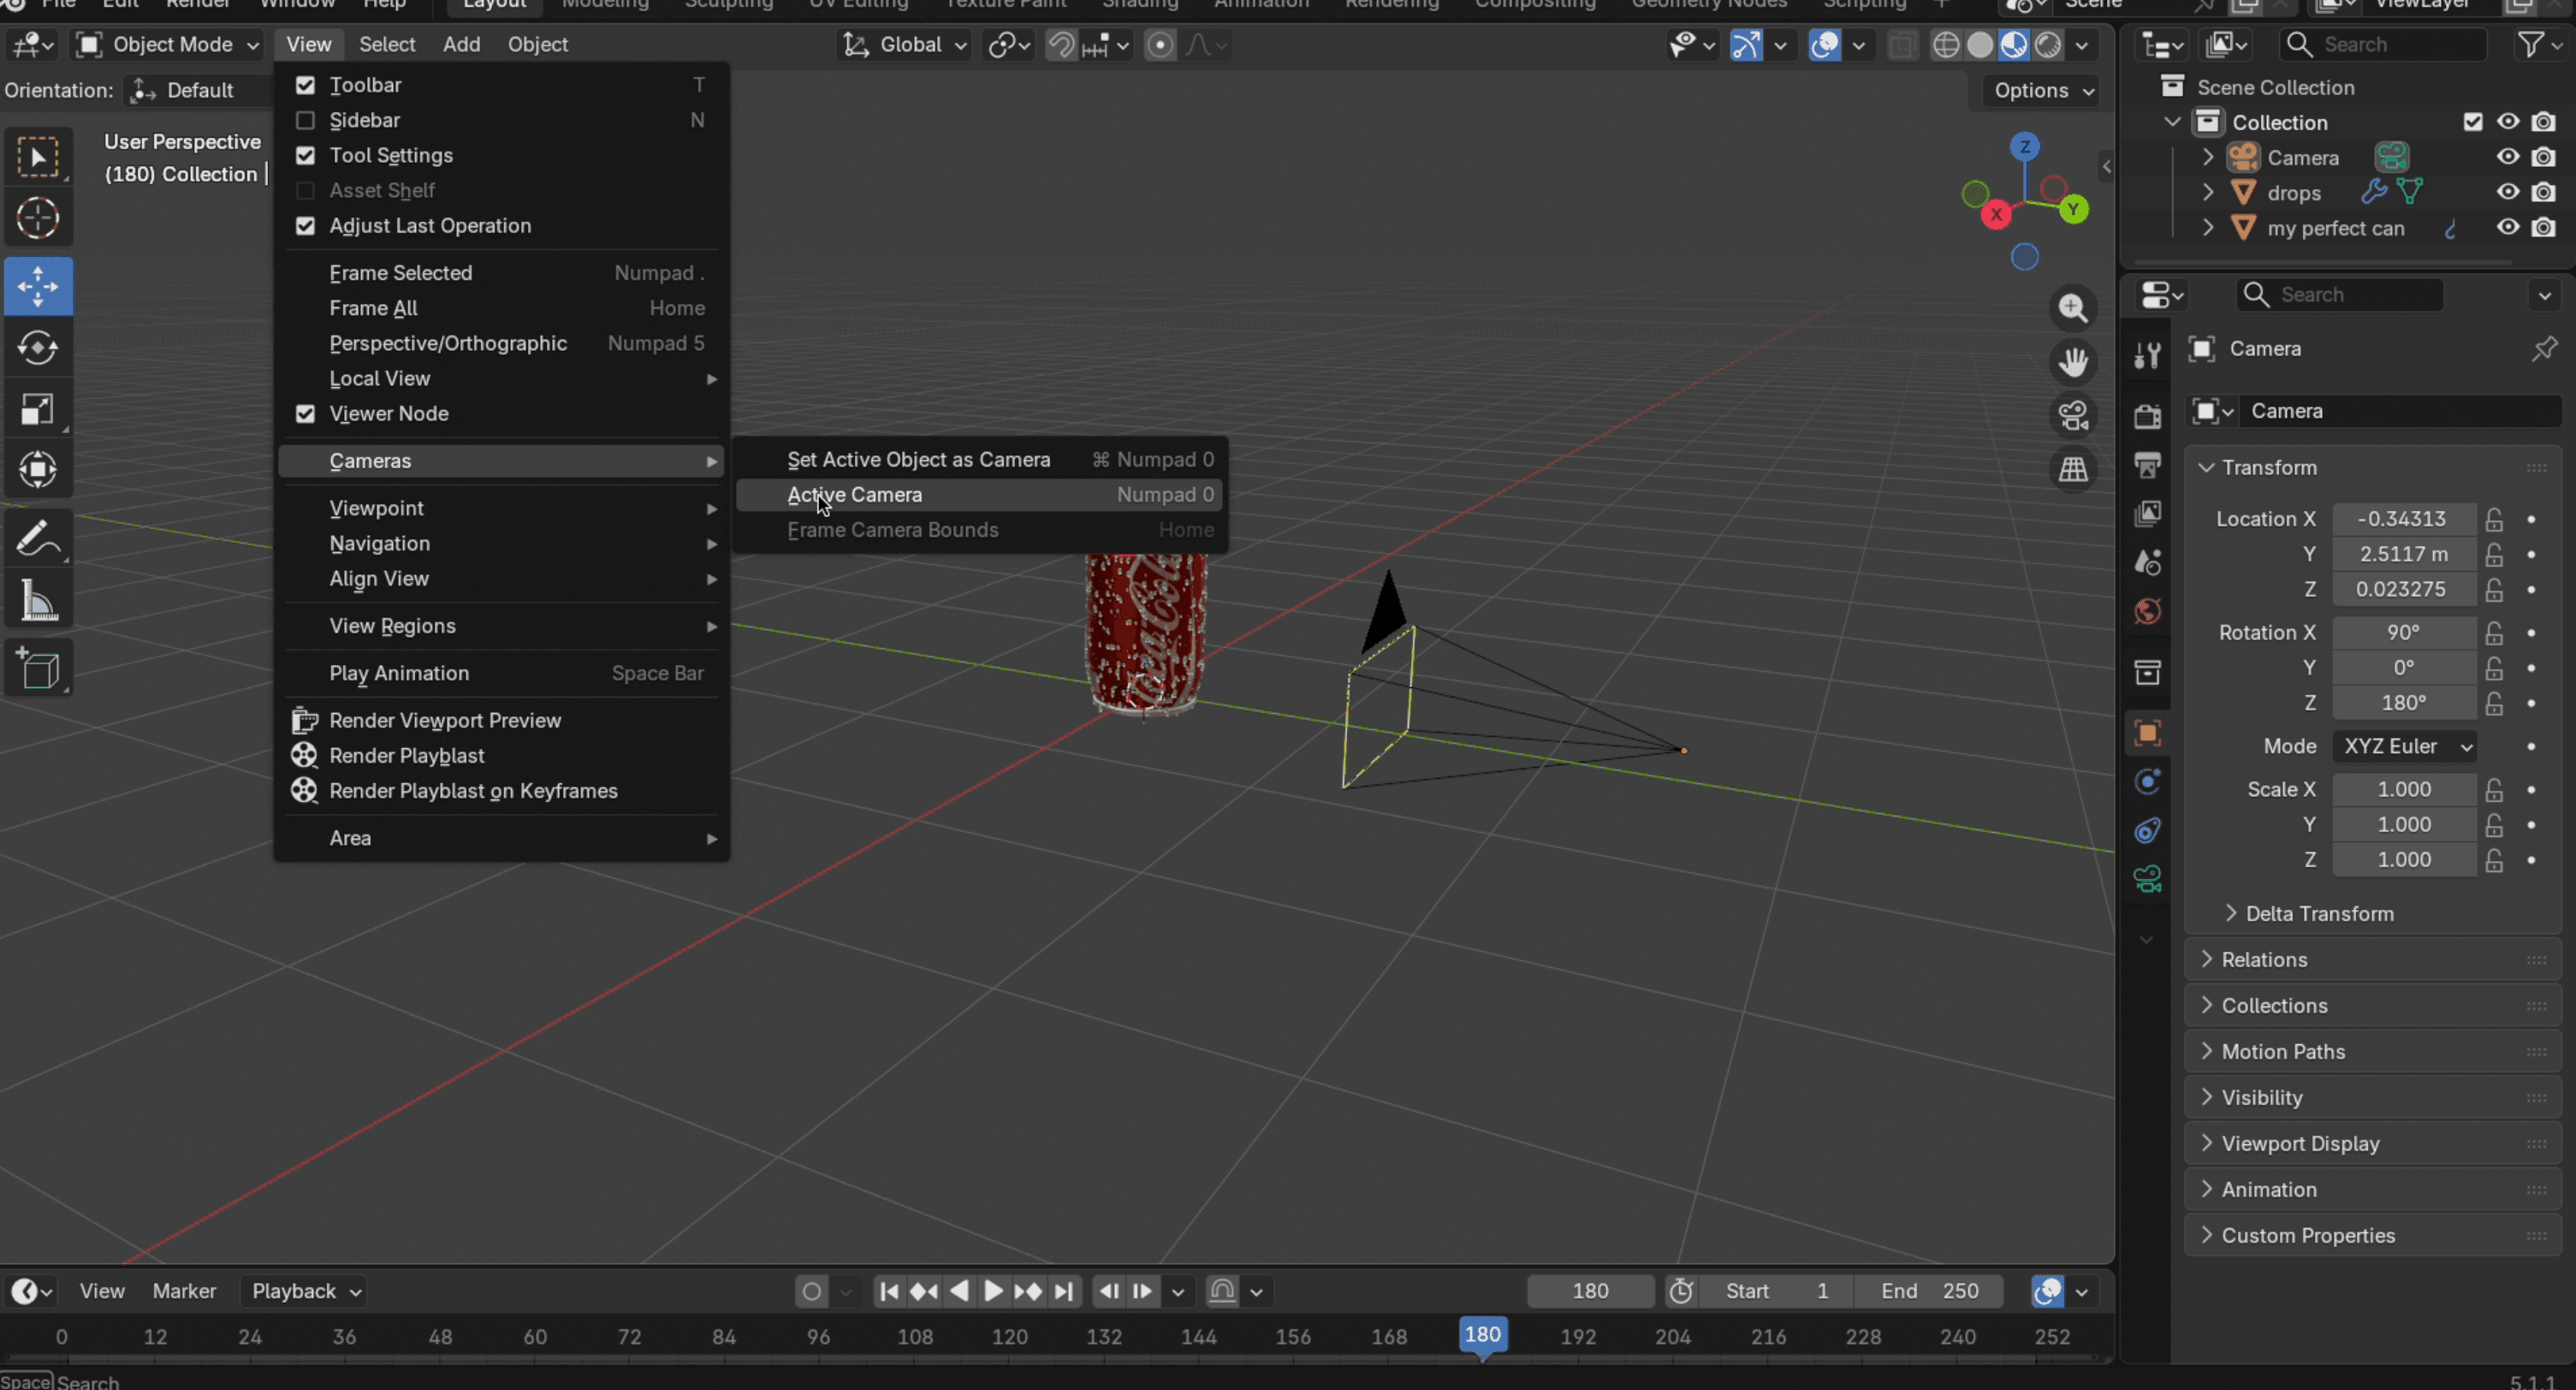
- No Verpainel, selecione Câmeras → Definir Câmera Ativapara fixar sua visão atual como o enquadramento da câmera.
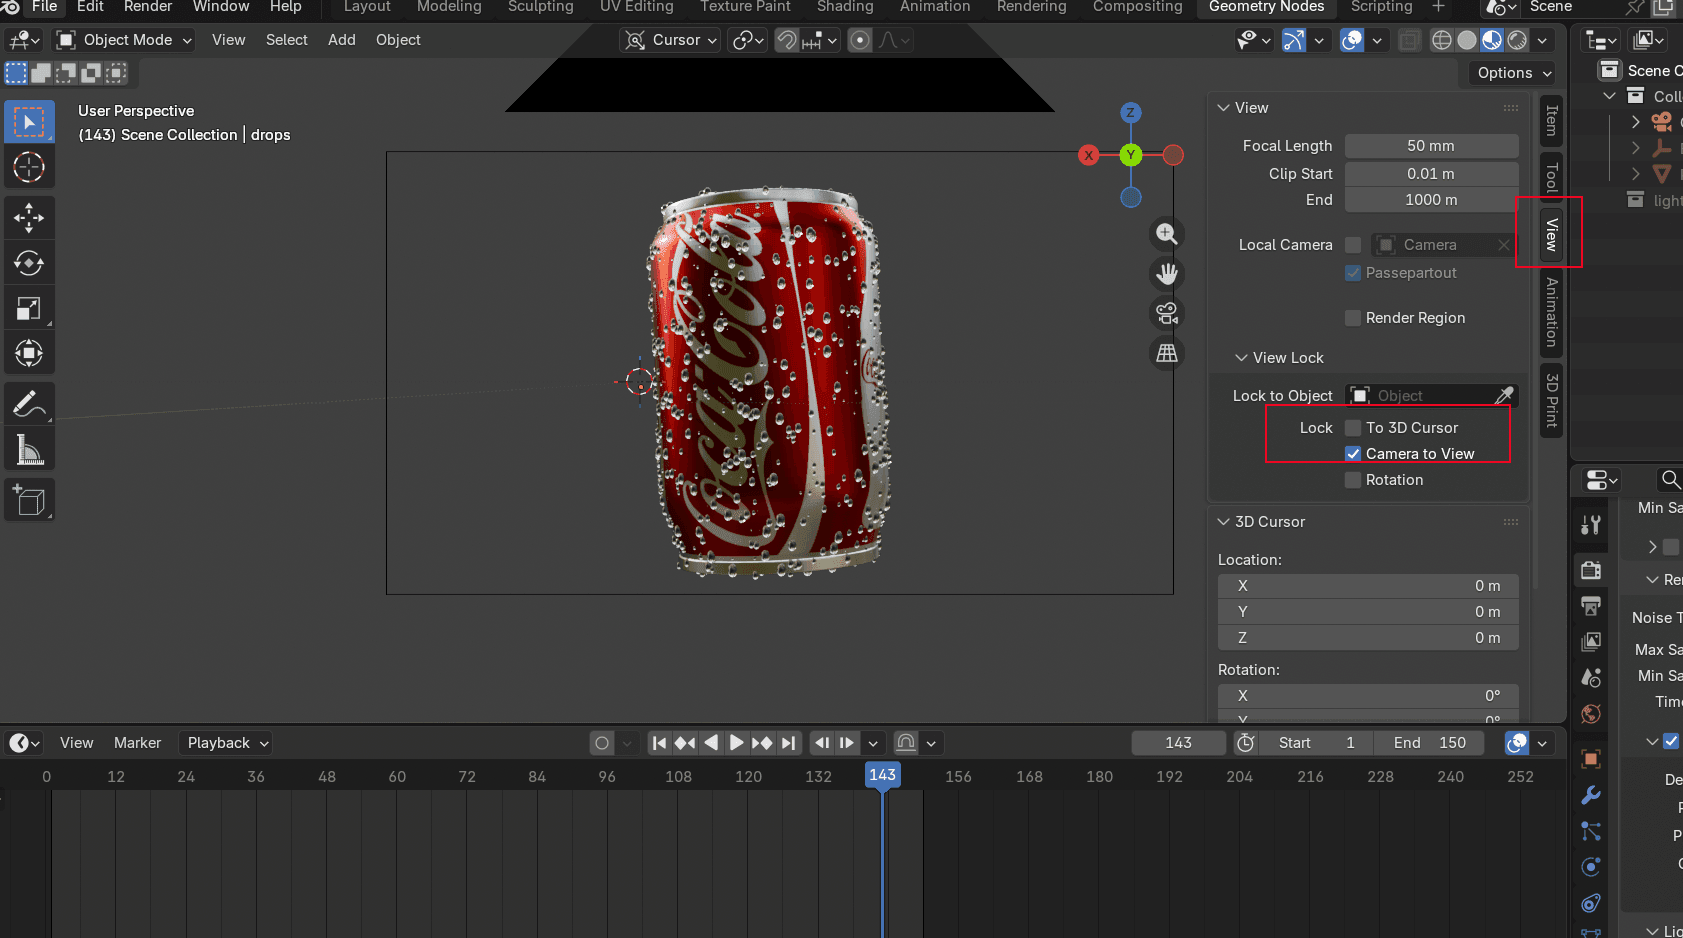
- Abra o Visualizar Barra Lateral e ativar Bloquear Câmera na Tela. Deslize a página para cima e para baixo com o botão central do mouse para ajustar o tamanho da moldura. Certifique-se de que todas as partes do objeto estejam dentro da moldura. Você também pode rotacionar a visualização para qualquer ângulo que desejar.
Configuração de Iluminação para Visualização de Produtos
Boa iluminação faz os produtos parecerem caros. Iluminação ruim faz os produtos parecerem que foram fotografados em uma garagem. Antes de adicionar luzes, talvez você queira também adicionar um fundo para deixar o modelo mais limpo. Após selecionar um, mude para Visualização Renderizada. Pode levar um momento para carregar da primeira vez.
Agora instale as luzes. A iluminação de três pontos é o padrão para fotografia de produtos, e segue este esquema:
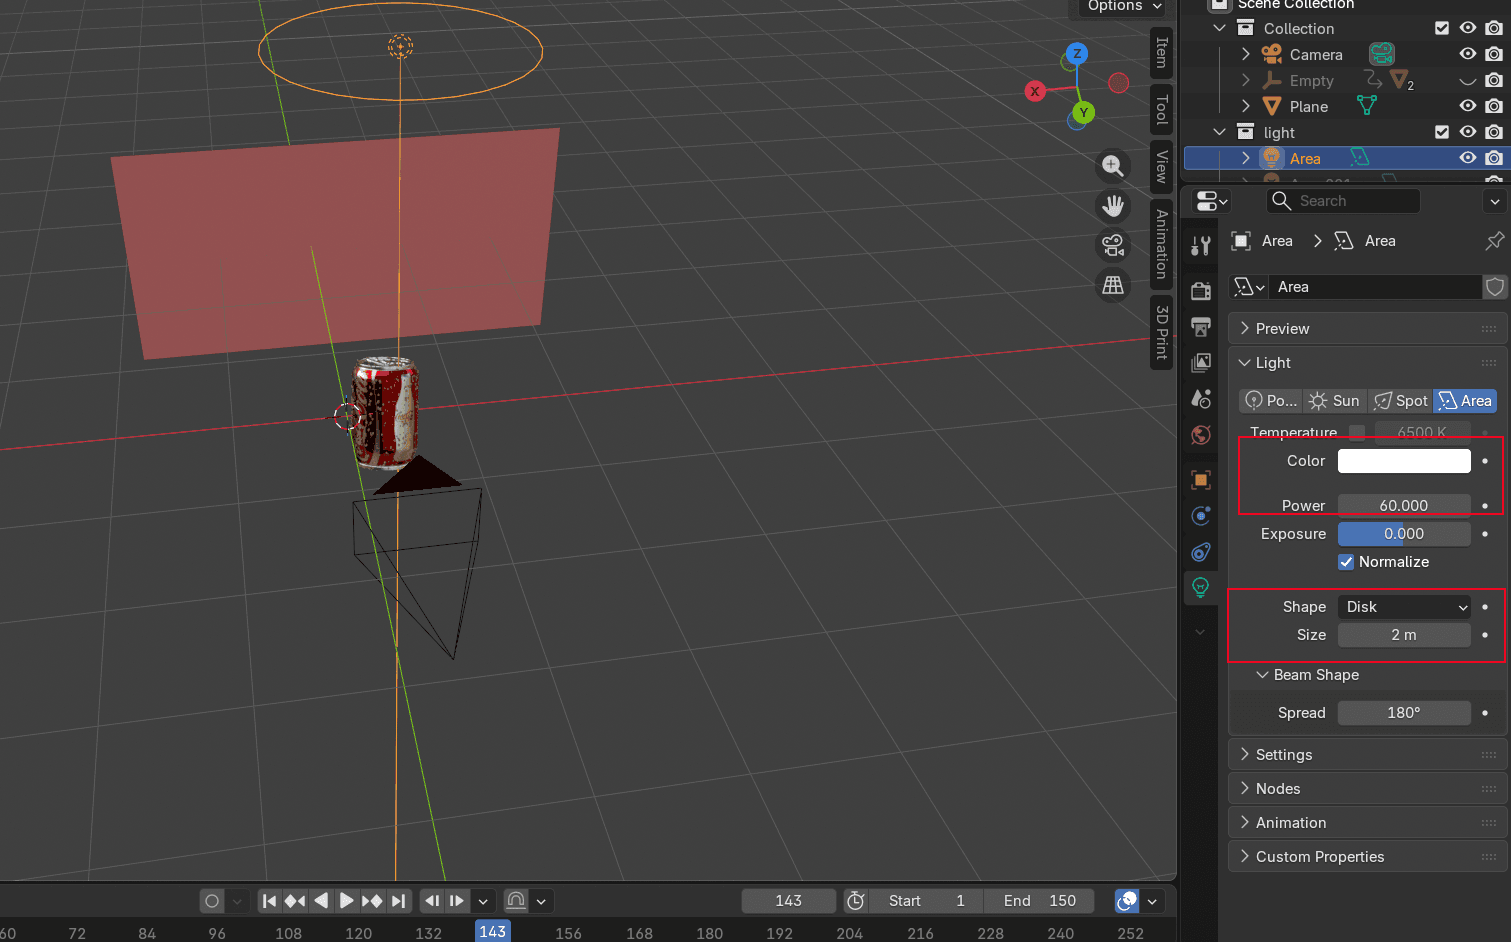
- Adicionar uma luz de teto Posicione a luz diretamente acima do produto. Ajuste a potência da luz plana. Quanto maior o valor, mais brilhante será o objeto. O tamanho e a distância também afetam como a luz aparecerá: suave ou dura. Ajuste os três parâmetros até que o produto esteja iluminado da maneira desejada.
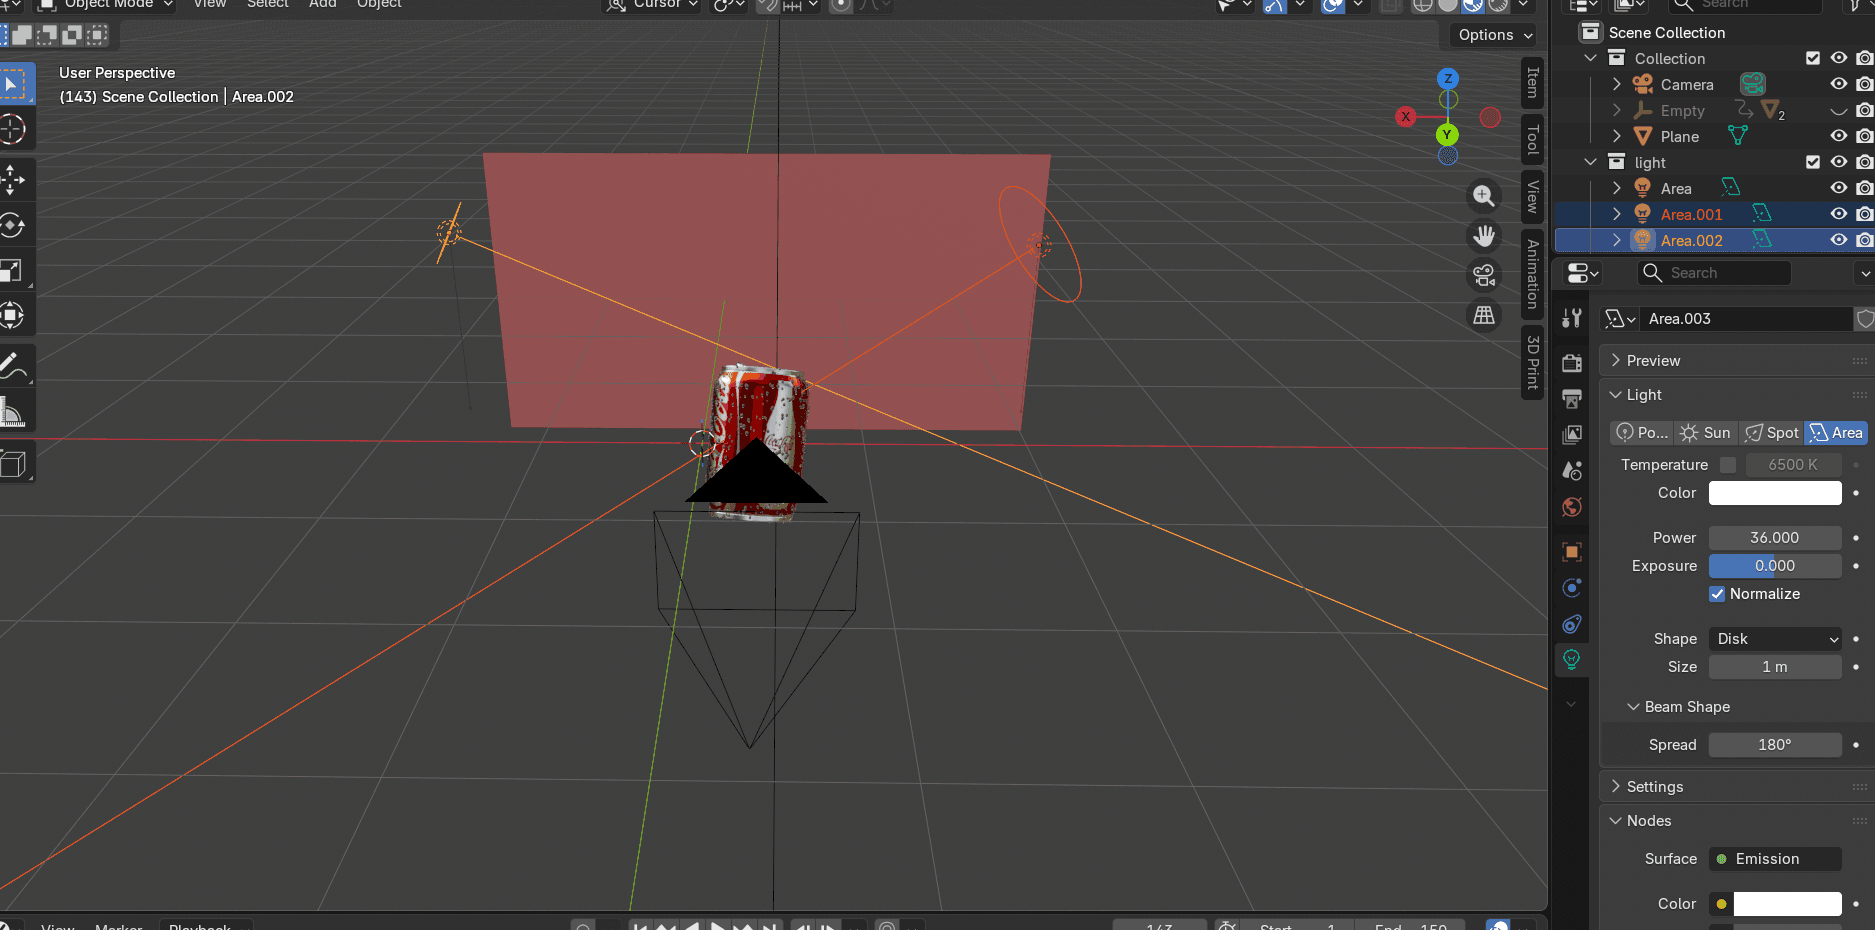
- Adicione um par de fontes de luz espelhadasnos dois lados. Isso faz com que as superfícies metálicas pareçam brilhantes e ajuda a destacar as bordas. Verifique o ângulo em relação aoVista Z para garantir que a luz passe livremente pela lata.
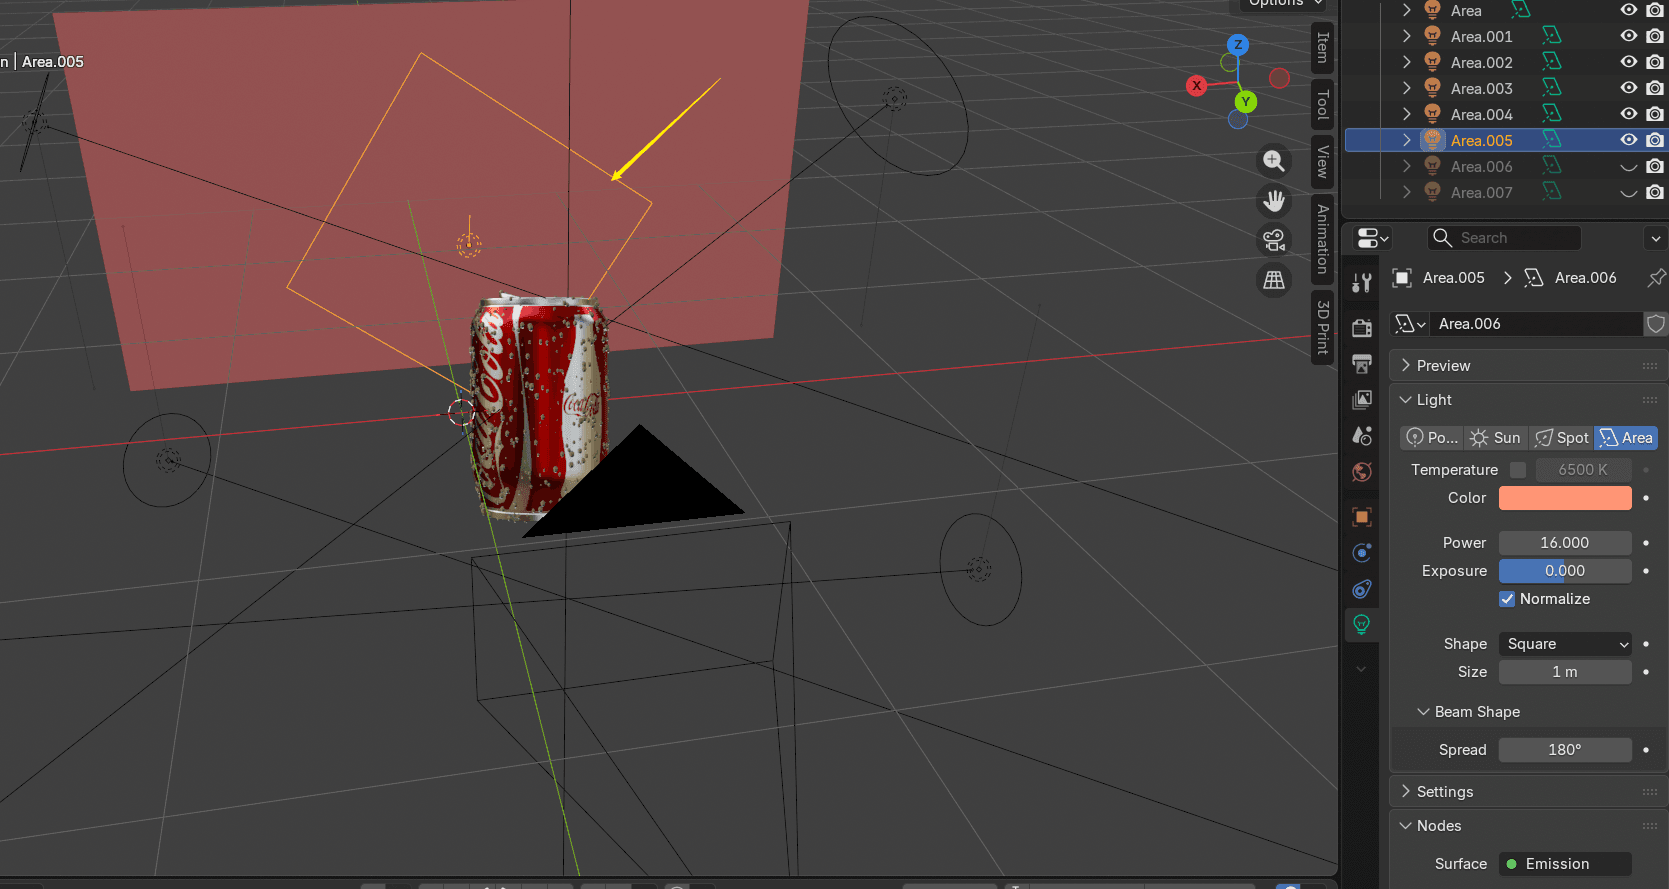
- Adicionar retroiluminação atrás do objeto para criar um realce vítreo no meio. Você pode adicionar várias luzes traseiras, se necessário. Uma única luz traseira com baixa potência geralmente funciona melhor do que duas intensas.
Animação de Rotação do Blender
A rotação da plataforma giratória é a base da visualização de produtos. O produto gira, a câmera permanece parada e o espectador obtém uma visualização completa de todos os ângulos. Parece simples, mas há alguns truques específicos do Blender que fazem com que funcione corretamente.
Preparação do Modelo do Produto
- Clique
Shift+Apara adicionar um Esfera UV Limpa. Torne-o um pouco maior que o modelo. PressioneSpara ajustar o tamanho eG+X/Y/Zpara colocá-lo no lugar certo.

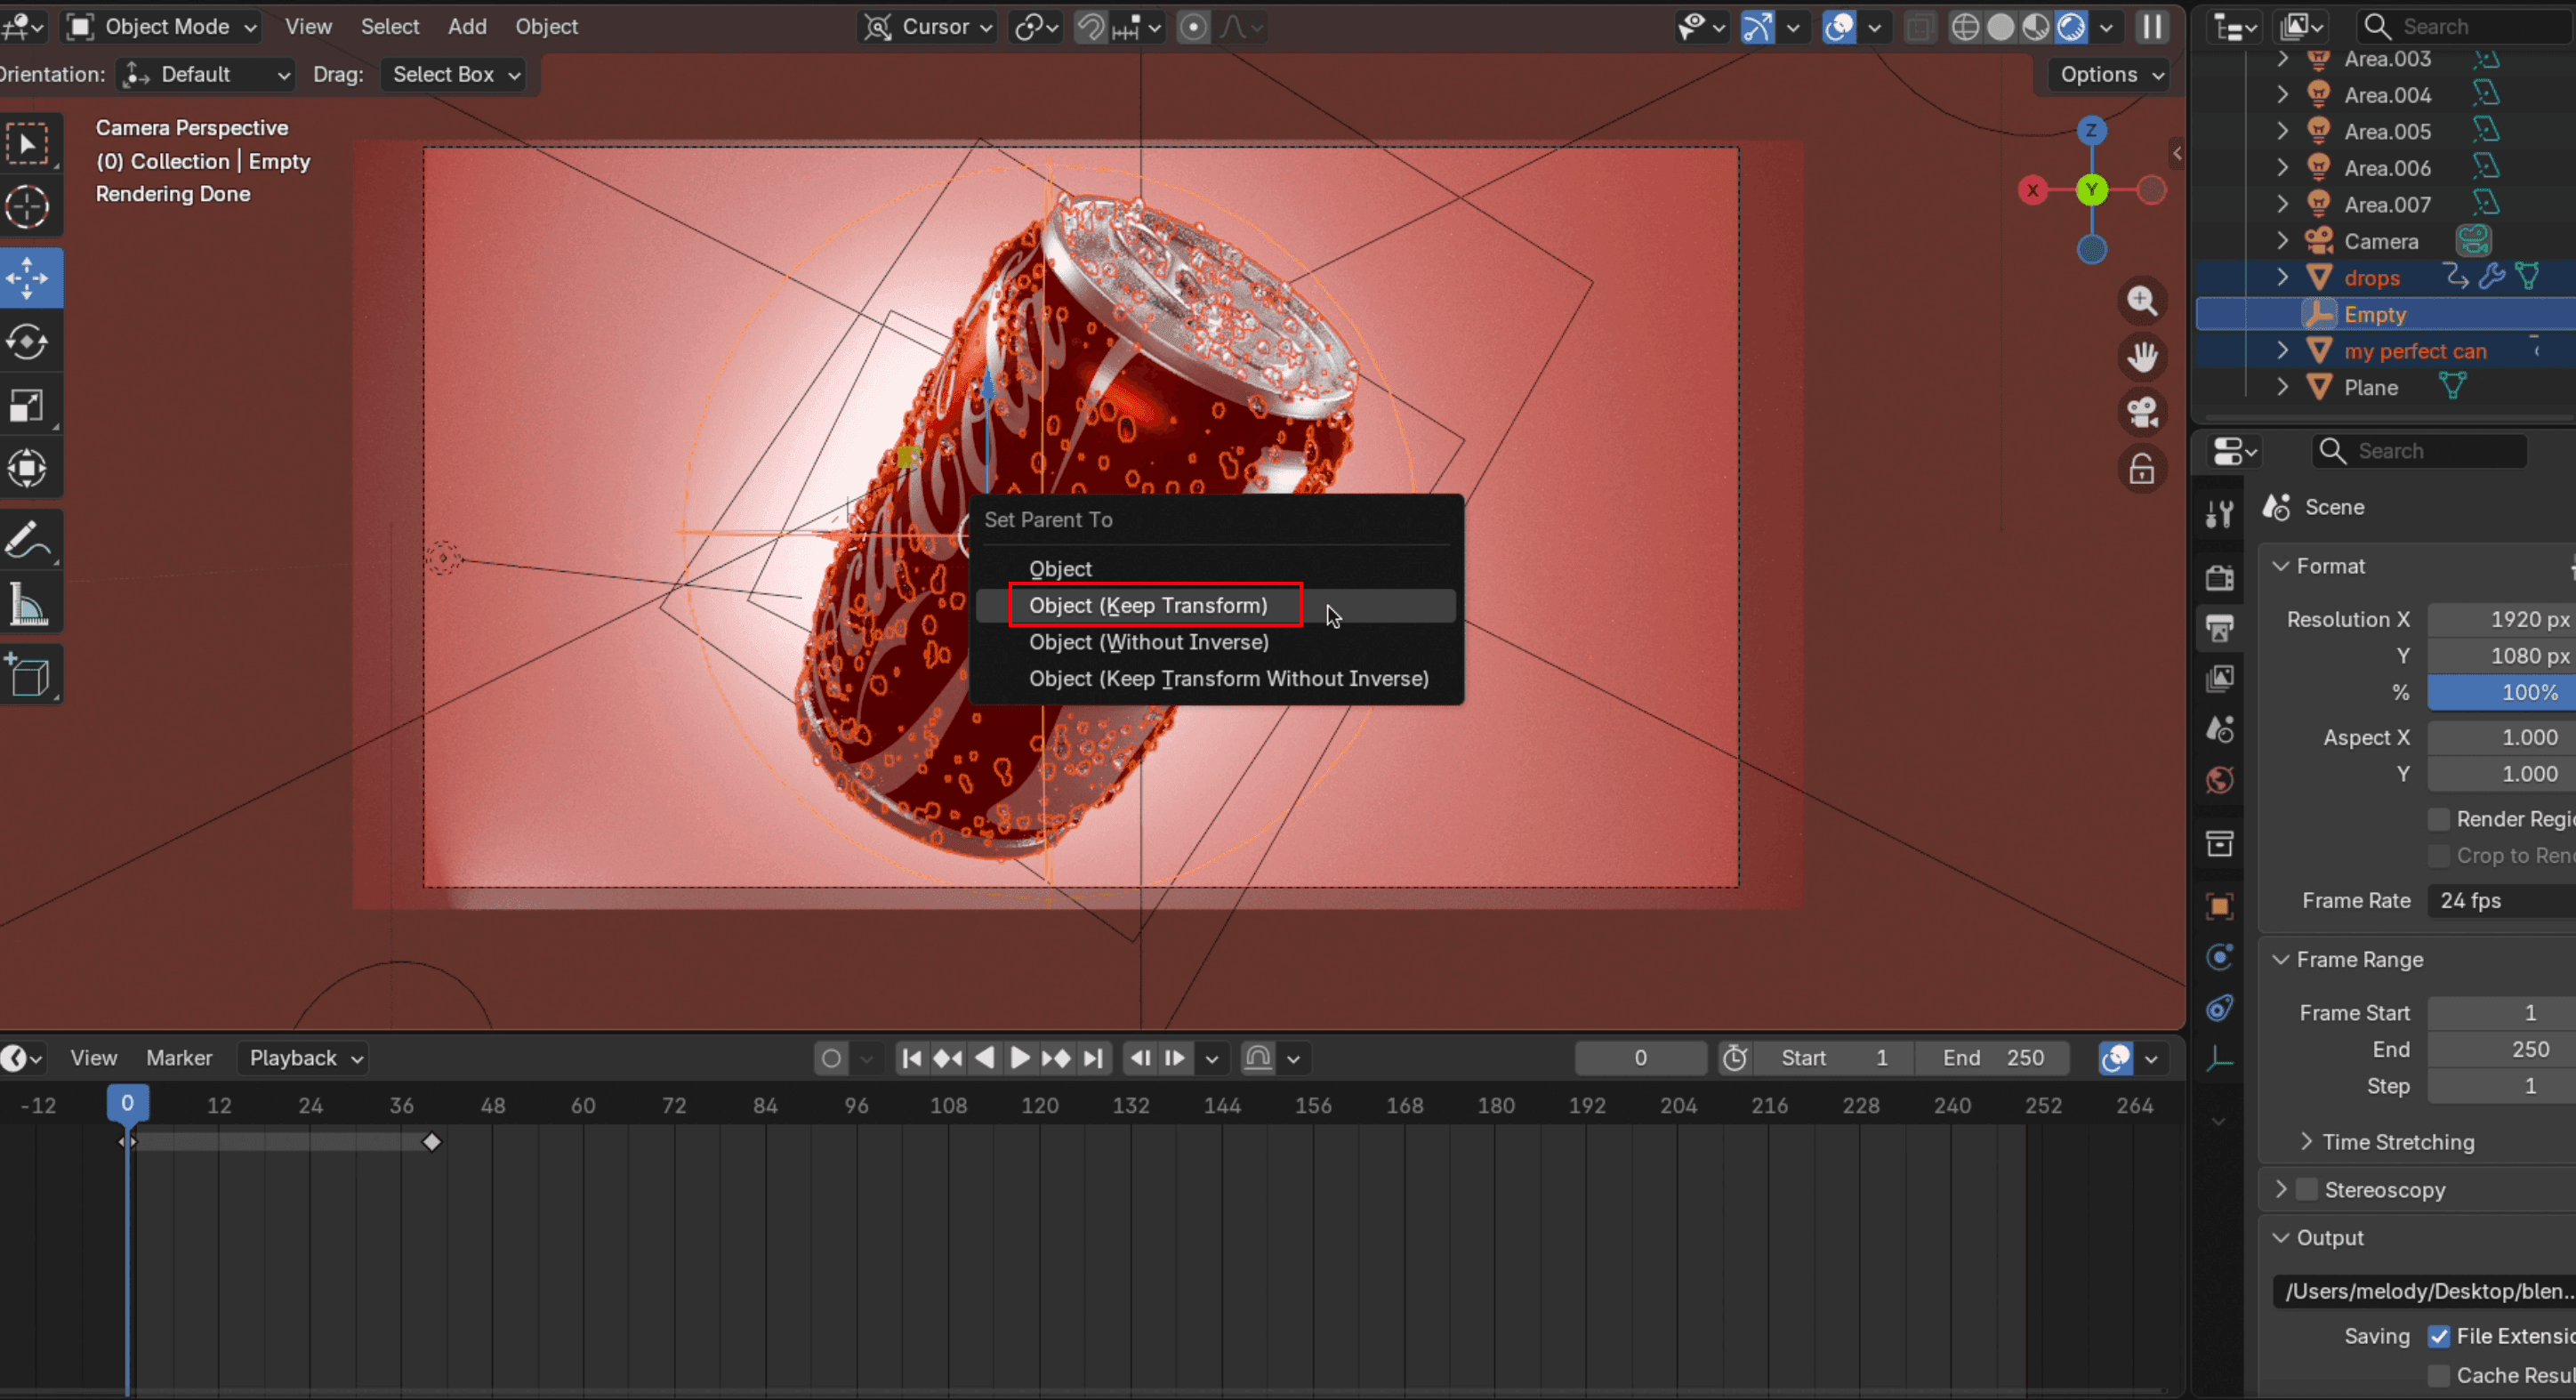
- Primeiro, selecione cada parte do seu modelo e, em seguida, selecione também a esfera UV vazia. Pressione
Ctrl+Pe escolher Manter TransformAgora a esfera UV vazia controla a posição do modelo. Mova a esfera e o modelo se move junto com ela.
Renderização da Animação Final do Turntable
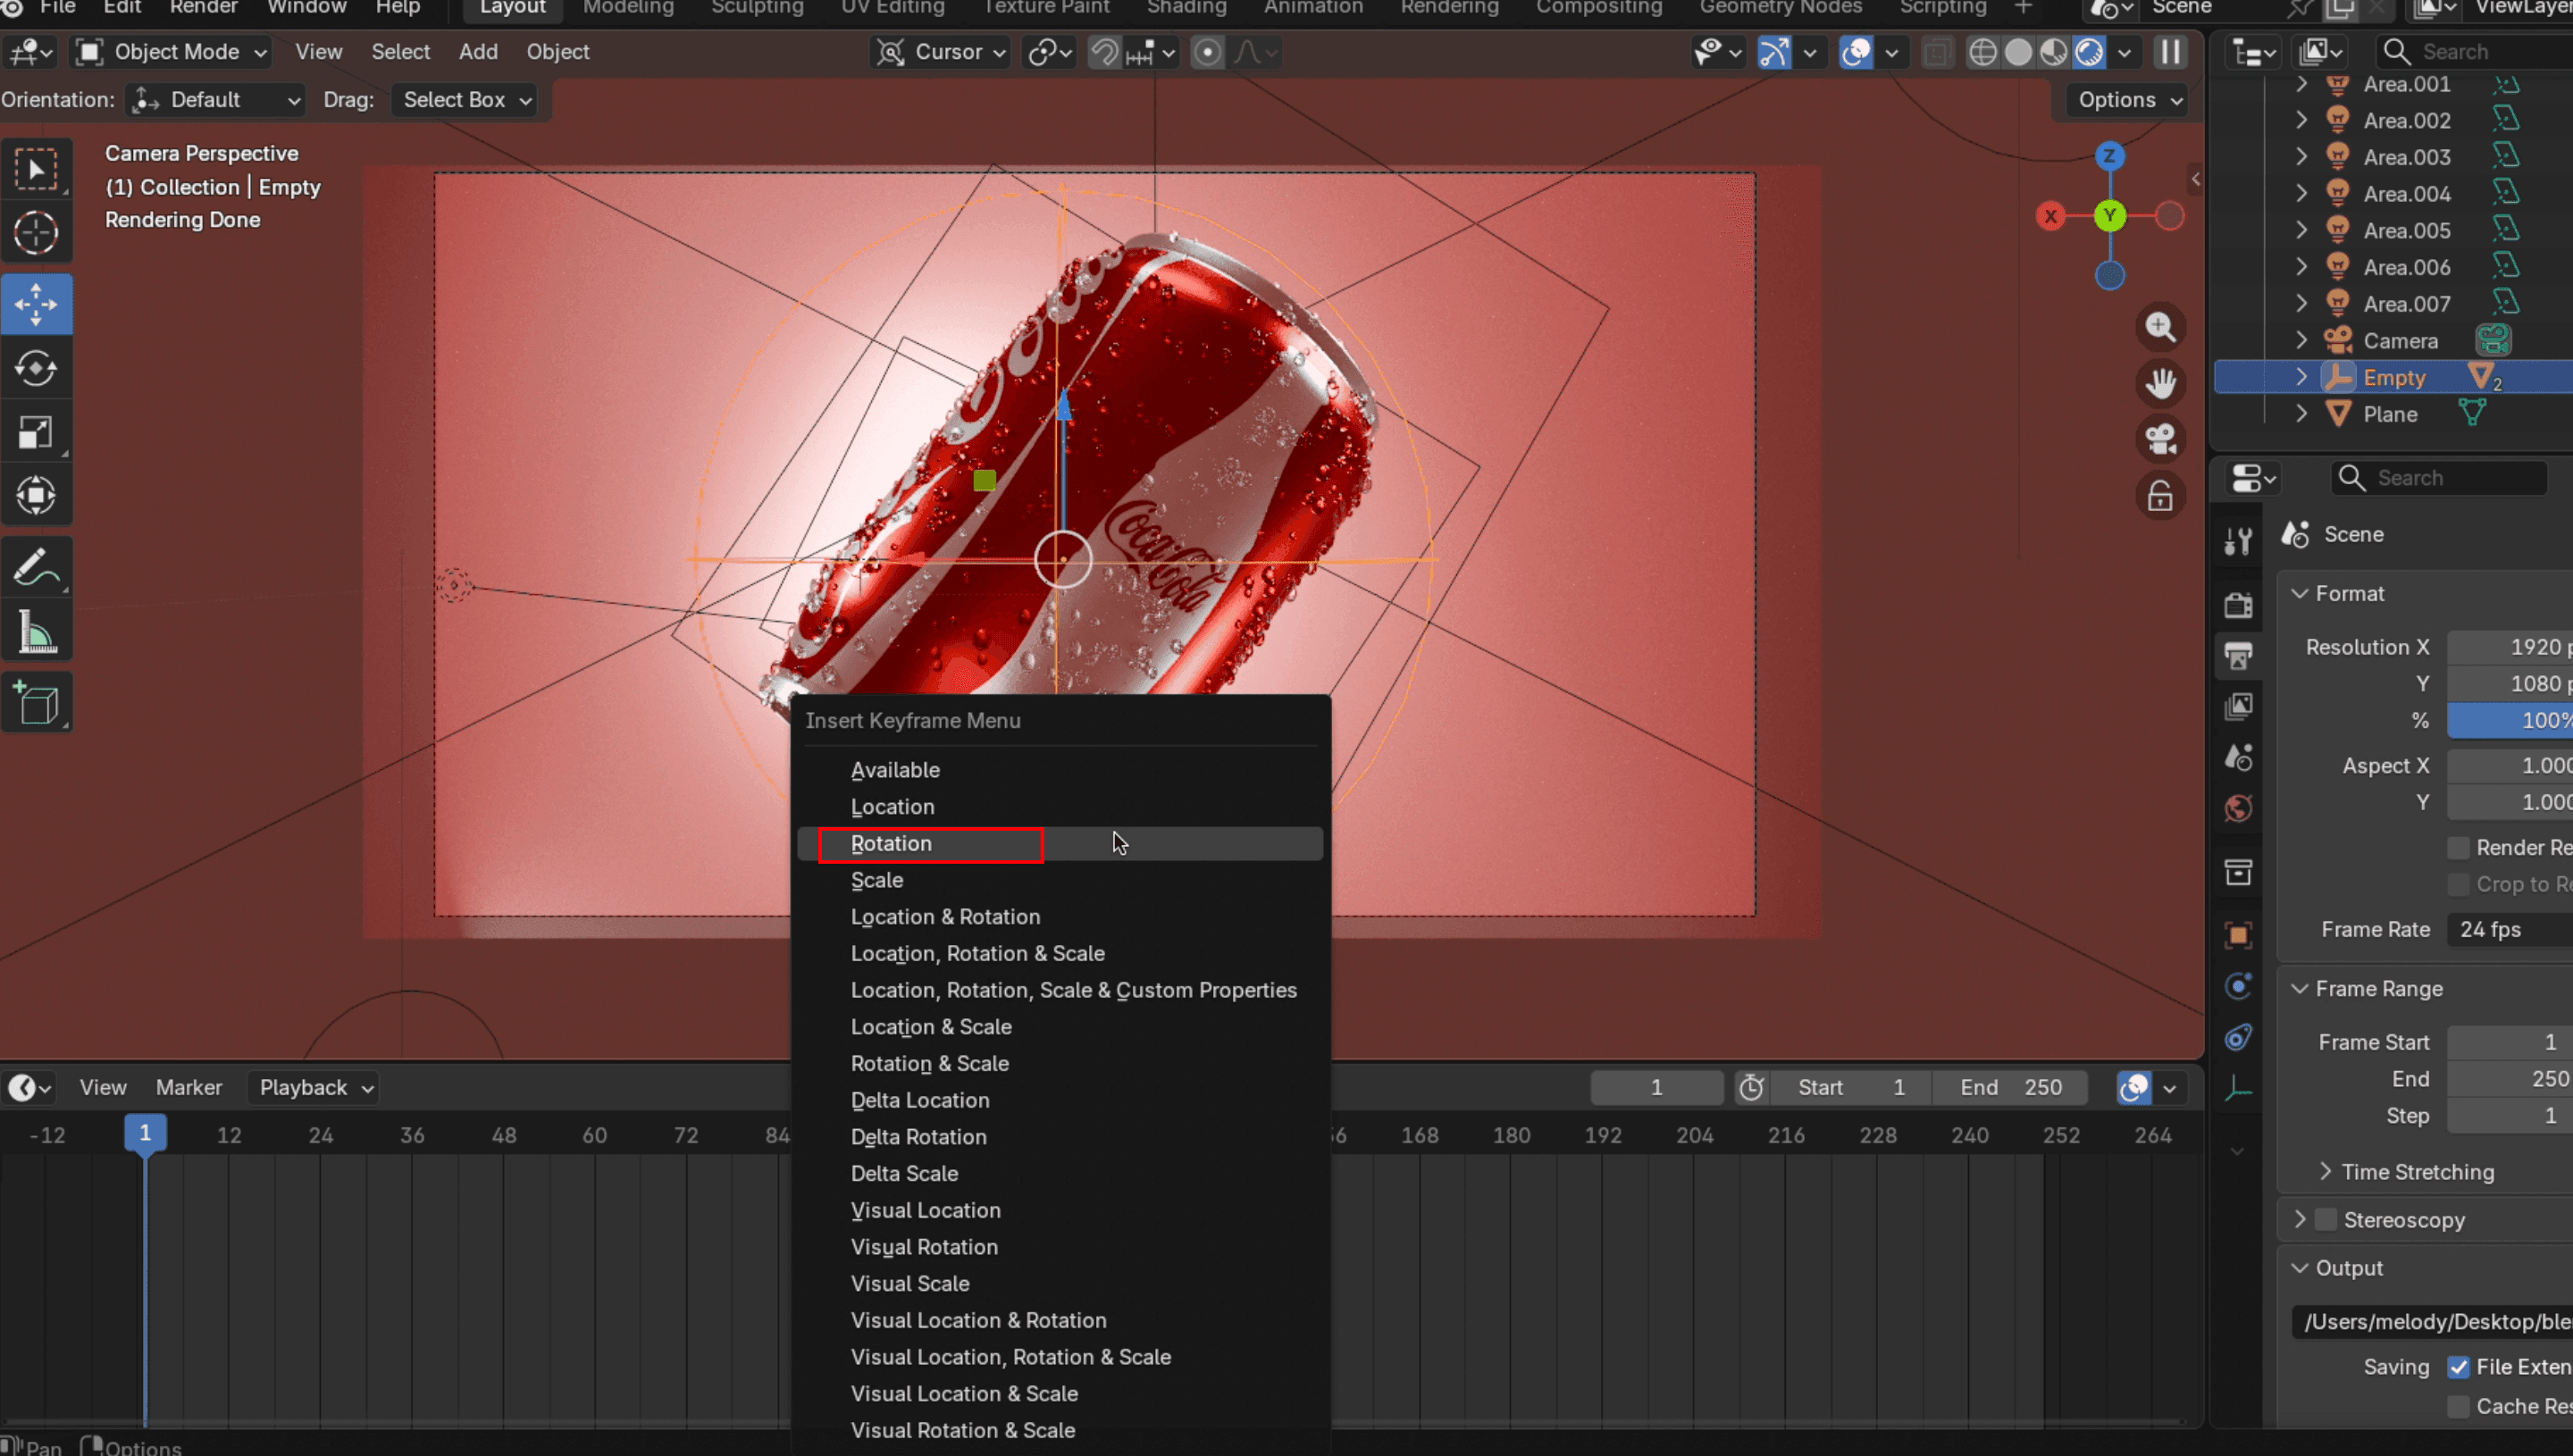
- Defina o Cronograma do Frame 1e defina a posição de início. Com o objeto selecionado, vá para Objeto → Animação → Inserir Keyframe e escolha Rotação.
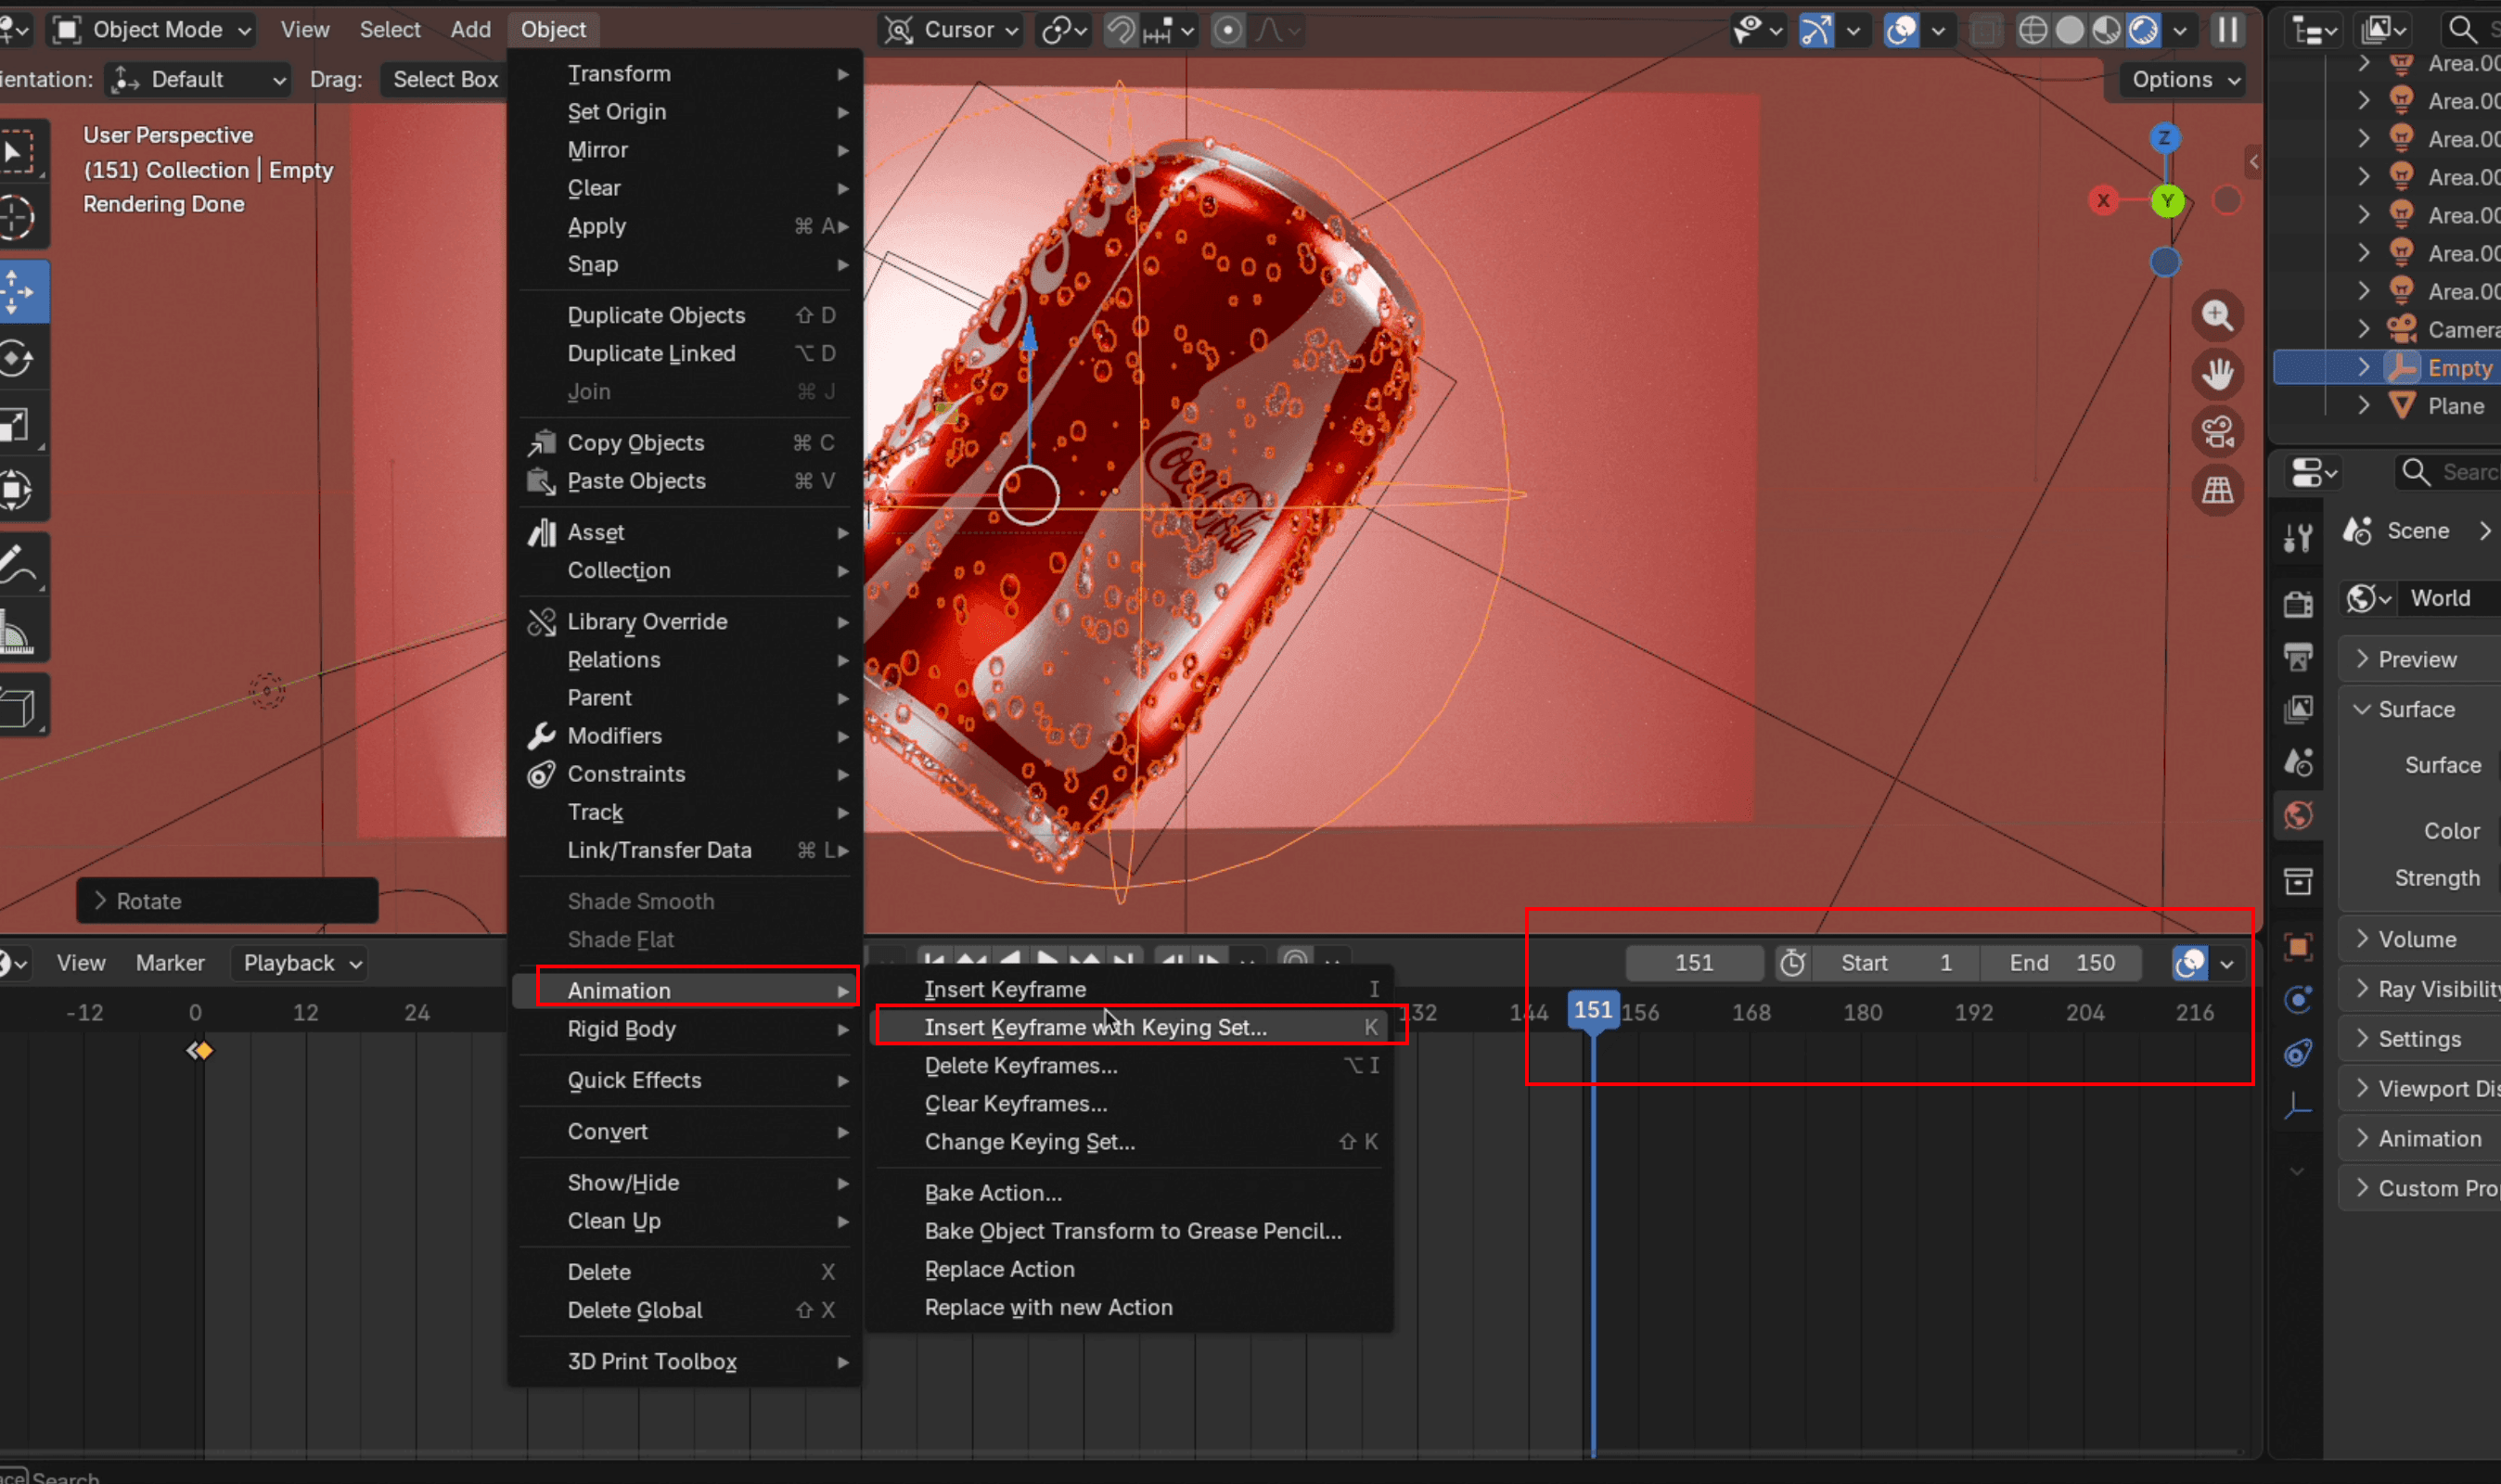
- Configure o Frame Final para o que precisar. Uma animação de 7 segundos geralmente começa em 1 e termina em 150. Em seguida, mova o cursor da timeline para um fotograma após o fotograma final (por exemplo, Fotograma 151). Gire o objeto até sua posição final. Para uma rotação de 360 graus, pressione
R, entãoZ, e digite 360.
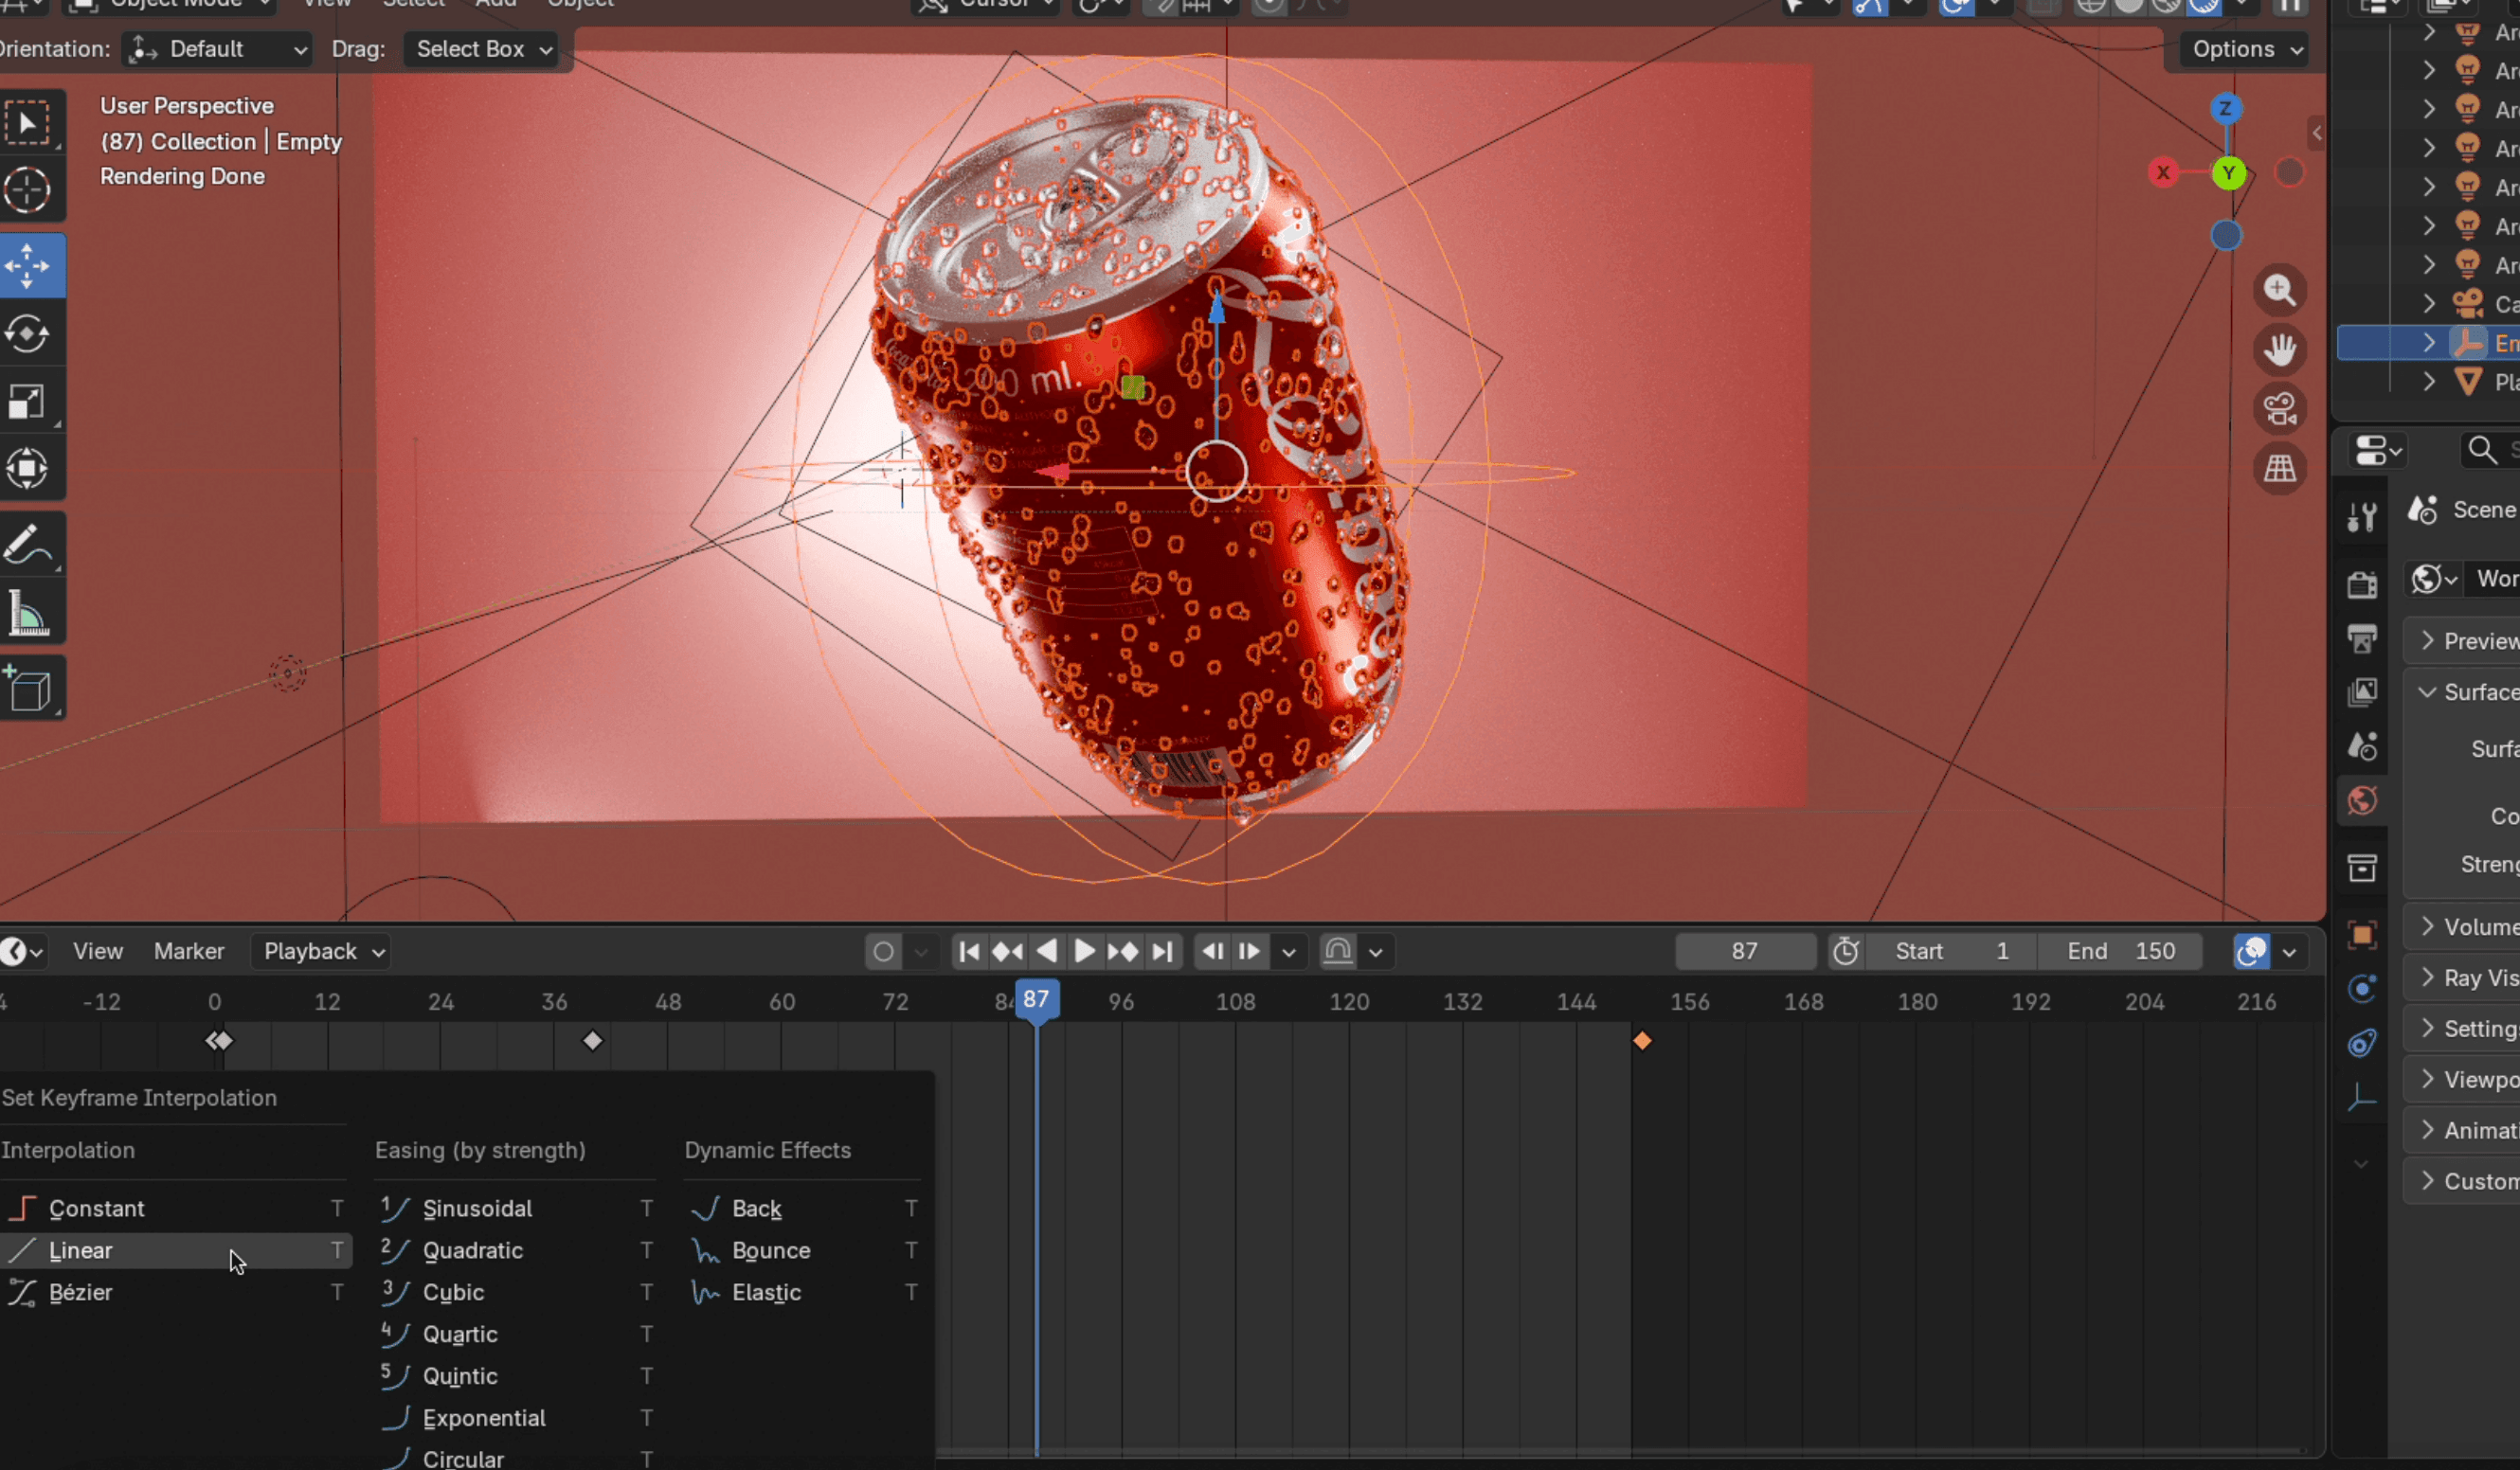
- Posicione o cursor sobre a área da timeline e pressione a tecla
Tpara abrir o painel de interpolação. Escolha o tipo que melhor se adapta às suas necessidades. Linear proporciona uma velocidade constante durante toda a rotação, o que funciona bem para apresentações nítidas de produtos.
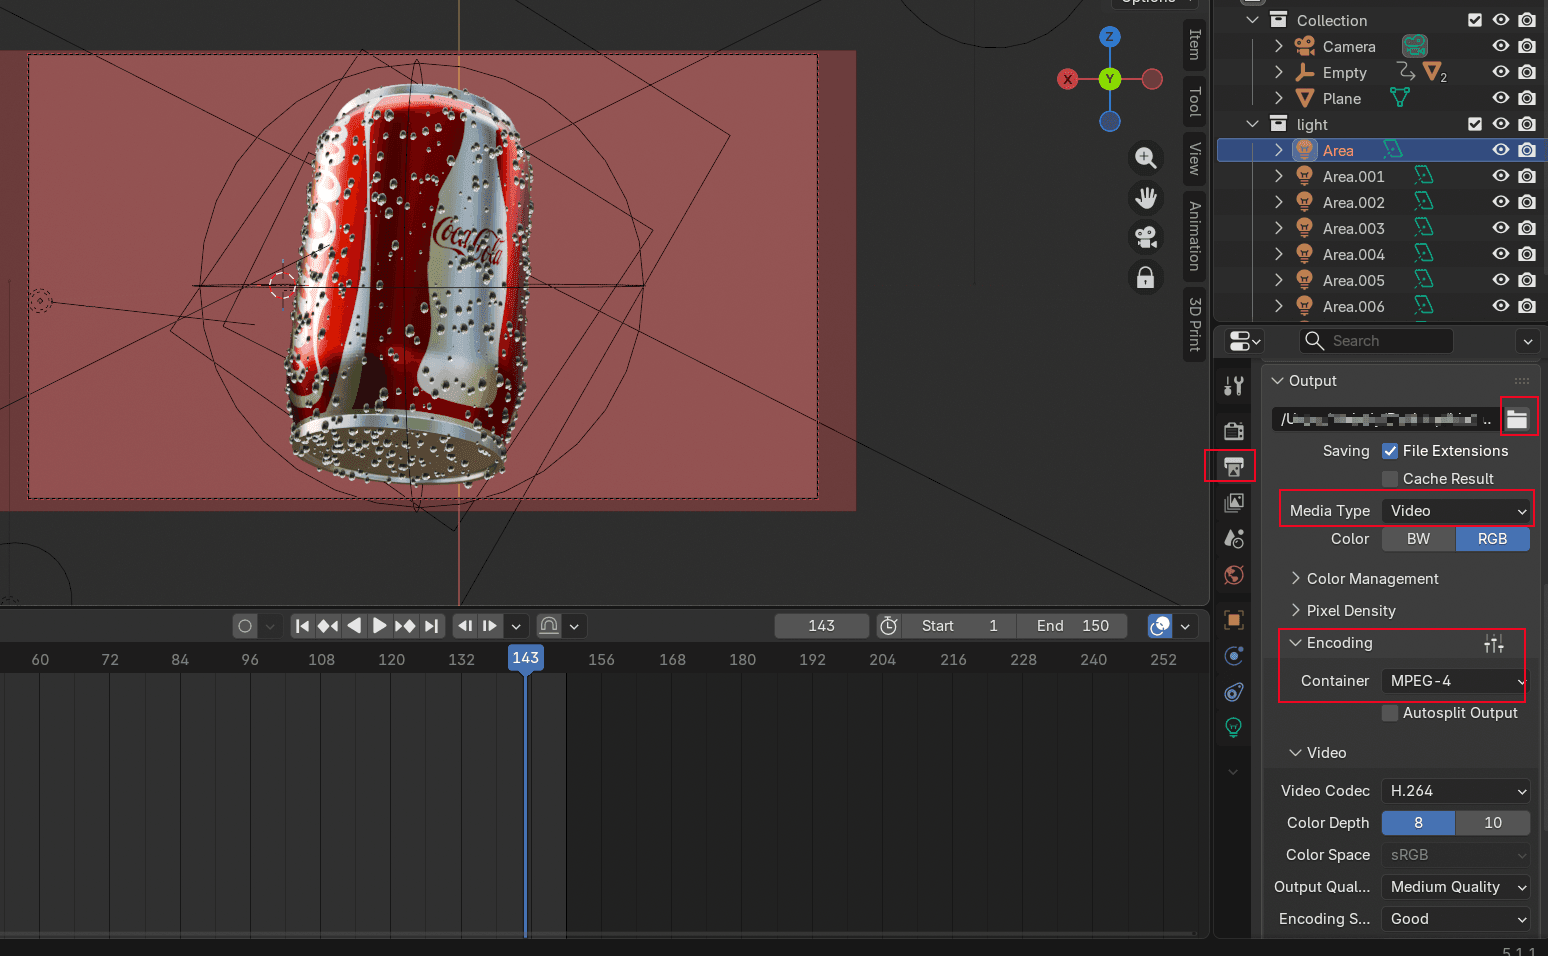
- No Saída seção, altere o tipo de mídia para Vídeo, defina seu arquivo de destino de exportação e em Codificação de caracteres, defina oContentor para MP4. Se você deseja um fundo transparente, acesse a Propriedades de Renderícone, e abaixo deCinema, assinale a Transparente opção.
Tutorial de Simulação de Fluidos no Blender
A simulação de fluidos torna a animação de produtos divertida. Nada chama mais atenção do que um líquido se chocando contra um produto em câmara lenta. Vamos simular um líquido respingando ao redor de um produto (água atingindo uma lata de cola).
Configuração do Domínio Fluido
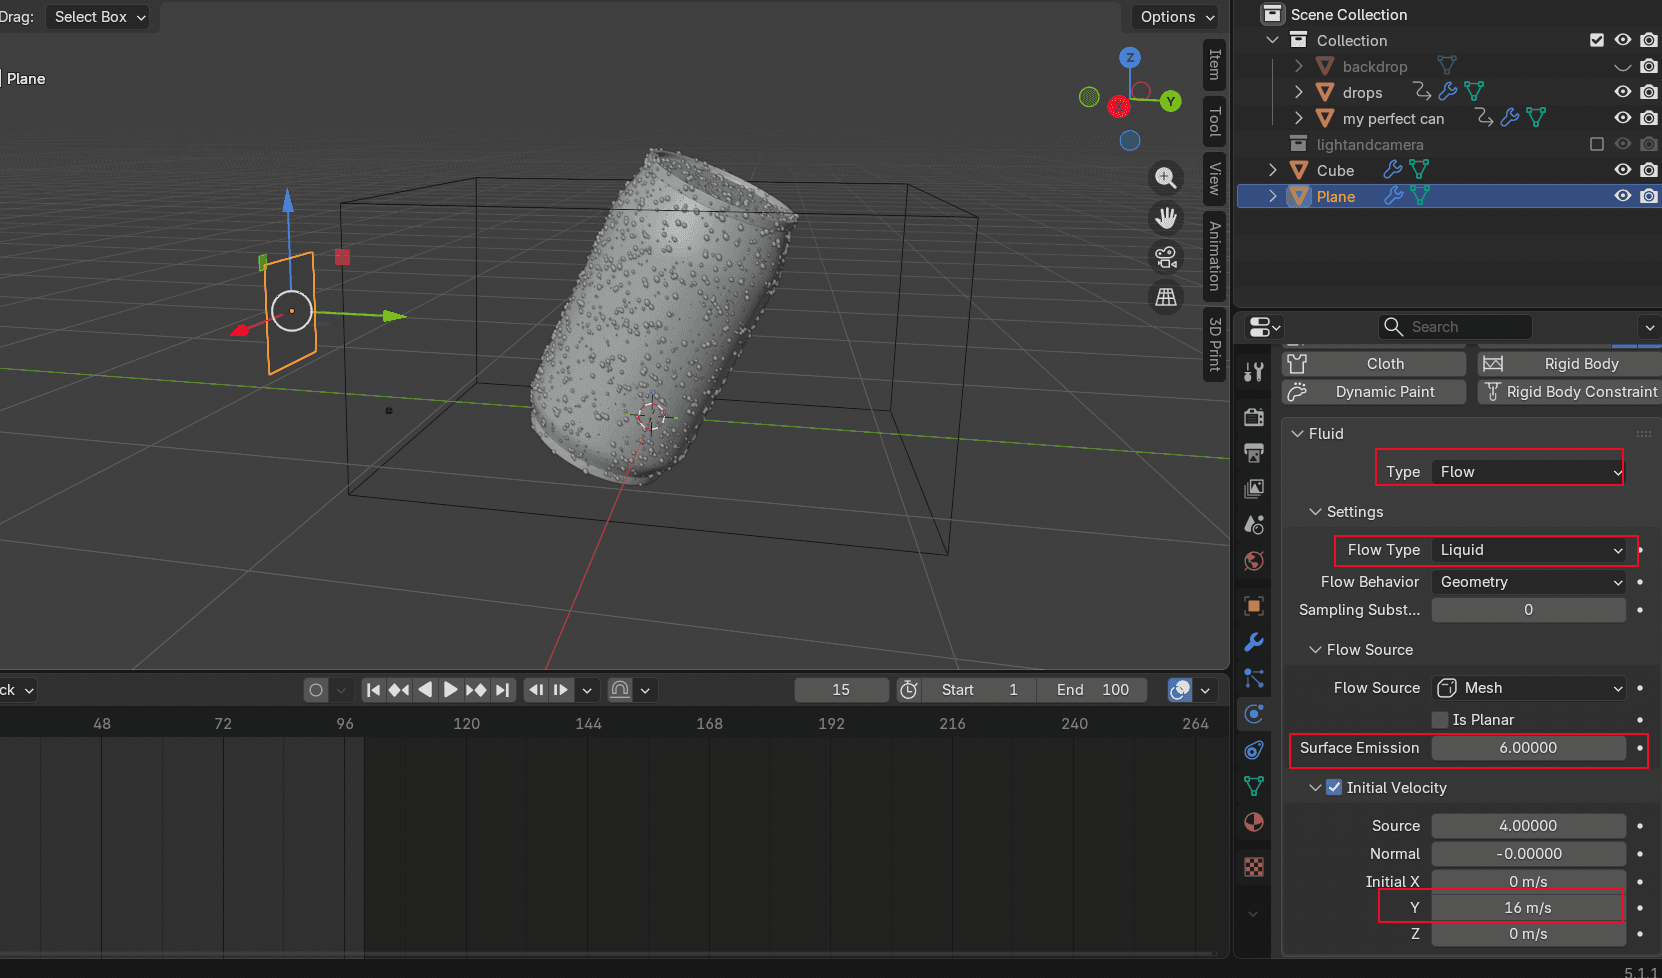
Shift+Apara adicionar um Aeronave, gire-o 180 graus, e mova-o para a parte traseira do objeto. Certifique-se de que o plano está voltado para o objeto. As partículas são pulverizadas na direção indicada pela seta. Vá para Propriedades Físicas, adicioneLíquido, e defina o Tipo para Fluxo. Defina o Tipo de Fluxo até Liquid. Definir Emissão Superficial para cerca de 6. Quanto maior o número, maior a área de injeção. Ative Velocidade iniciale ajustarInicial X/Y/Z para definir a direção da injeção.
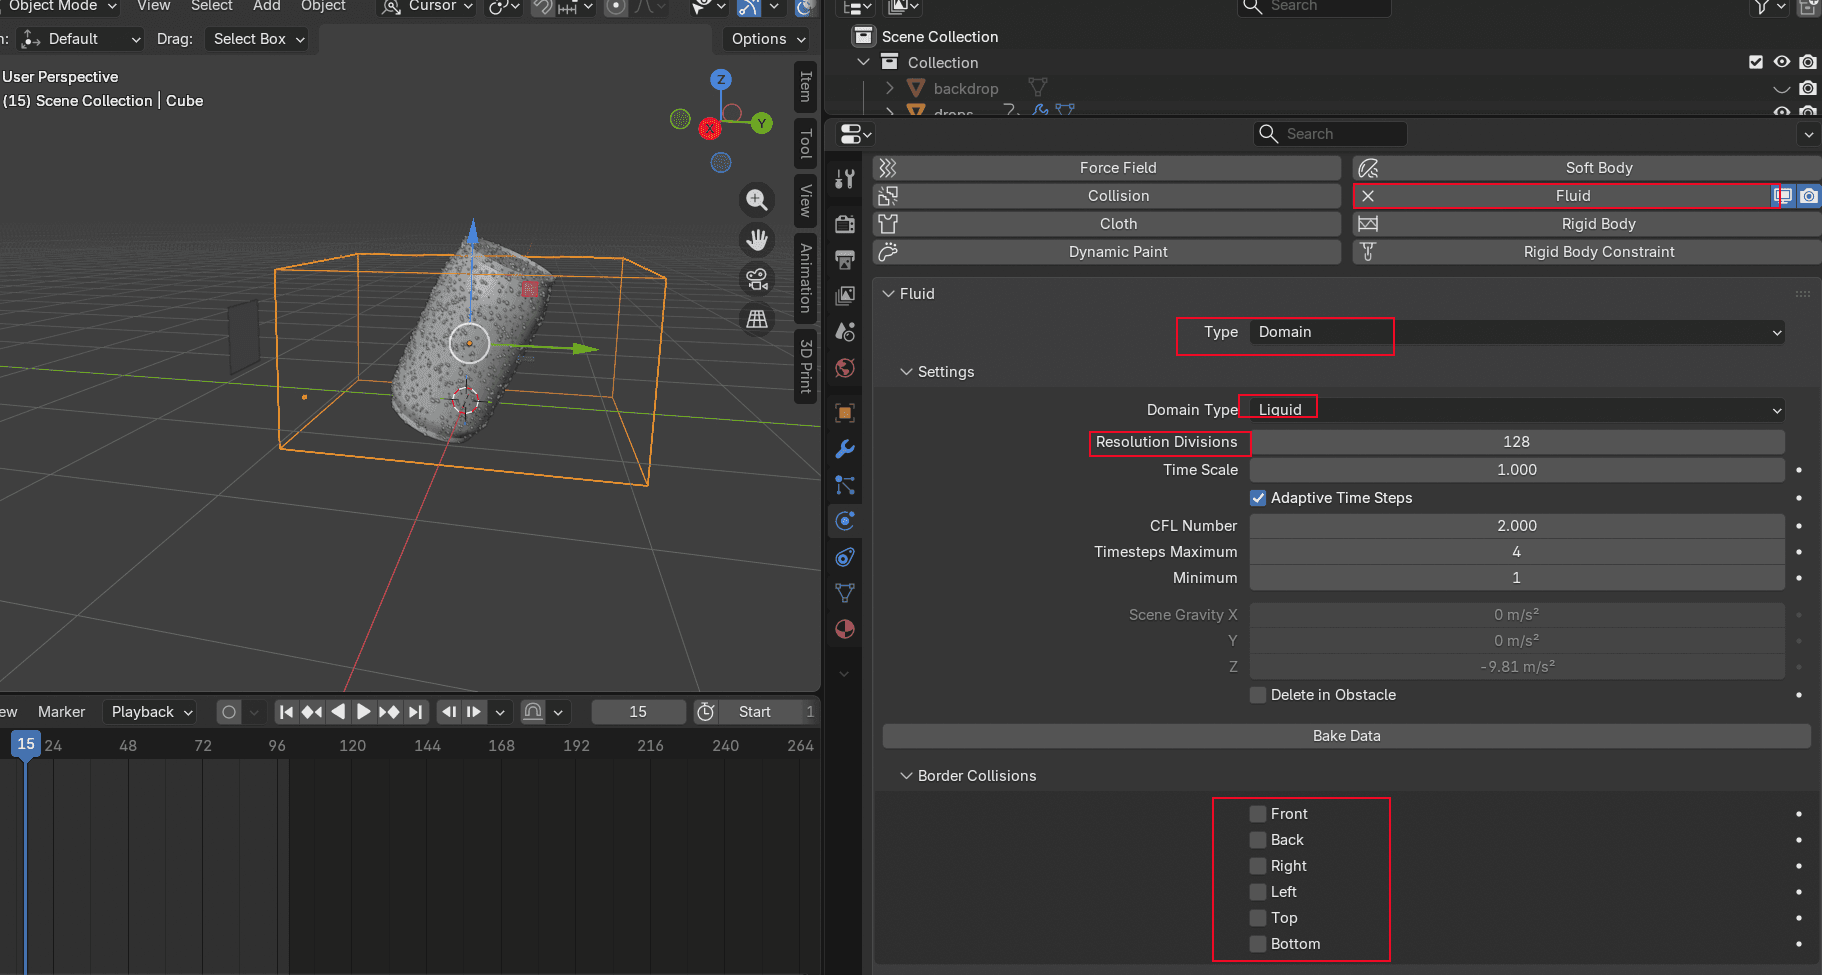
Shift+A para adicionar um Cube. Este cubo funciona como o domínio do fluido. Ele define até onde a água espirra. Mantenha a altura ligeiramente maior do que o seu objeto. As dimensões X e Y ficam a seu critério (elas controlam a largura dos respingos de água atrás do objeto). Em Propriedades do Objeto → Exibição da Viewport, mude o Modo de Visualização a Fio. Isso impede que o cubo de domínio bloqueie sua visão do objeto.

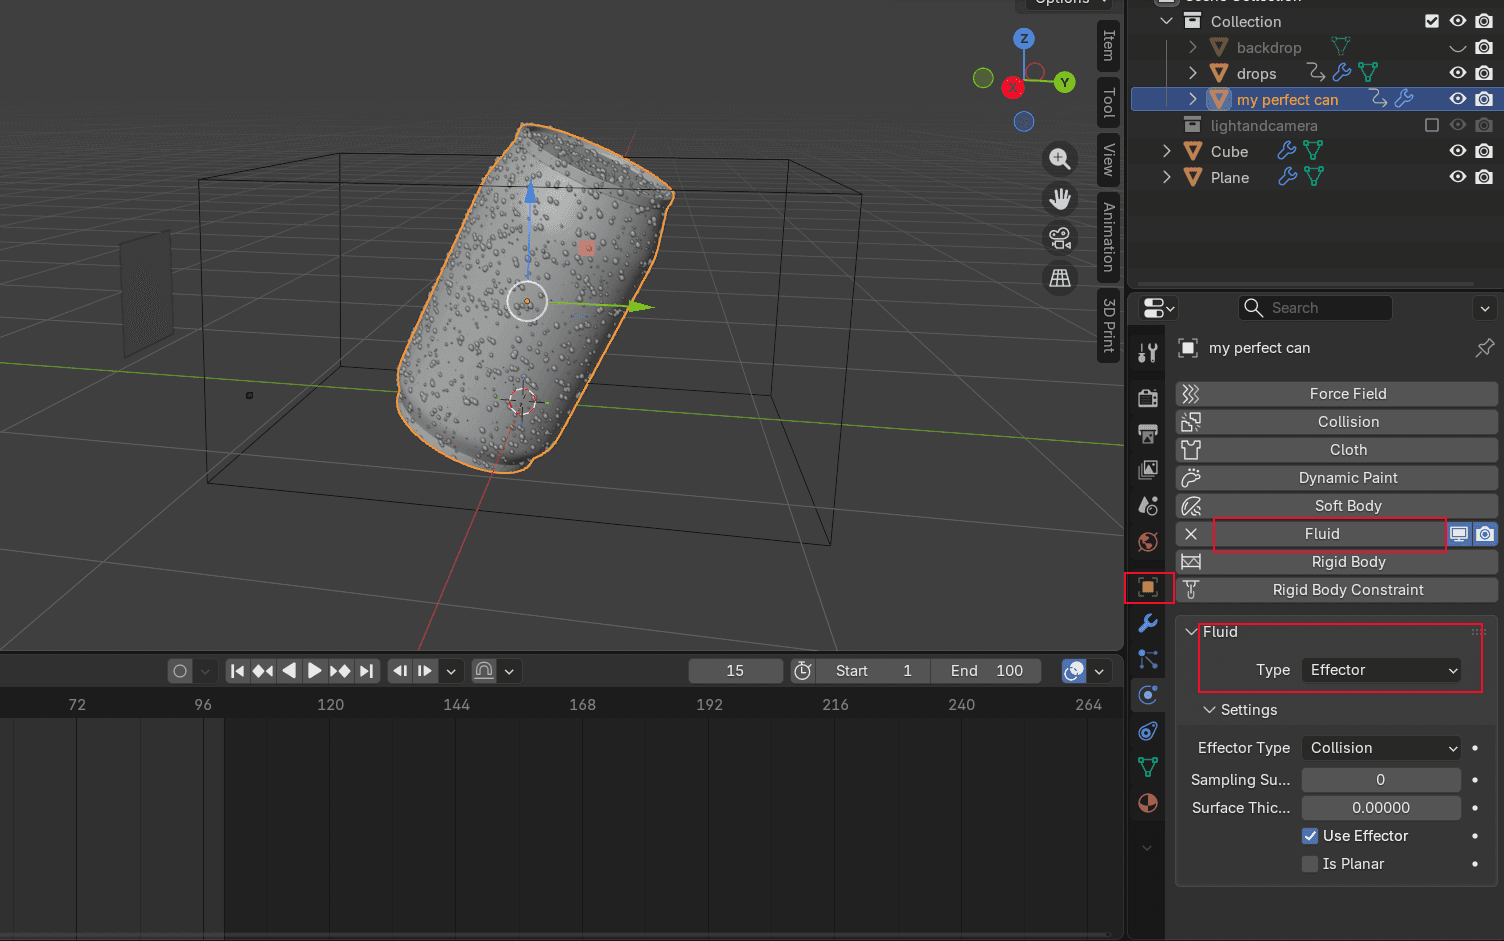
- Selecione o modelo do seu produto, acesse Propriedades de Física, adicione Fluid, e configurar o Tipo a Efetor Isso informa à simulação que o recipiente é um objeto sólido contra o qual a água deve colidir.
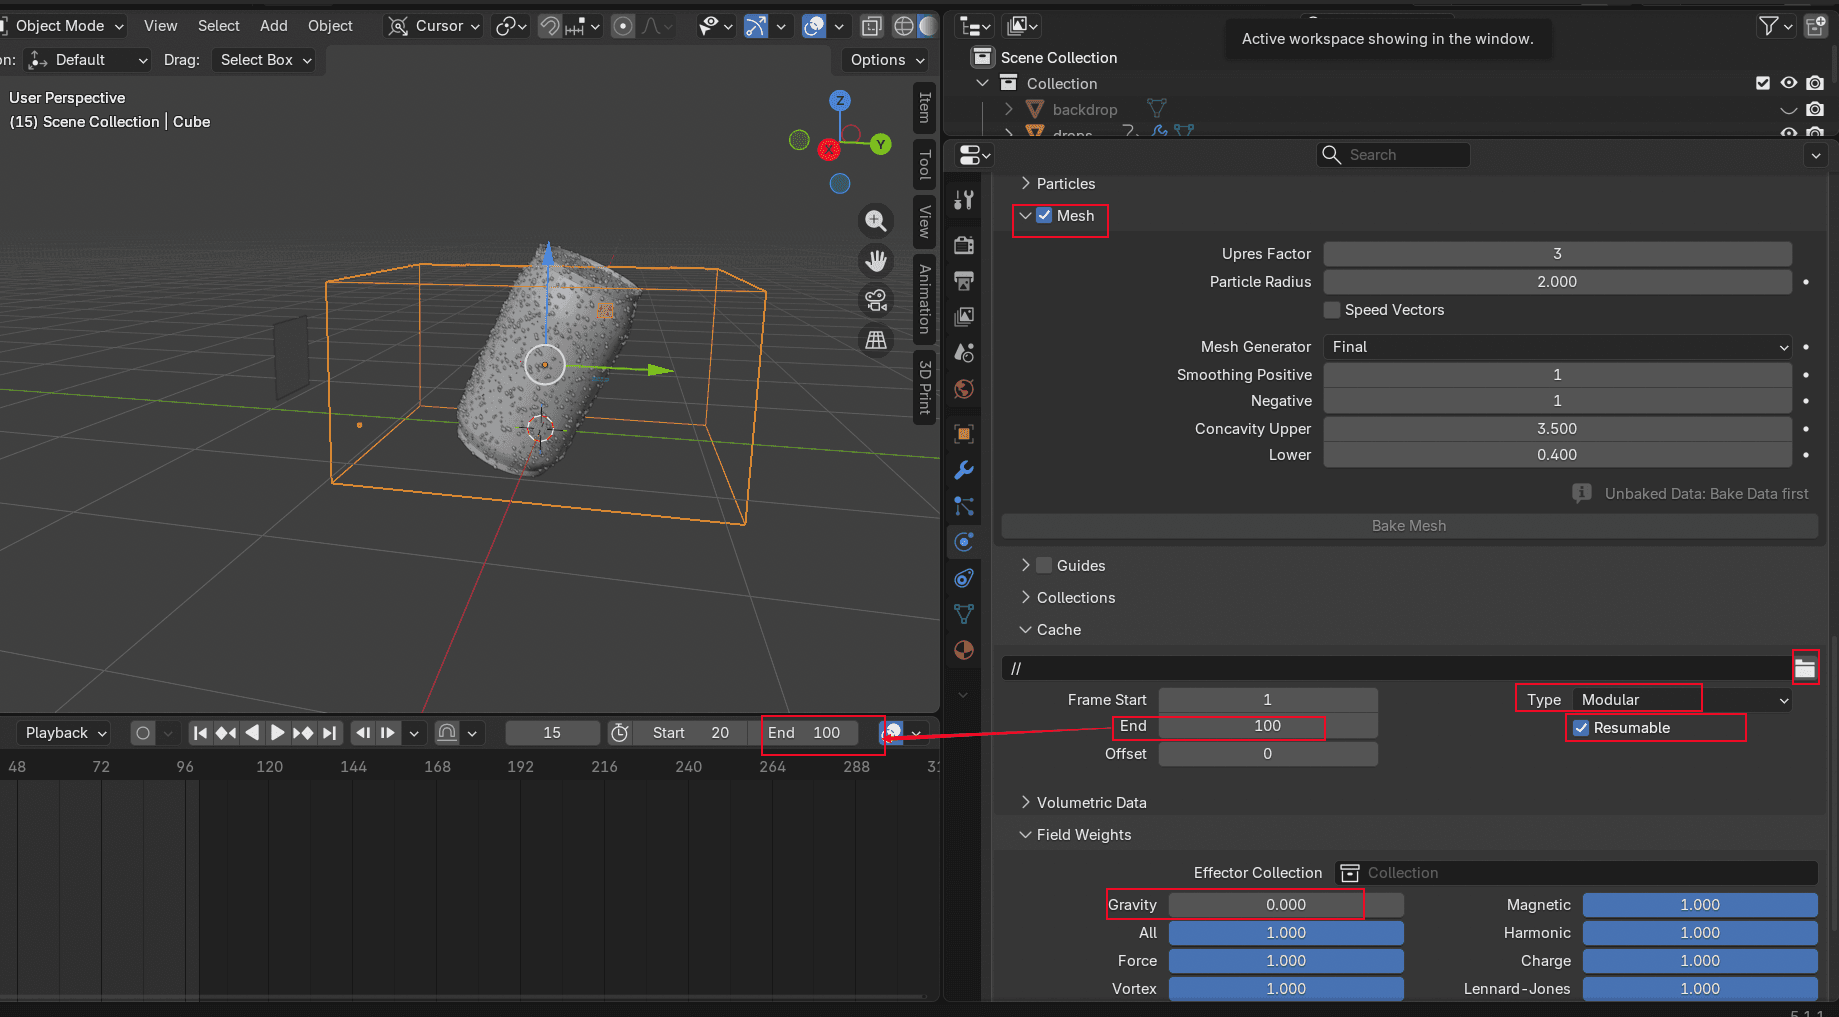
- Selecione o cubo, adicione Fluido, defina o Tipo para Domínio, e selecione um Divisão de Resolução. Quanto maior o número, mais longo será o tempo de assamento e mais detalhada a malha. Se você não quiser que a água reflita nas paredes do domínio, desative a Colisões Fronteiriças ajustes. Ativar Malha, configure o Tipo para Modular, e configure o Último Quadro para corresponder ao tempo de reprodução. Configure Gravidade para zero (você está simulando um jato horizontal, não uma cachoeira). Certifique-se de verificar o Retomável opção. Sem ela, você não poderá refazer o bake se quiser ajustar o resultado posteriormente. Em seguida, altere o Modo de Exibição retornando do Wire em Visualização da Área de Tela para que a janela de visualização fique mais legível.
Bake da Animação Líquida
- Selecione o cubo e clique Fluido de Cozedura no Propriedades Físicas guia. Isso levará algum tempo, dependendo da configuração de resolução. Após concluir, clique em reprodução para conferir o resultado.
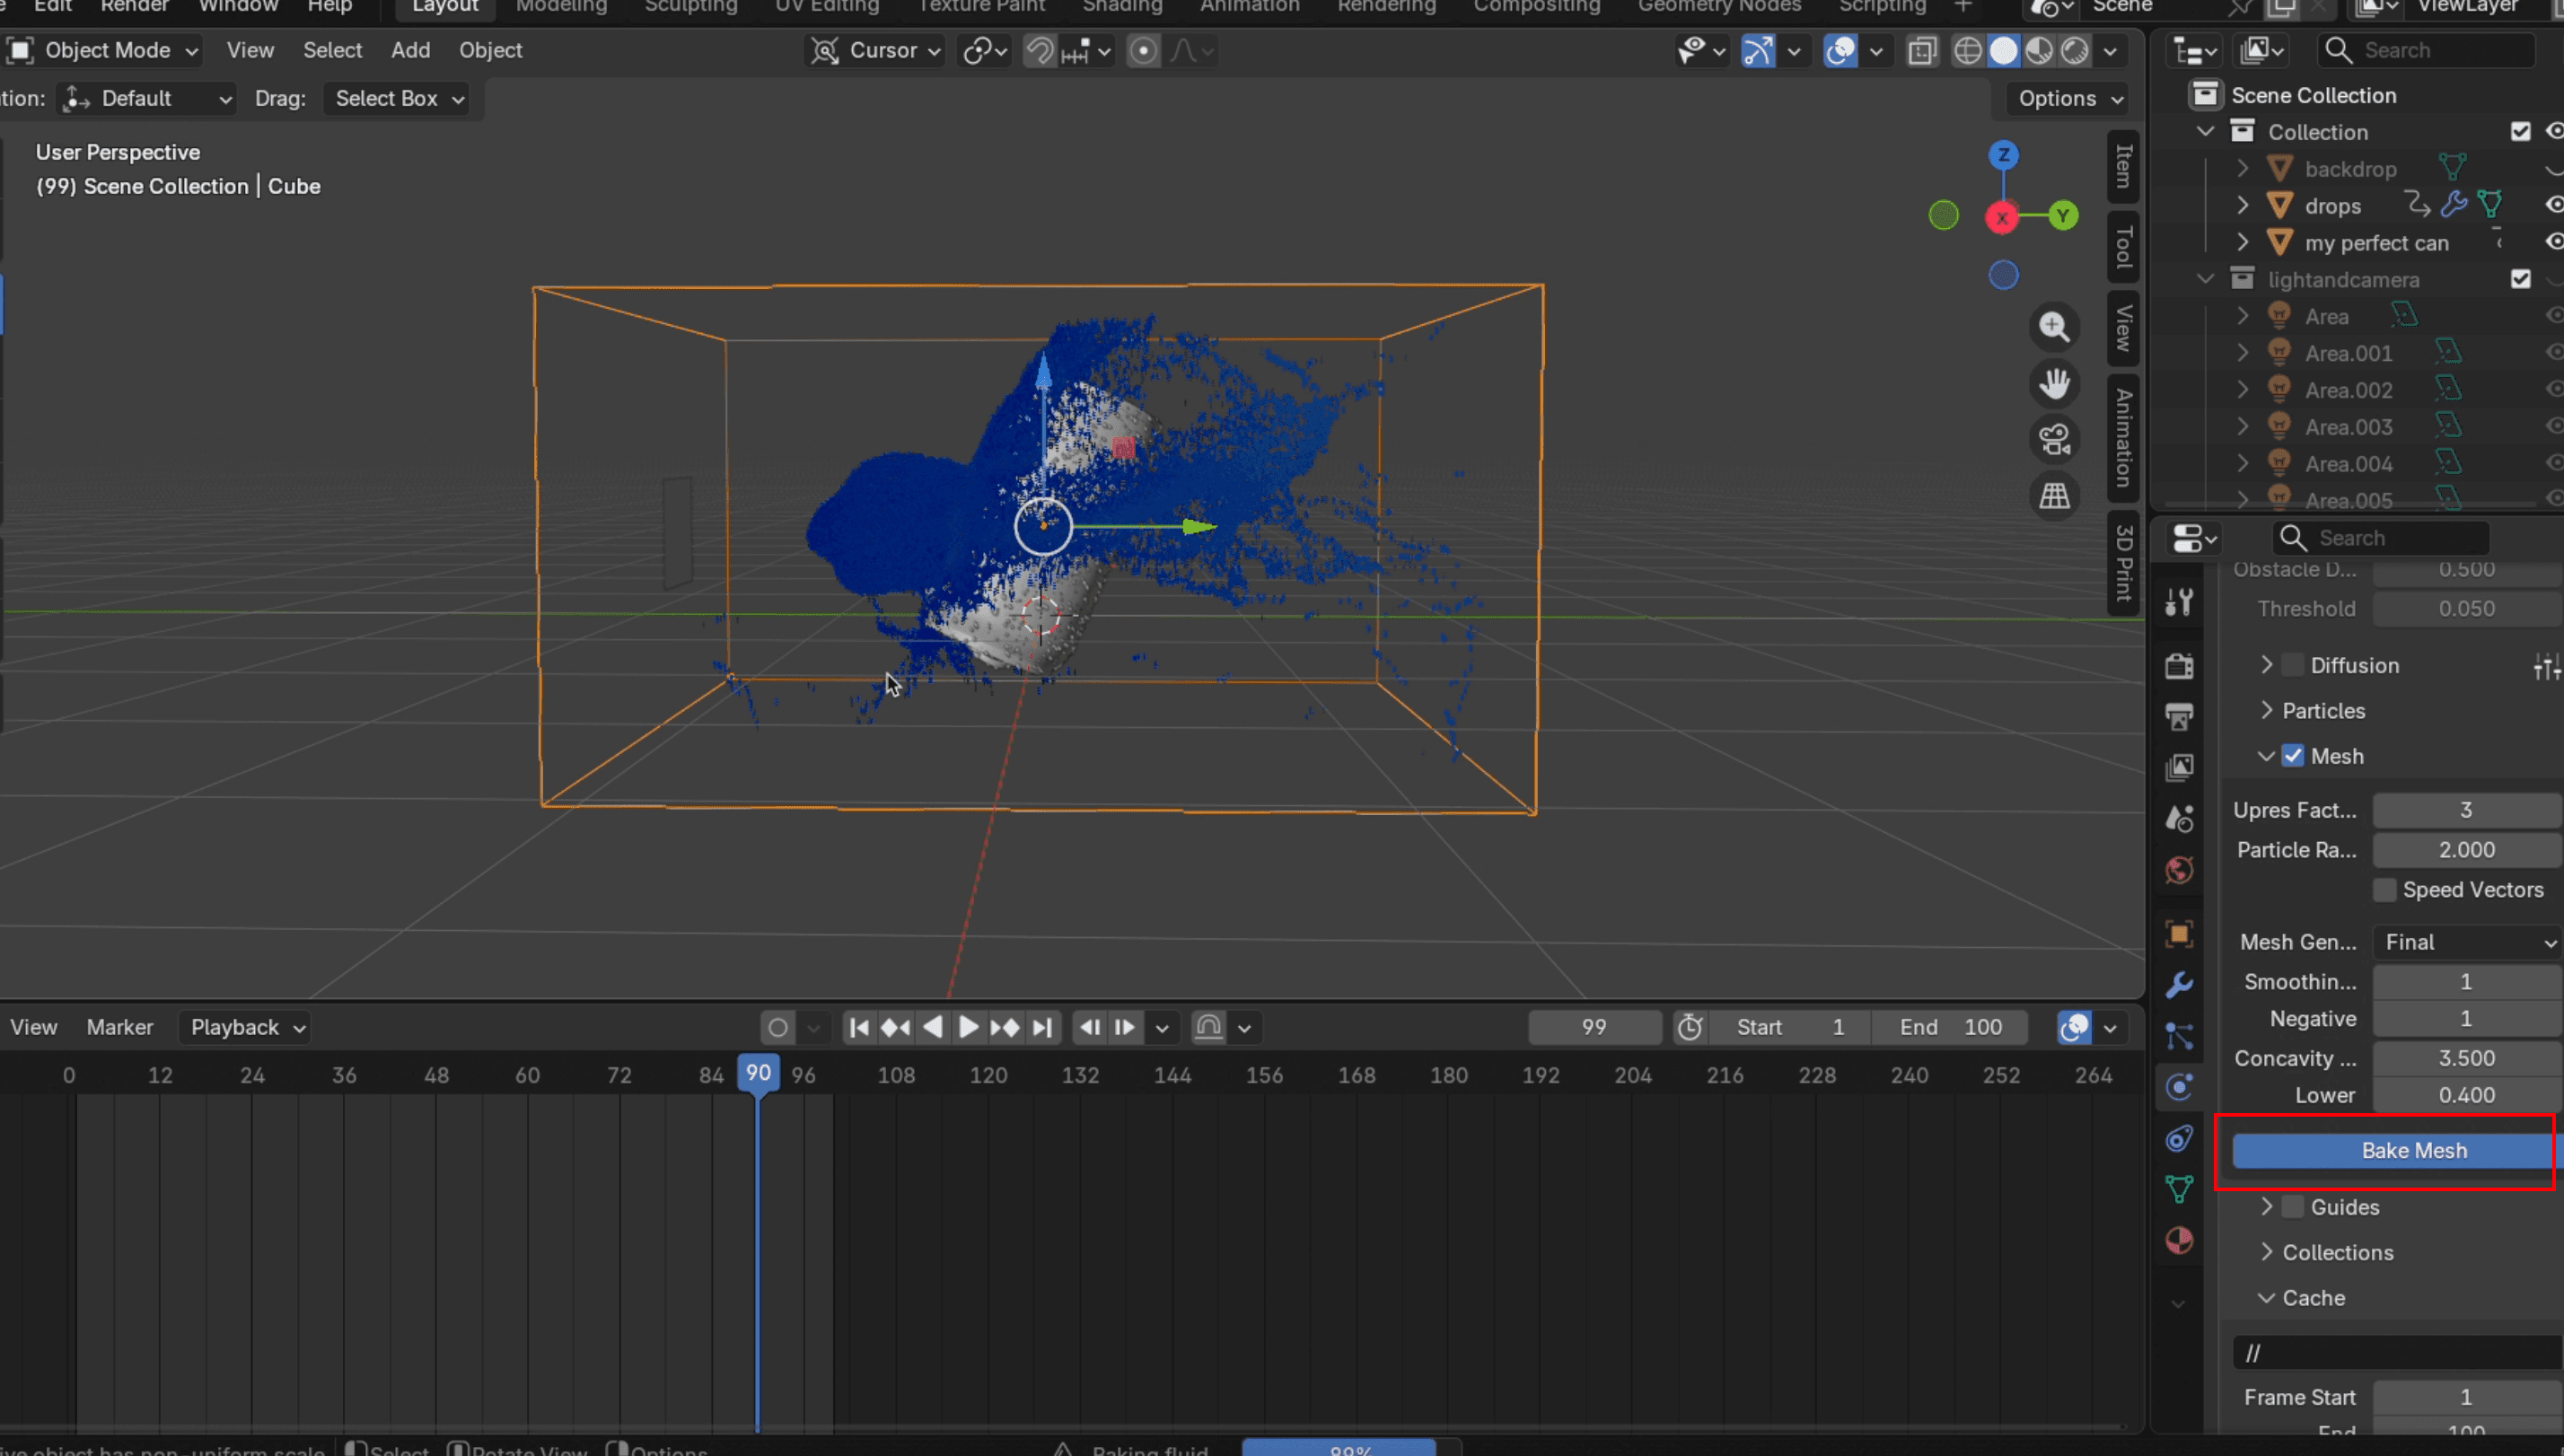
- Caso esteja satisfeito com a simulação, clique...Assar Malha. Você pode configurar o Fator de Pressão para cerca de 3 para tornar a superfície da água mais lisa. Se não estiver satisfeito, clique em Dados Gratuitos, ajuste configurações como a distância da aeronave ou a velocidade de injeção, e clique Processar Dados novamente. É aqui que o Continuável o checkbox te salva. Sem ele, cada ajuste significa começar o processamento desde o início.
Renderização do Efeito Final de Salpico
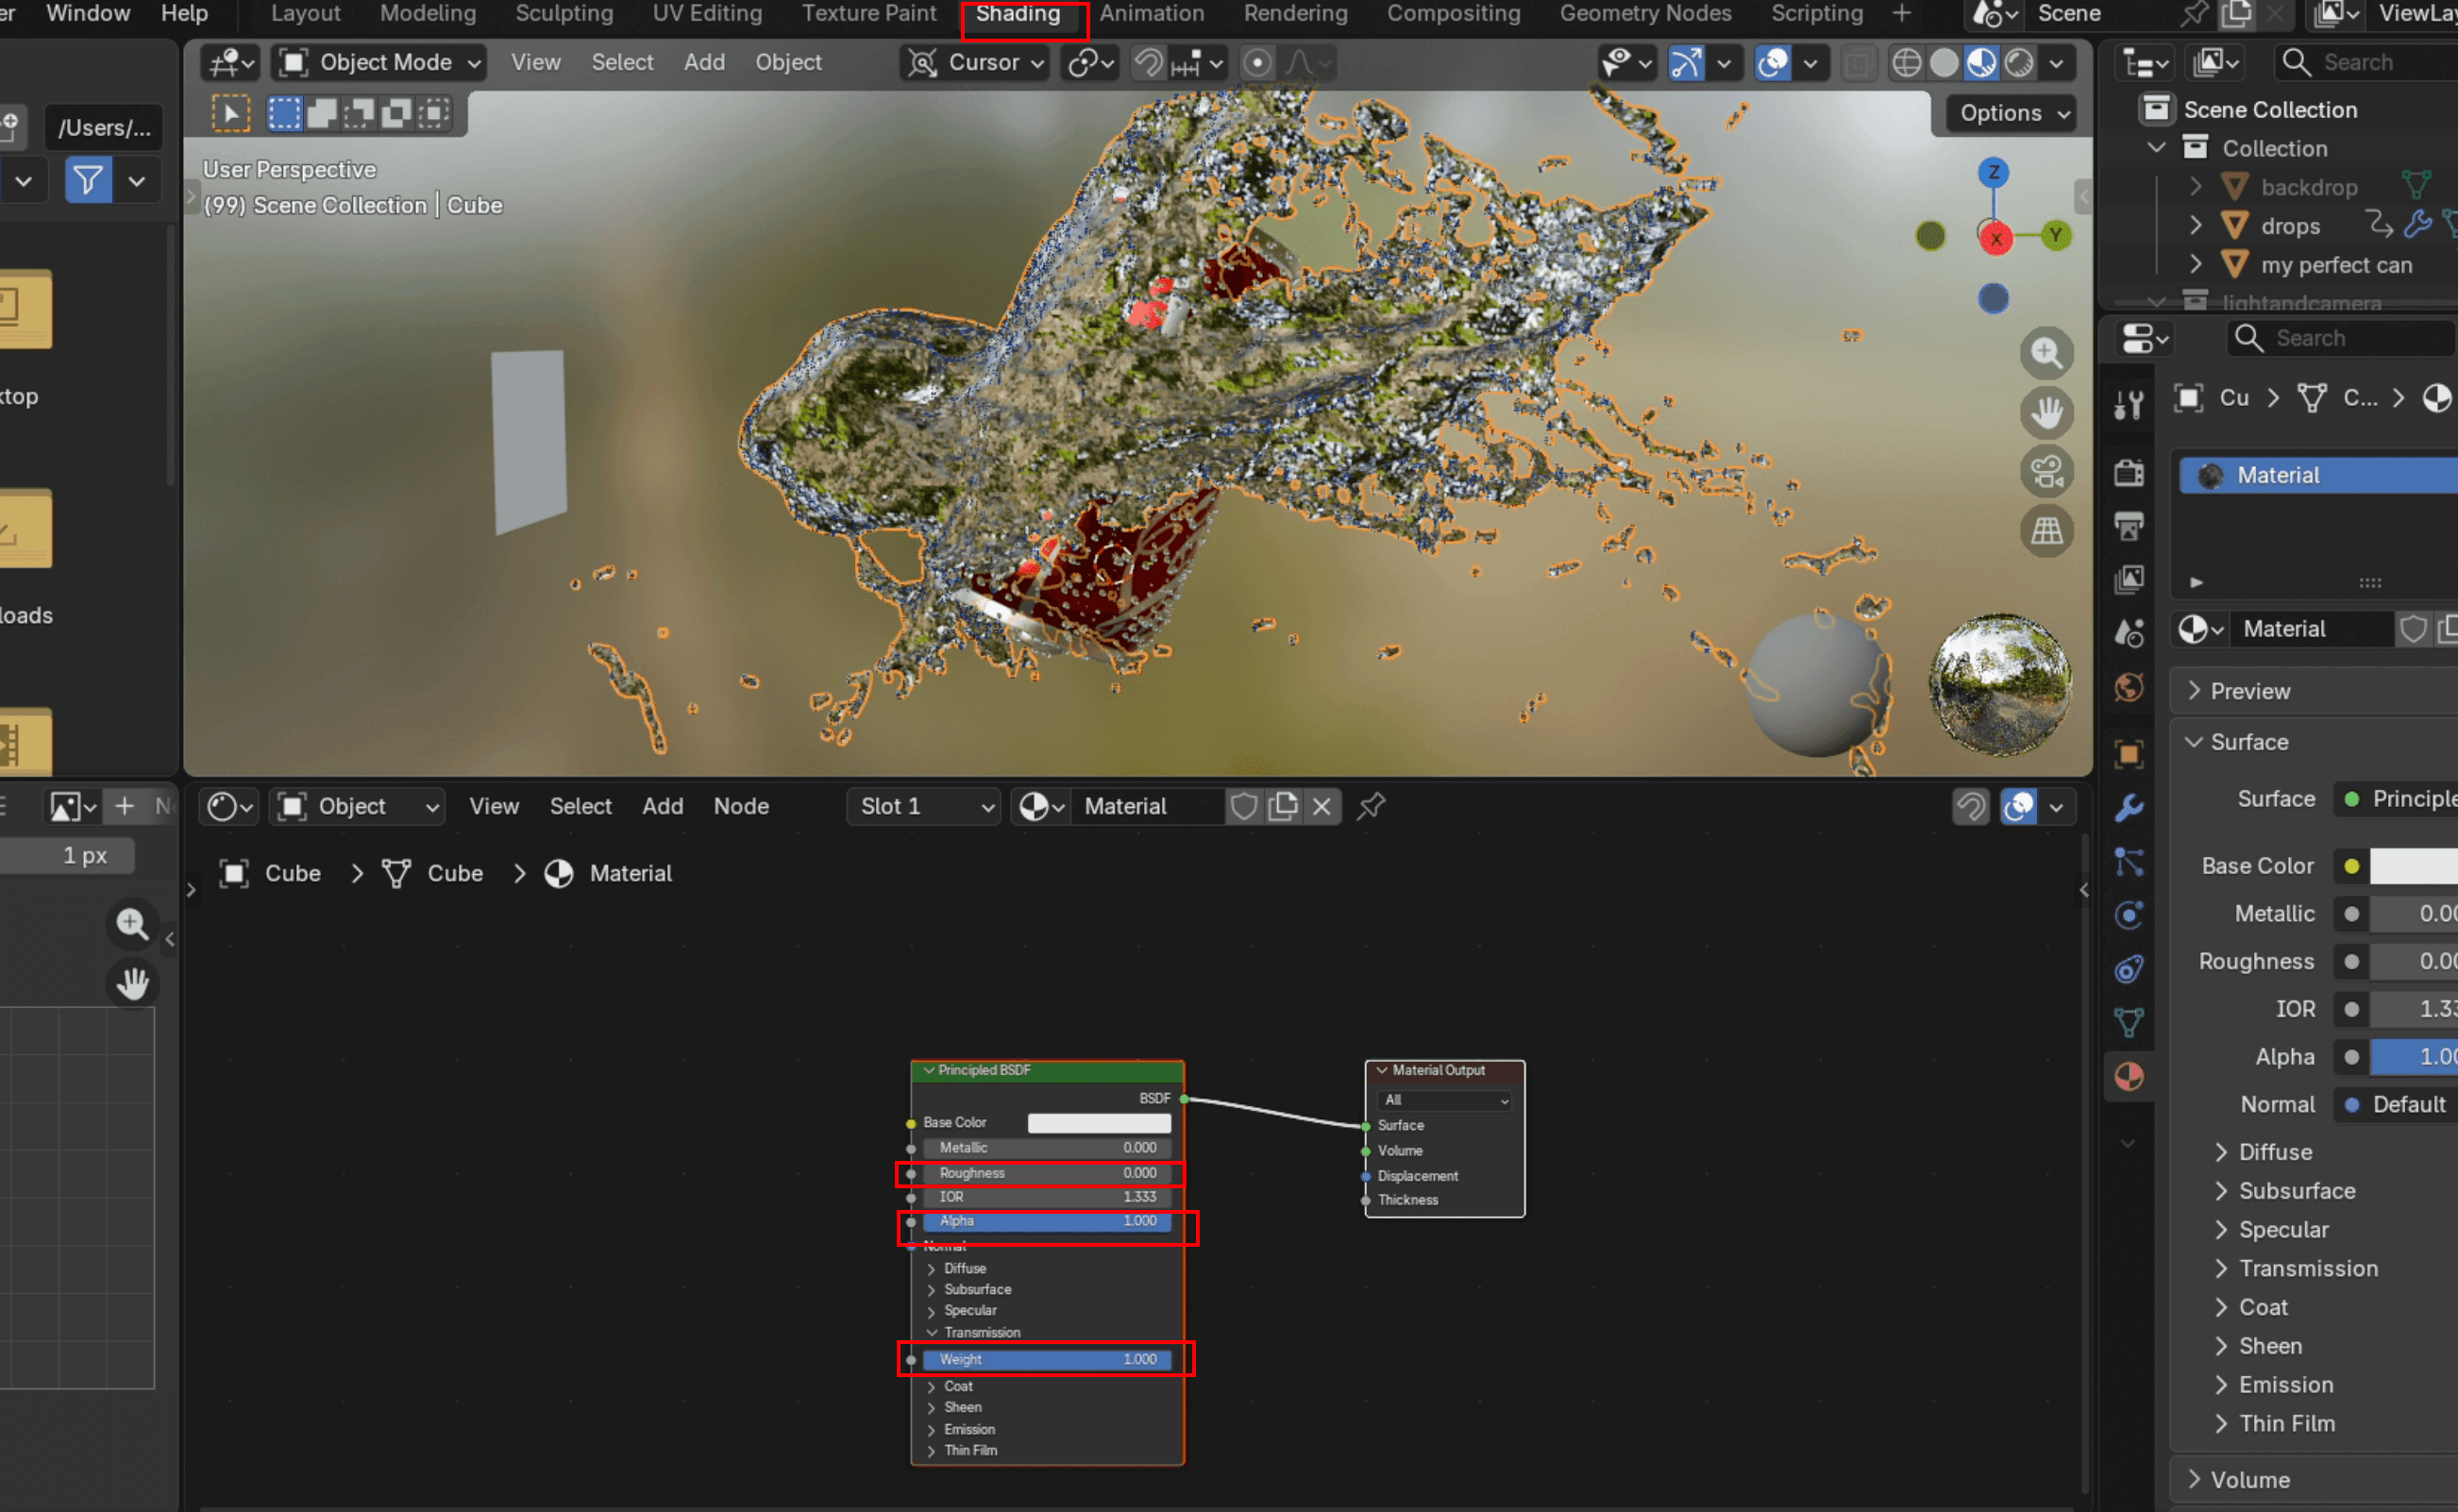
- Ir para Sombreamento, adicione uma nova Material, definir Rugosidade a 0, Peso a 1, e IOR para aproximadamente 1,33 (o índice de refração da água no mundo real). Depois, volte para Layout, selecione o cubo e adicione um Modificador de Suavidade (sob Deformação). Clique com o botão direito no objeto e escolha Alisar Sombras.
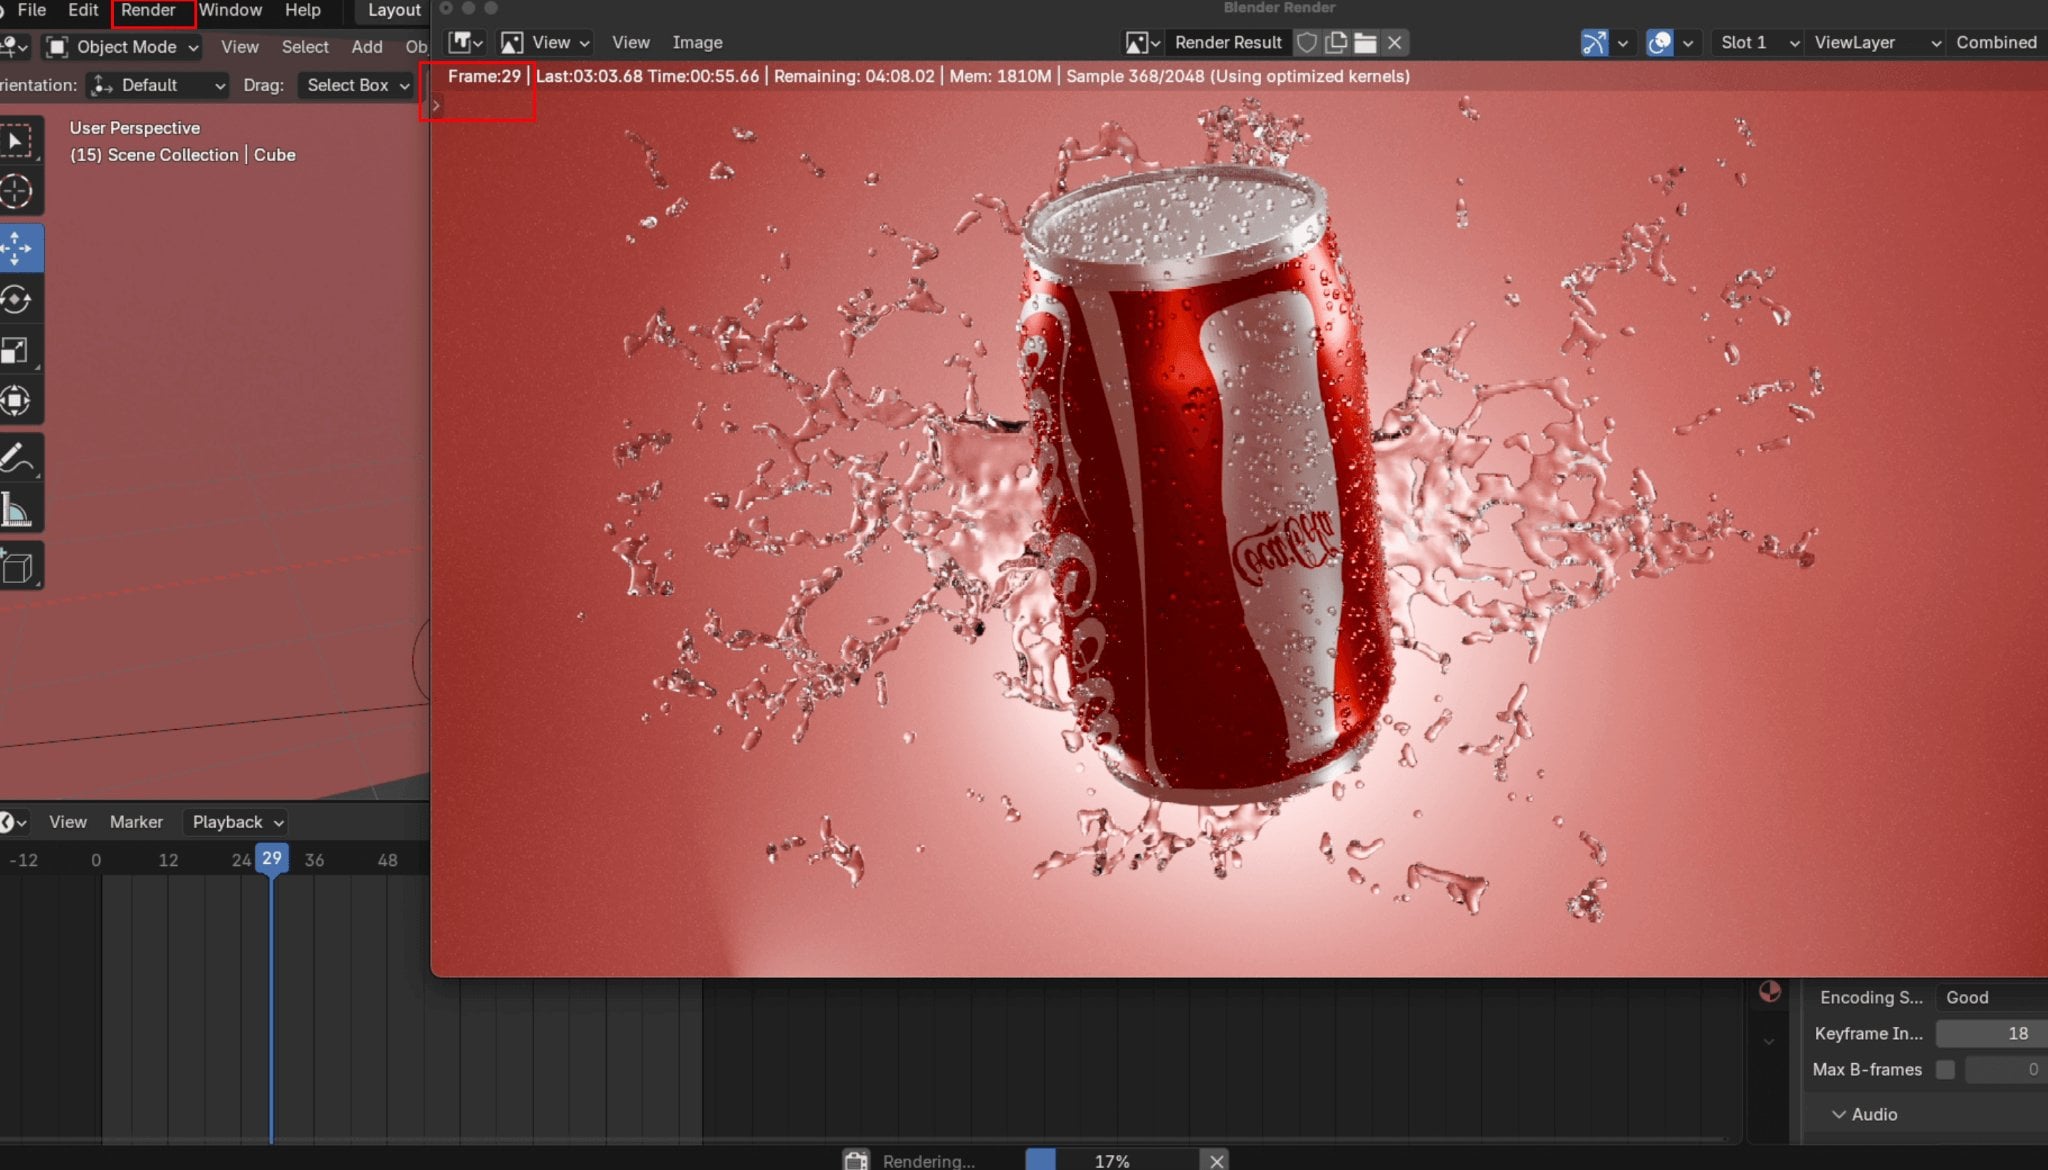
- Em Saída, mude o tipo de mídia para Vídeo, defina seu arquivo de destino da exportação e, em seguida,Codificação de caracteres configure o Contentor para MP4. Clique Renderizar → Renderizar Animação para iniciar a renderização final. Não feche o Blender durante a renderização, ou o processo será interrompido. Quando o contador de frames atingir o número do quadro final que você definiu, o processo estará concluído. O Blender salvará automaticamente o arquivo na pasta que você selecionou.
Gerar um Modelo do Produto sem Processo de Modelagem
Criação de um modelo de produto do zero no Blender exige tempo considerável, mesmo para artistas experientes. Se você precisa de um modelo para sua animação de visualização de produto e não tem um disponível, o Triverse AI oferece um caminho mais rápido: gere um modelo 3D print-ready diretamente de uma imagem ou um comando de texto, depois importe-o para o Blender.
Gerar modelo 3D a partir de uma imagem
Digamos que você quer um anão mineiro com abdominais definidos para sua animação. Em vez de construí-lo no Blender, você pode criá-lo a partir de uma foto de referência.
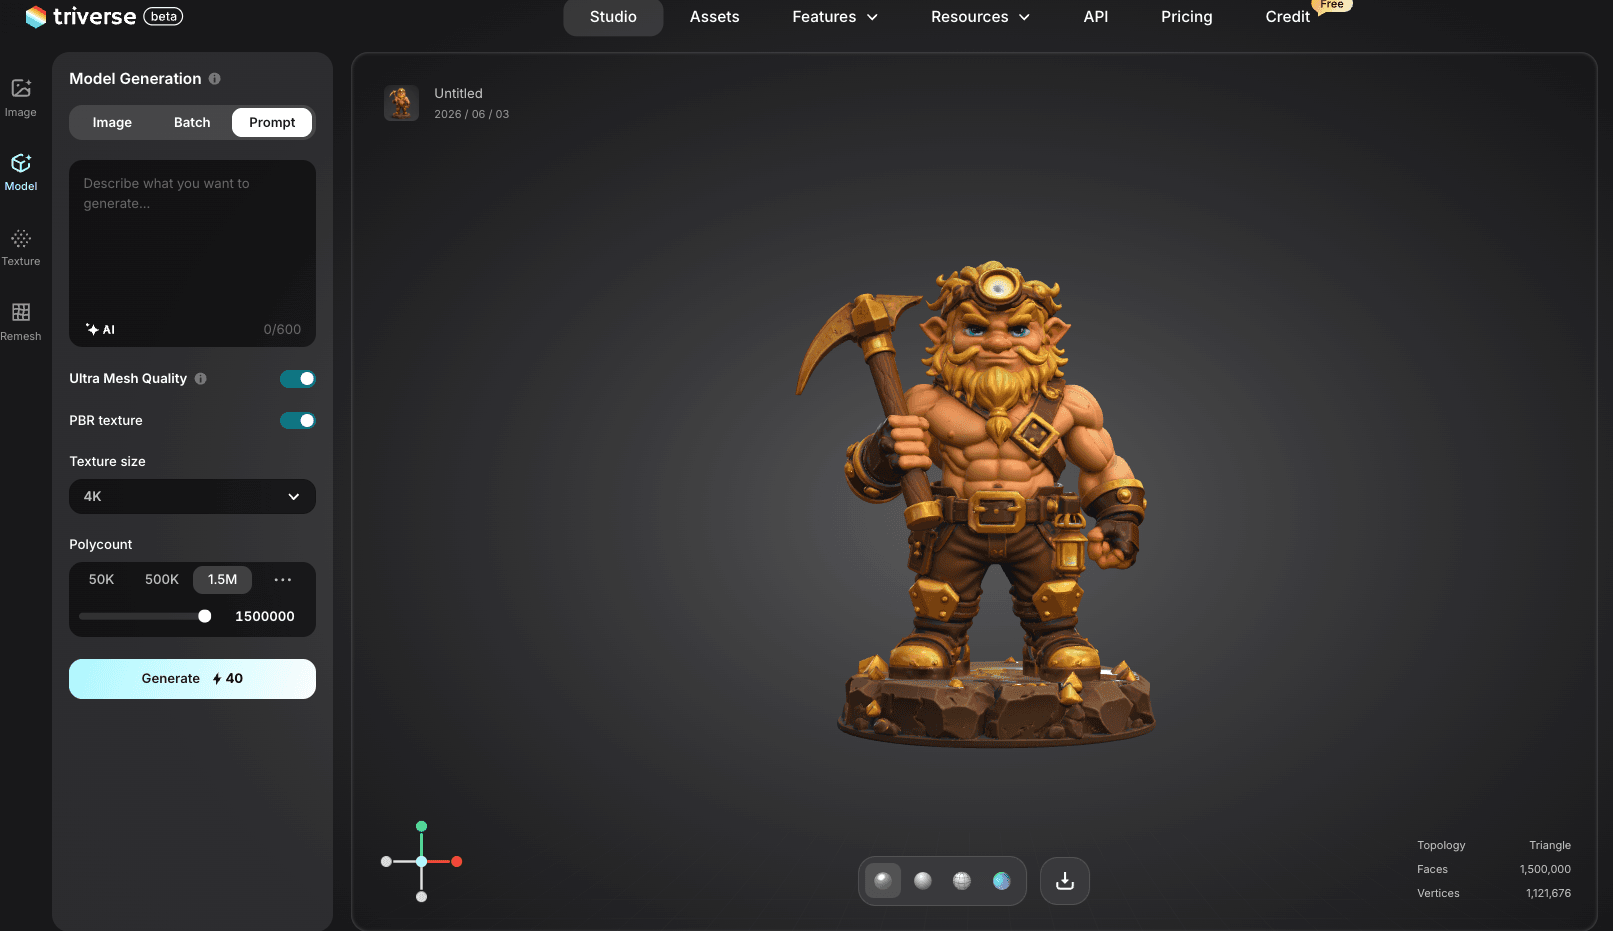
- Ir para Triverse AI Studiocarregue uma imagem de referência de um mineiro anão atarracado. Uma foto de frente com fundo branco e limpo é a melhor opção.
- Mantenha todas as predefinições, clique em Gerare baixe o modelo.
Gerar modelo 3D por meio de descrição textual
Sem imagem de referência? Sem problema. O Triverse AI também permite gerar um modelo 3D apenas com um prompt de texto.
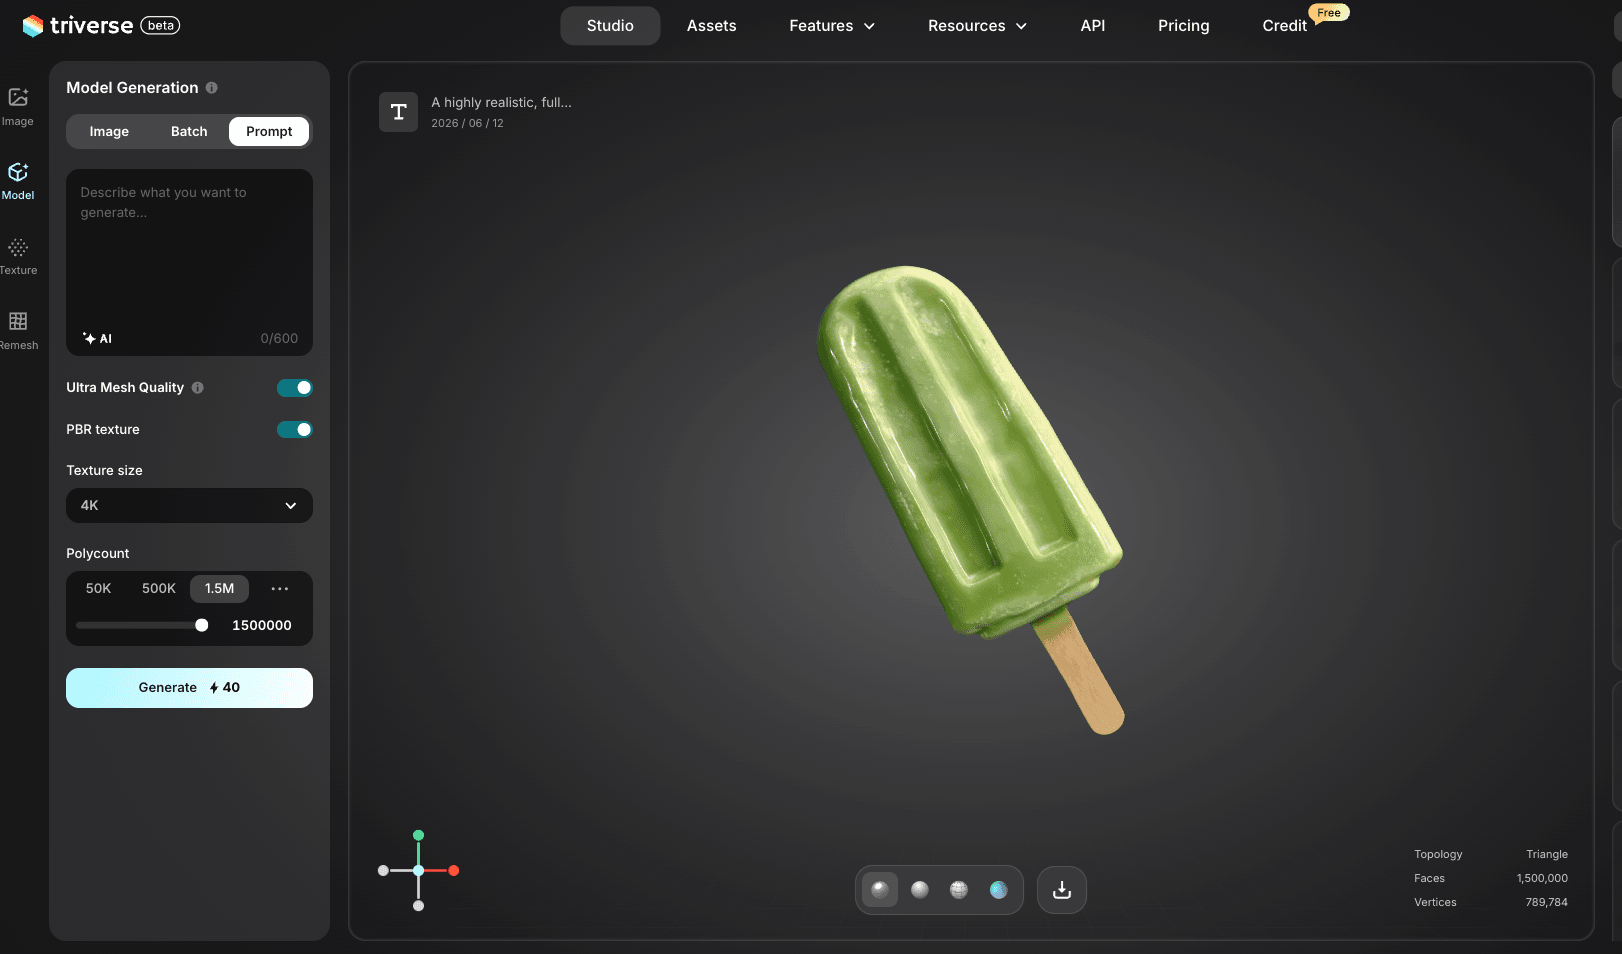
- Ir para Triverse AI Studio e insira uma instrução descritiva no campo de texto. Quanto mais específico, melhor:
"Um modelo 3D verde, altamente realista e completo de um único picolé, centralizado no quadro e totalmente visível sem recortes."
- Mantenha todas as configurações predefinidas, clique em Gerar, e baixe o modelo.
Dicas para obter melhores resultados em prompts:
- Inclua descrições de materiais ("alumínio", "plástico fosco", "vidro")
- Especifique a escala ("tamanho real", "miniatura de 28 mm")
- Adicionar "malha impermeável" e "pronto para gráfica" para promover uma geometria mais limpa
Exportar o Modelo para o Blender
Após obter o modelo, a importação para o Blender leva menos de um minuto.
- Abra o Blender e acesse
Arquivo → Importar → OBJ(ou outros formatos, dependendo do que foi descarregado) - Encontre o ficheiro no seu computador e clique Importar
- O modelo aparece no centro do cenário; faça os ajustes desejados. A partir daí, você pode personalizá-lo ainda mais, como adicionar gotas de água nas latas ou criar animações.
Conclusão
A visualização de produtos no Blender se resume a três elementos: uma cena bem iluminada, animação suave e drama visual. A rotação em turntable exibe o produto de todos os ângulos. A simulação de fluidos adiciona aquele tipo de impacto que faz as pessoas pararem de rolar o feed. Nenhuma das técnicas é difícil de configurar, e ambas escalam de acordo com o esforço que você dedica a elas.
Suas primeiras renderizações não parecerão um anúncio publicitário. Isso é normal. A visualização de produtos tem uma curva de aprendizado íngreme no início, mas se torna mais fácil rapidamente. Cada renderização ensina algo sobre iluminação, timing ou materiais. As ferramentas são gratuitas. O único investimento real é o seu tempo.
Não se esqueça de testar o gerador gratuito de modelos 3D com IA, Triverse AI. Gere rapidamente seu modelo antes de prosseguir para a próxima etapa!
Aviso: A lata da Coca-Cola usada neste tutorial é apenas para fins de demonstração. Não temos afiliação, nem somos endossados ou patrocinados pela The Coca-Cola Company.
Perguntas Frequentes sobre Animação de Visualização de Produtos no Blender
Posso usar o Blender para visualização de produtos em vez de software pago?
Sim, o Blender realiza renders e animações de produtos de nível profissional. O Cycles (seu motor de rastreio de caminhos) produz saídas fotorrealistas que competem com motores de renderização comerciais. A principal compensação é a velocidade do fluxo de trabalho: ferramentas dedicadas como KeyShot ou Cinema 4D têm iterações de pré-visualização mais rápidas, mas a qualidade final da renderização é comparável.
Preciso de um modelo 3D para começar, ou posso criar um no Blender?
Você precisa de um modelo 3D. Você pode modelá-lo no Blender, baixá-lo de bibliotecas gratuitas como Sketchfab ou Printables, ou gerá-lo com uma ferramenta de IA como Triverse AI a partir de uma imagem ou prompt de texto. Especificamente para visualização de produtos, a geração por IA costuma ser o caminho mais rápido.
Quanto tempo leva para renderizar uma animação de produto no Blender?
Uma animação de rotação 360º de 150 quadros em 1080p com Cycles e remoção de ruído leva de 15 minutos a 2 horas em uma GPU moderna (RTX 3060 ou superior). Renderização via CPU leva de 5 a 10 vezes mais tempo. Simulações de fluidos adicionam tempo considerável à renderização: uma animação de respingo de 150 quadros em resolução média pode levar de 1 a 3 horas. Ative o GPU Compute nas Propriedades de Renderização e use remoção de ruído para manter os tempos de renderização gerenciáveis.
Qual é o melhor motor de renderização para visualização de produtos no Blender?
Cycles para saída final. Ele usa rastreio de caminhos para reflexos, refrações e sombras suaves realistas com configuração mínima. Eevee para pré-visualizações e iterações rápidas. O Eevee é muito mais rápido, mas não lida com reflexos ou refrações tão naturalmente. A maioria dos artistas de visualização de produtos usa o Eevee para esboçar a cena e depois alterna para o Cycles para a renderização final.
Como faço meus renders de produtos parecerem mais realistas?
Três coisas fazem a maior diferença. Iluminação: use um mapa ambiental HDRI em vez de uma única luz direcional. Materiais: defina valores realistas de rugosidade, metálico e transparência usando o Principled BSDF e compare seus resultados com fotos reais do produto. Imperfeições de superfície: adicione riscos sutis, impressões digitais ou texturas de granulação. Superfícies perfeitamente lisas parecem sintéticas.
Posso fazer visualização de produtos sem um produto físico?
Esse é exatamente o objetivo da visualização de produtos em 3D. Você cria um modelo digital, ilumina-o em um estúdio virtual e o renderiza em qualquer ângulo, em qualquer ambiente e em qualquer quantidade. Mesmo produto em 50 variações de cor, 10 ambientes e 5 ângulos, tudo sem fabricar uma única amostra física.
Em qual formato de arquivo devo exportar minha animação de produto?
MP4 (H.264) para web e redes sociais. Oferece o melhor equilíbrio entre qualidade e tamanho de arquivo. Exporte como sequência de imagens (PNG ou EXR) se planeja compor no After Effects ou DaVinci Resolve, já que cada quadro é sem perda e mais fácil de editar individualmente. O EXR preserva mais dados de cor que o PNG se você precisar de alto intervalo dinâmico para pós-produção.
Preciso de um computador potente para simulações de fluidos?
A memória da GPU importa mais que a velocidade bruta para simulações de fluidos. 8GB de VRAM é o mínimo para um baking confortável em resolução média (64-128). 12GB ou mais é ideal se você planeja trabalhar em altas resoluções (200+) ou simular grandes domínios de fluido. O passo de baking grava no disco, então um SSD rápido também ajuda. Computadores apenas com processador podem fazer isso, mas espere tempos de baking significativamente maiores.