What Makes a 3D Model Truly Game-Ready?
Game-ready 3D models need more than low polycount. Here's a practical framework for evaluating your assets, from topology and UVs to engine-specific requirements.
2026年7月15日
"Game-ready" gets thrown around constantly on asset marketplaces and in tutorials. It doesn't mean the same thing for a hero character as it does for a 200-poly rock in a mobile game, and most articles skip defining it entirely.
This guide is the definition first. It breaks down the actual criteria, gives you numbers you can use, and a checklist you can run against any asset, whether you made it yourself, bought it from a marketplace, or generated it with AI.
What "Game-Ready" Actually Means in Practice
Let me be straightforward about this: game-ready is a sliding scale, not a pass-or-fail exam.
At its core, a game-ready 3D model needs to render in real-time without looking like a compromise. That means the mesh has to be efficient enough that the GPU can draw it tens or hundreds of times per frame, while still carrying enough visual information to convince the player it's a real object.
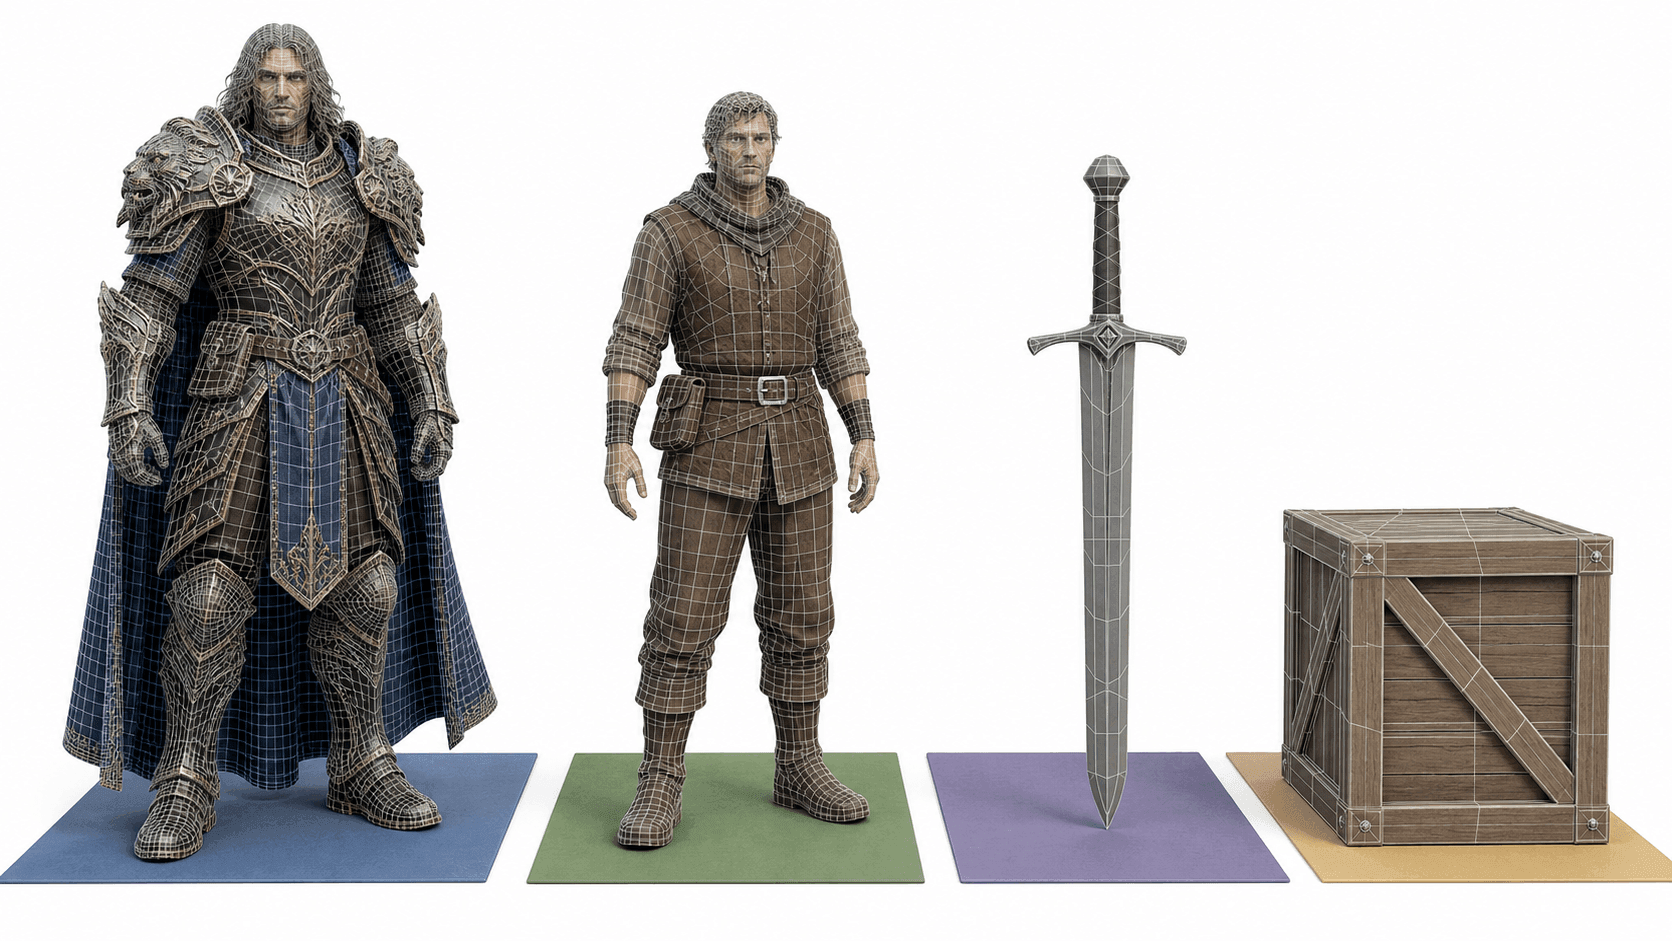
This balance shifts depending on where the model lives in your project. The main character you'll see in every cutscene? That model gets a generous budget. The 200 crates scattered across a warehouse floor? Each one needs to be almost free to render.
I've seen too many beginners assume game-ready means "as few polygons as possible." It doesn't. It means the right number of polygons for the job, arranged in a way the engine can handle efficiently, with textures and materials that look good in your lighting pipeline instead of fighting it.
For developers looking for a more specific breakdown by asset type, I covered some of this territory in my guide on game-ready modular environment assets, where topology requirements differ from characters or hero props.
The 7 Pillars of a Game-Ready 3D Model
When I evaluate an asset now, I run it through these seven categories. If you check all of them, you'll catch 95% of the issues that cause problems in-engine. The Polycount community wiki is also a solid reference if you want deeper dives into engine-specific standards.
Polygon Count: Matching Density to Asset Role
Polycount is usually the first thing people think about, and it's a good starting point, but only when you have a target range based on the asset's role in your game.
Here are the ranges I've found work well across most PC and current-gen console projects:
Asset Role | Triangle Budget | Notes |
Hero character (playable, major NPC) | 15K to 50K | Deformation-quality topology, full subdivision-ready |
Standard NPC / enemy | 5K to 15K | Less geometry in limbs, shared texture sheet possible |
Hero prop (weapon, key item) | 3K to 10K | Needs silhouette quality in close inspection |
Standard prop / pickup | 1K to 3K | Readable silhouette, basic bevels |
Filler / decorative | 500 to 1.5K | Flat shading fine, no unique UV layout needed |

If your game targets mobile or Switch, cut these numbers by 30 to 50 percent. If you're shipping on a single platform with fixed hardware, test your worst-case scene with all assets visible and work backward from 60 FPS.
Most engines display triangle count in the import preview, so there's no guesswork. Check it before you greenlight any purchased asset.
Clean Topology and Edge Flow
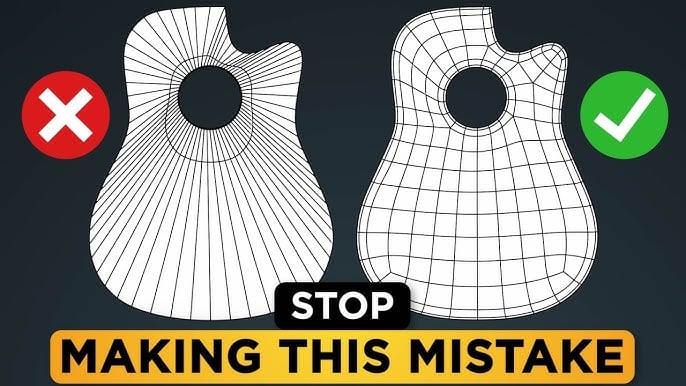
Topology is where I see the most confusion. Here's the short version: game engines don't care if your mesh has quads or triangles. Modern GPUs render tris. Your engine will triangulate quads on import anyway.
What matters is how the geometry flows.

For static props, rocks, crates, furniture, environment pieces, any clean triangulation works. I've imported AI-generated triangle meshes into Unity without any retopology pass, and they render perfectly with the right shading, provided the normals are correct.
For characters and animated assets, you need edge loops around deformation zones, shoulders, elbows, knees, the mouth area if you're doing facial rigging. Without edge loops, the mesh collapses when bones move. This is where AI-generated topology still needs manual work, and where cleaning up AI-generated meshes becomes a necessary step before rigging.
The golden rule: if it deforms, it needs edge loops. If it sits still, any clean topology works.
Proper UV Unwrapping and Texel Density
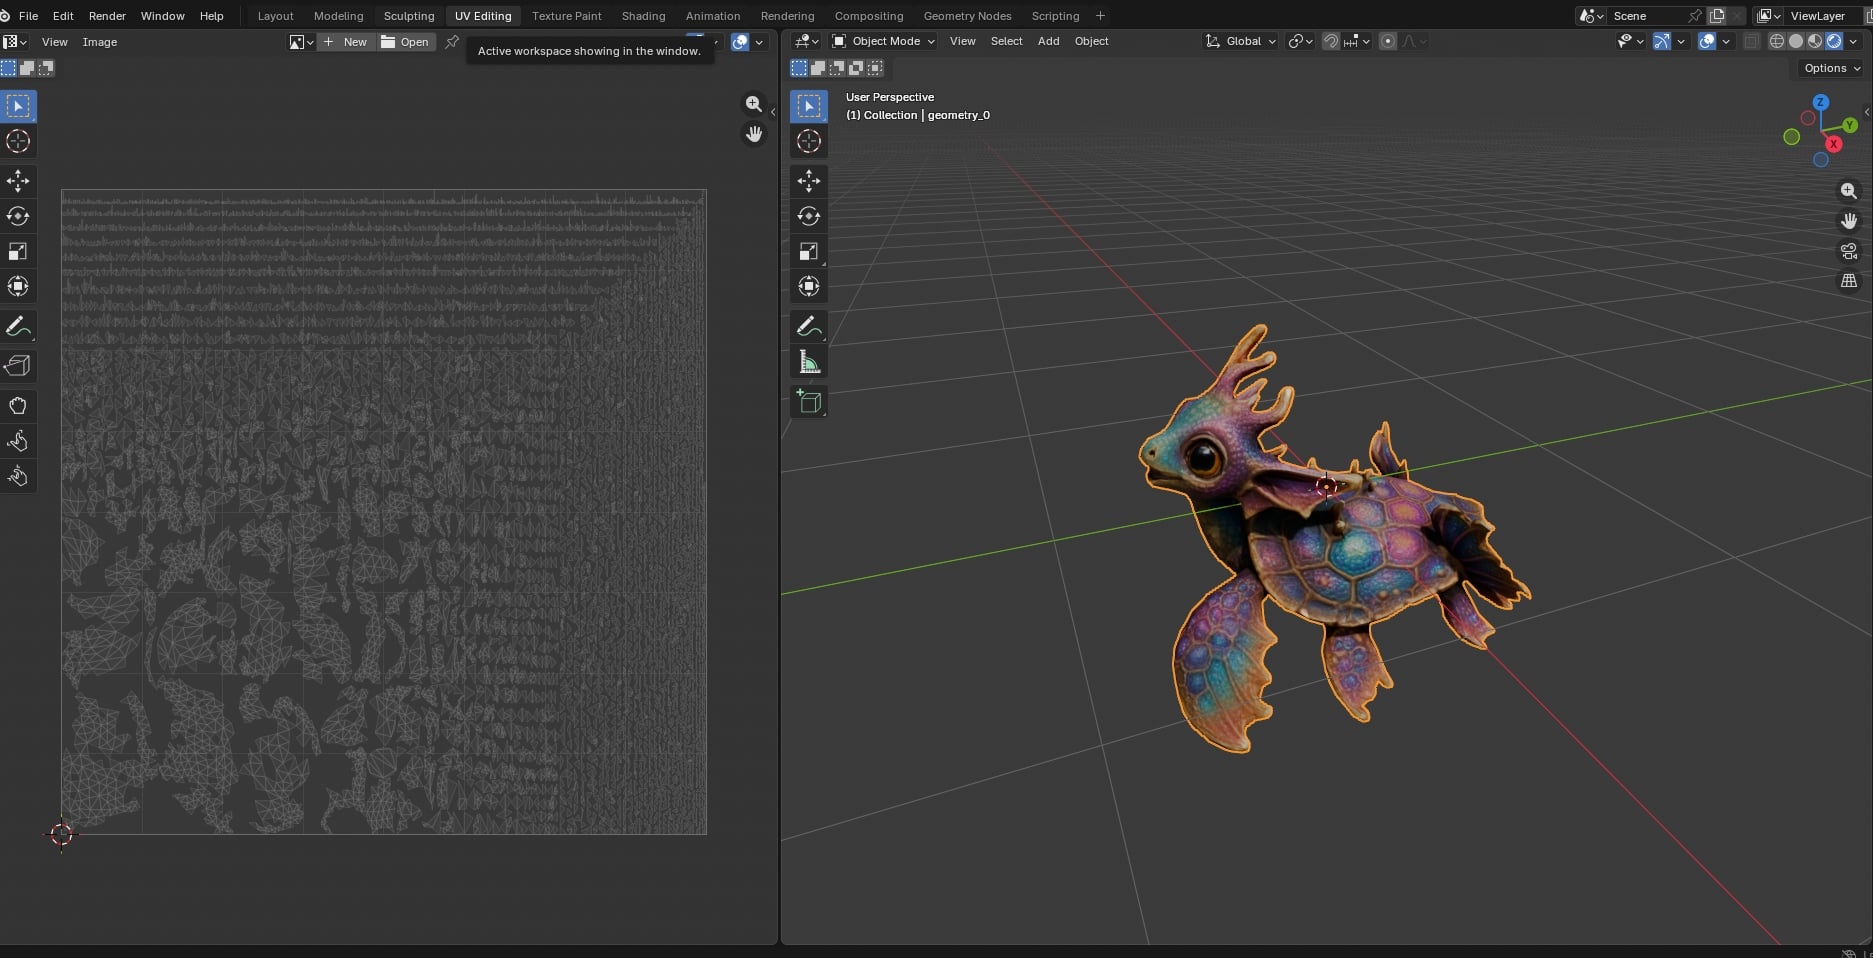
Bad UVs are the most common issue I catch in marketplace assets. The model looks fine in Blender, but after texturing, some parts are muddy, and others are unnecessarily sharp. That's a texel density mismatch.
Good UVs need three things:
- No overlapping islands, unless you specifically want mirrored textures (common for symmetrical organic models)
- Balanced texel density, every visible part of the model should get a similar amount of texture resolution. In Unity and Unreal, you can check this with a checkerboard material
- A minimum of 2 to 4 pixels of padding between islands to prevent mipmap bleeding

If you're baking lighting in Unreal Engine or Unity's progressive lightmapper, you also need a second UV channel (lightmap UV) with a larger padding and no overlapping shells. Many assets fail on this requirement alone.
Resolution guidelines from my experience: 2K for hero props, 1K for standard assets, 512 for anything the player rarely inspects up close. Anything larger than 4K per object is almost never worth it unless it fills the entire screen. For hands-on UV workflow details, Blender's official UV mapping manual covers unwrapping, packing, and texel density checks step by step.
PBR Textures and Material Setup
Standard PBR real-time rendering requires four core maps for most materials:
- Albedo, the base color (sRGB, no lighting baked in)
- Normal, surface detail without geometric cost (linear, tangent space)
- Roughness, how rough or shiny the surface is (linear, single channel)
- Metallic, which areas behave like metal (linear, black or white, no smooth gradients)
Ambient occlusion maps are common as extras, and most engines support them natively. Emissive maps for glowing elements. Opacity masks for cutout effects like foliage or chain-link fences.
Before you import any asset into production, confirm which material pipeline your project uses. Unity's Built-in Render Pipeline, URP, and HDRP all handle PBR slightly differently. Unreal Engine defaults to a single Master Material with different parameter sets. If your asset was set up for the wrong pipeline, you'll spend a whole afternoon fixing material references.
Correct Scale, Orientation, and Pivot
This is a frustrating one because it takes two seconds to fix but beginners miss it constantly.
Scale convention is the biggest trap. In Unreal Engine, 1 unit equals 1 centimeter. In Unity, 1 unit equals 1 meter by convention (though Unity itself is unitless). If you model a character at 1.8 units in Blender, import into Unreal expecting 180 units, you'll get a 1.8 cm character. Blender's default export to FBX multiplies scale by 100 for Unreal, but only if your FBX settings are correct.

Unreal Engine's import pipeline and scale conventions are documented thoroughly, and I recommend reading through the import reference at least once before exporting your first batch.
Pivot placement also matters. Center of mass for props; that way they rotate naturally in your inventory system. Base of the bounding box (or actual feet) for characters, keeps them aligned to the floor without manual Y-adjustment on every placement.
Rigging and Skinning (for Animated Assets)
For animated characters, the skeleton needs to follow a predictable hierarchy: root, pelvis, spine, chest, neck, head, with limbs branching from their parent joints. Weight painting should be smooth across deformation zones, no sharp transitions where skinning pops from one bone to another.
Auto-rigging tools work well for bipedal humanoids these days. For anything non-standard, four-legged, many-jointed, or with unusual proportions, manual rigging still produces better results, even with AI-assisted workflows.
I use a practical test for skinning quality: deform the character into an extreme pose and look for collapsed geometry, candy-wrapper twisting, or spikes. If you see any of those, the weight painting needs a manual pass.
LODs, Collision, and Engine-Specific Requirements
LODs (Level of Detail) reduce triangle count as the model moves further from the camera. For hero assets, I typically generate 3 to 4 LOD levels. For standard props, 2 levels. For filler, none, the performance gain from LODs on 500-tri props is not worth the authoring time.
Collision meshes need their own consideration. Unity's mesh import and optimization documentation covers how to set up convex hull and primitive colliders. Convex hull works for most props, but concave objects (archways, U-shaped furniture) need multiple convex hulls or a mesh collider marked as convex.
Platform-specific features to watch: Unity compresses mesh data by default with optional optimization that can sometimes remove or merge UV channels when you least expect it. Unreal Engine's Nanite handles unlimited geometry for static meshes but doesn't work on anything with vertex animation. If you're building for Nanite, your topology requirements completely change; you can import multi-million tri sculpts directly.
How to Evaluate a Game-Ready 3D Model in 5 Minutes
I use this quick process when I download an asset or generate one:
- Import and check scale, drop a cube scaled to 1 meter next to the asset. Does it match?
- Apply a checkerboard shader, this reveals UV stretching, overlapping islands, and texel density problems in seconds
- Check triangle count, most engine import panels show this immediately
- Inspect normals, flip them to see if any faces are inverted (blue surface view in Unreal, Shaded Wireframe in Unity)
- Test a quick material, assign a default PBR material and look for shading artifacts, edge seams, or material slot issues
If the asset passes all five checks, it's ready for the specific LOD, collision, and rigging setup your project needs. If it fails any one, fix that issue before moving the asset into your production folder. For a broader perspective on asset formats, this 3D file format comparison for game assets covers how different exports handle normals, UVs, and compression.
How AI Is Changing the Game-Ready Standard
For the past decade, going from a sculpted high-poly model to a game-ready asset required a rigid pipeline: create high-poly sculpt, retopologize into a low-poly mesh, unwrap UVs, bake normal maps, assign materials, test in-engine. Each step took hours, and retopology alone could eat a full day for a complex character.
AI-assisted 3D generation tools like Triverse AI are compressing this pipeline, particularly for the parts that used to take the longest.
HD Mesh vs. Artist Mesh: Knowing Which Mode to Use
This is the distinction I wish someone had explained to me earlier. Triverse AI has two output modes, and they serve different purposes.
- HD Mesh outputs a high-poly sculpted mesh. It looks impressive, but it's not game-ready by default. You may still need to run a Remesh pass in Blender or another tool to get polygon counts under control, and that Remesh pass can strip fine detail and introduce its own artifacts. If you're working from HD Mesh, add roughly 30 to 60 minutes of cleanup time before the mesh is usable in-engine.
- Artist Mesh (the mode Triverse AI uses for this workflow) outputs clean triangle topology directly from an image input. There is no separate Remesh step. The geometry that comes out is already in the polygon range appropriate for a static game prop. In my own testing: a simple modular wall section came out at roughly 1,193 triangles, a stair piece at around 4,375 triangles. Both were importable into Unity and Unreal without any topology cleanup. For game environment work, Artist Mesh is the mode that eliminates the retopology bottleneck.
The Triverse AI's Artist Mesh Workflow, Step by Step
Here is the workflow I've settled on for static environment props:
- Prepare your reference image. A clean front-view PNG works best. Avoid heavy shadows or cluttered backgrounds, they confuse the AI. A clean line drawing or a well-lit product photo both work.
- Go to Triverse AI Studio and select Artist Mesh mode. Do not use HD Mesh for environment props. The mode toggle is on the generation page.
- Choose your density preset. I start with Low for almost everything. If the output looks too coarse for a hero prop, I regenerate at Medium. I rarely need High. All three presets cost the same in credits, so there is no penalty for testing multiple density levels.
- Download and import into your engine. Triverse exports in GLB, OBJ, STL, 3MF, FBX, and USDZ. GLB is the most engine-portable format for most real-time workflows.
- Run the 5-minute evaluation check from the previous section. Confirm scale, check triangle count against your budget, assign a PBR material, and look for shading artifacts.
That is the full pipeline. No Remesh. No manual retopology for standard props.
What AI still struggles with: complex deformation zones that need custom edge loops, beveled hard-surface detail with intentional chamfer patterns, and trim sheet integration that requires manual UV layout. For hero characters and complex weapons, you still want a manual topology pass. But for the filler props, environment pieces, and modular kit components that make up the majority of a game's geometry budget, AI-generated meshes are crossing the game-ready threshold.
This shifts the developer's job from "make every mesh from scratch" to "evaluate and refine." The bottleneck moves from modeling speed to quality control, which is exactly why having a clear game-ready framework matters more than ever.
Game-Ready Checklist (Quick Reference)
Requirement | Hero Characters | NPCs | Hero Props | Filler Assets |
Polycount Target | 15K to 50K tris | 5K to 15K tris | 3K to 10K tris | 500 to 1.5K tris |
Topology | Quad-dominant, edge loops around joints | Quad-dominant, deformation loops | Clean tris acceptable | Any clean mesh |
UV Unwrap | Non-overlapping, balanced texel density, separate lightmap channel | Same as hero | Non-overlapping, reasonable padding | Smart UV Project OK |
Texture Resolution | 2K to 4K | 1K to 2K | 1K to 2K | 512 to 1K |
PBR Maps | Full set (albedo, normal, roughness, metallic, AO) | Full set | Albedo + normal minimum | Albedo + normal |
LOD Count | 3 to 4 levels | 2 to 3 levels | 2 levels | Not needed |
Rigging (if animated) | Full skeleton, smooth skinning | Full skeleton, smooth enough for combat | Not applicable | Not applicable |
Frequently Asked Questions about Game-Ready 3D Model Generation
What is a game-ready 3D model?
A game-ready 3D model is optimized for real-time rendering in a game engine. This means appropriate triangle density for its role, clean topology that doesn't create shading artifacts, properly-arranged UVs, PBR-compatible textures, correct scale and pivot placement, and engine-specific settings like LODs and collision meshes where needed. It's not a fixed specification, it changes based on asset type and target platform.
What polygon count should a game-ready model have?
It depends on the asset's role. Hero characters in a PC or console game typically run 15K to 50K triangles. Standard NPCs fall between 5K and 15K. Environment props range from 500 to 3K. Mobile-targeting projects should aim for roughly half of these numbers. The best approach is to benchmark your worst-case level with all assets visible and work backward from 60 FPS.
Can AI-generated 3D models be game-ready?
Yes, but with caveats. AI tools that produce clean triangle topology, like Triverse's Artist Mesh mode, can output meshes that are immediately usable in-engine as static props and environment pieces. For characters and assets that need deformation, AI-generated topology generally lacks the edge loops required for clean animation, so a manual retopology pass or additional cleanup is still needed.
What's the difference between game-ready and 3D printing topology?
Game-ready topology prioritizes real-time rendering efficiency, lower triangle counts, proper UVs for texture mapping, and PBR material compatibility. 3D printing topology prioritizes watertight closed volumes with no inverted normals, manifold geometry, and no concern for polygon count. A mesh that prints perfectly might have terrible topology for real-time rendering, and vice versa.
How do I check if a 3D model is game-ready in Unity?
Import the FBX, apply a default material, and check three things in the Inspector: triangle count (lower-left corner), scale (compare to a 1m cube primitive), and shading (orbit the camera and look for faceting or artifacts). Then apply a checkerboard shader from the debug menu to check UVs. If everything looks solid, it passes the basic check.
Do game-ready models need LODs?
For hero assets and large props that the player sees up close, yes, 2 to 4 LOD levels depending on the asset's maximum screen coverage. For filler assets under 1,000 triangles, LODs usually aren't worth the effort. Unreal Engine's Nanite renders unlimited geometry with automatic LOD generation, so if your project uses Nanite, manual LOD authoring is not needed for static meshes.
What texture resolution is game-ready?
2K textures are the standard for hero props and characters. 1K works well for medium-sized assets. 512 is fine for small filler objects and decals. Anything above 4K per individual object is rarely worth it outside of marketing screenshots, and it will cost significant video memory if you have many such objects in one scene.
How do I make an AI-generated model game-ready?
Start with the 5-minute evaluation from the checklist above. Check triangle count against your asset role budget, verify scale against a 1-meter cube, and assign a PBR material to look for shading artifacts. If you're using Triverse AI, skip the HD Mesh mode for static props, use Artist Mesh mode instead. Pick the Low density preset as your starting point, only move up to Medium or High if the output looks too coarse for a hero prop. Download in GLB format for maximum engine compatibility. For animated characters, AI topology generally lacks the edge loops needed for clean deformation, so budget in a manual retopology pass.
Bottom Line
Game-ready isn't a badge you earn once. It's a set of context-dependent decisions you make for every asset based on its role in your game. A rock needs less budget than a dragon. A filler prop doesn't need a unique UV layout. An NPC only needs as many vertices as it takes to sell the shape from gameplay distance.
The more you internalize this framework, the faster you'll evaluate assets. You'll stop spending time polishing things that nobody will notice, and you'll catch the issues that actually break a build: wrong scale, missing UV channels, invisible collisions.
For rapid prototyping and base mesh generation, Triverse AI's Artist Mesh mode has become my default starting point for static environment props. Upload a reference image, pick a density preset, export in GLB, run the 5-minute evaluation, and the mesh is in my engine. No Remesh pass. No retopology for standard pieces. That pipeline shift is real, and it means the difference between spending a day on ten props and spending an afternoon.
Start with the checklist. Evaluate one asset. You'll see exactly where the gaps are in your current workflow.