How to Make a 3D Plant Cell Model: Step-by-Step Guide for School Projects
Build a 3D plant cell model for school using clay, edible materials, or AI-generated digital tools. Includes major organelles, a free materials list, and step-by-step instructions for different methods.
Your kid just came home with the assignment. Build a 3D model of a plant cell. Due in two weeks. And you suddenly realize you haven't touched modeling clay since elementary school.
Do not panic. Building a plant cell model is one of those school projects where there is no single right way to do it. The method you pick depends on how much time you have, what materials you already have at home, and whether this needs to survive a science fair or just get a passing grade.
This guide covers five different plant cell model generation methods, ranked by effort and visual impact. Each method includes a complete organelle assignment list so you know exactly which parts to include and where they go.
What Organelles Go in a 3D Plant Cell Model?
Before picking a method, here is a quick refresher on what goes inside a plant cell and how each organelle should look in a 3D model:
- Cell wall: The outer rigid layer. In a model, this is the outermost shell or border. Square or rectangular.
- Cell membrane: A thin layer just inside the cell wall. Often represented as a separate colored lining.
- Nucleus: The largest organelle, usually round and centrally located. Make it stand out.
- Nucleolus: A small dark spot inside the nucleus where ribosomes are made.
- Chloroplasts: Oval or bean-shaped with internal green color. You need four to six of these scattered around.
- Vacuole: A large central cavity. In plant cells, the vacuole takes up most of the interior space.
- Mitochondria: Small bean shapes, two to four of them, often red or orange.
- Golgi apparatus: Stacked flat discs, like a stack of pancakes.
- Endoplasmic reticulum (ER): Wavy tube-like structures near the nucleus. Rough ER has dots (ribosomes) on it.
- Ribosomes: Tiny dots scattered on the ER and in the cytoplasm.
Here is a quick reference for what colors work well and what household items you can use for each part:
Organelle | Key Function | Recommended Color | What You Can Use |
|---|---|---|---|
Cell wall | Provides structural support and shape | Green or brown | Cardboard, foam board, clay |
Cell membrane | Controls what enters and exits the cell | Yellow or transparent | Plastic sheet, thin clay layer |
Nucleus | Contains DNA and controls cell activities | Purple | Clay ball, foam ball, bead, grape |
Nucleolus | Produces ribosome components inside the nucleus | Dark purple | Small clay piece, bead, peppercorn |
Chloroplasts | Carry out photosynthesis to make food | Green | Green clay, jelly beans, beads |
Large central vacuole | Stores water, nutrients, and waste | Blue or transparent | Gel, jelly, clear container, plastic cup |
Mitochondria | Produces energy for the cell | Orange or red | Clay pieces, kidney beans, candy |
Golgi apparatus | Packages and ships proteins out of the cell | Pink | Clay ribbons, stacked paper strips |
Endoplasmic reticulum | Synthesizes and transports proteins (rough ER) and lipids (smooth ER) | White or light blue | Clay strips, string, pipe cleaners |
Ribosomes | Build proteins from amino acids | Small dots | Sprinkles, beads, small balls |
For a standard middle school plant cell model, your rubric usually checks for completeness more than precise shape. (Source: Khan Academy on Eukaryotic cells)
Method 1: The Edible 3D Plant Cell Model
Estimated effort: Medium
Time: 2-3 hours
Cost: $15-25
The edible model is always a crowd-pleaser because you get to eat it after the presentation.
Step 1: Bake or buy a rectangular sheet cake
This serves as your cell wall base. A half-sheet cake gives enough surface area to fit all organelles without crowding. Let it cool completely before decorating.
Step 2: Frost the entire surface
Use green-tinted icing for the base layer (cell wall reference). Then add a separate yellow or clear gel layer to represent the cell membrane just inside the wall.
Step 3: Place organelles from largest to smallest
Start with the vacuole in the center, since it takes up the most space. Use a halved gummy fruit slice or a large jelly-filled donut hole. Arrange the nucleus nearby with a large circular lollipop or a frosted cookie.
Step 4: Add the remaining organelles around the edges
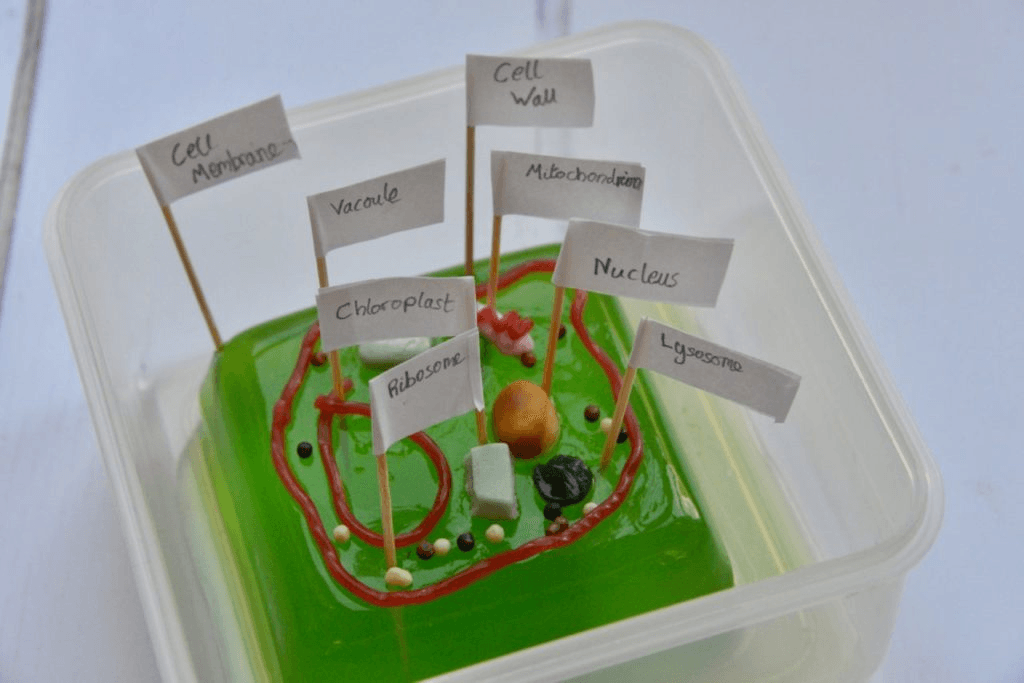
Green jelly beans work for chloroplasts (use four to six). Red licorice bits for mitochondria. Stacked wafer cookies for the Golgi apparatus. Pull-apart Twizzlers for the endoplasmic reticulum. Sprinkle small candy beads for ribosomes.
Step 5: Insert toothpick labels with organelle names
Write each name on a small paper flag and tape it to a toothpick. Stick them next to the corresponding candy.
The advantage is visual impact. Kids remember the organelle names because they associate each one with a candy. The downside is that edible models do not last more than a day, so present it early in the grading period.
Candy-to-Organelle Matching Guide
Food Item | Represents |
Grape or round candy | Nucleus |
Green candy | Chloroplast |
Jelly pieces | Mitochondria |
Sprinkles | Ribosomes |
Clear gelatin | Large vacuole |
Frosting | Cytoplasm |
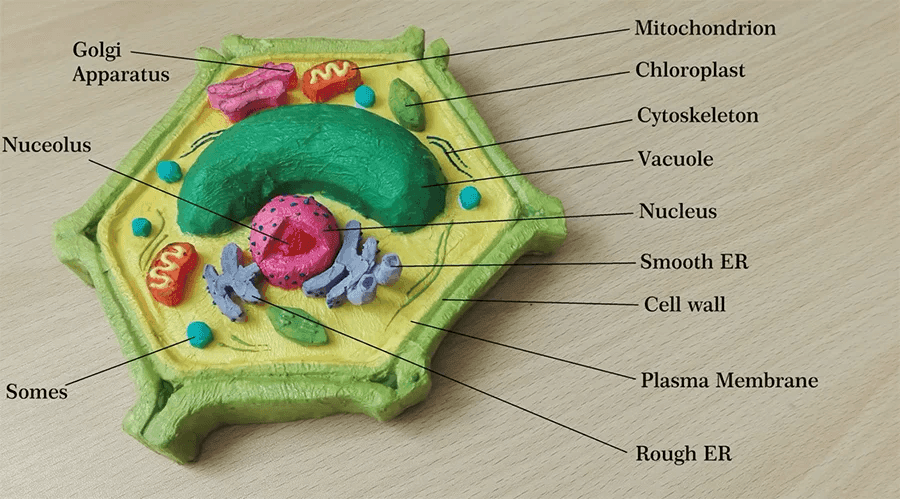
Method 2: Clay and Styrofoam 3D Plant Cell Model
Estimated effort: Medium-High
Time: 3-4 hours
Cost: $20-30
This is the classic approach. You need a styrofoam block or a cut section of a rectangular block as the cell body, and modeling clay in different colors for the organelles.
Step 1: Create the Cell Shape
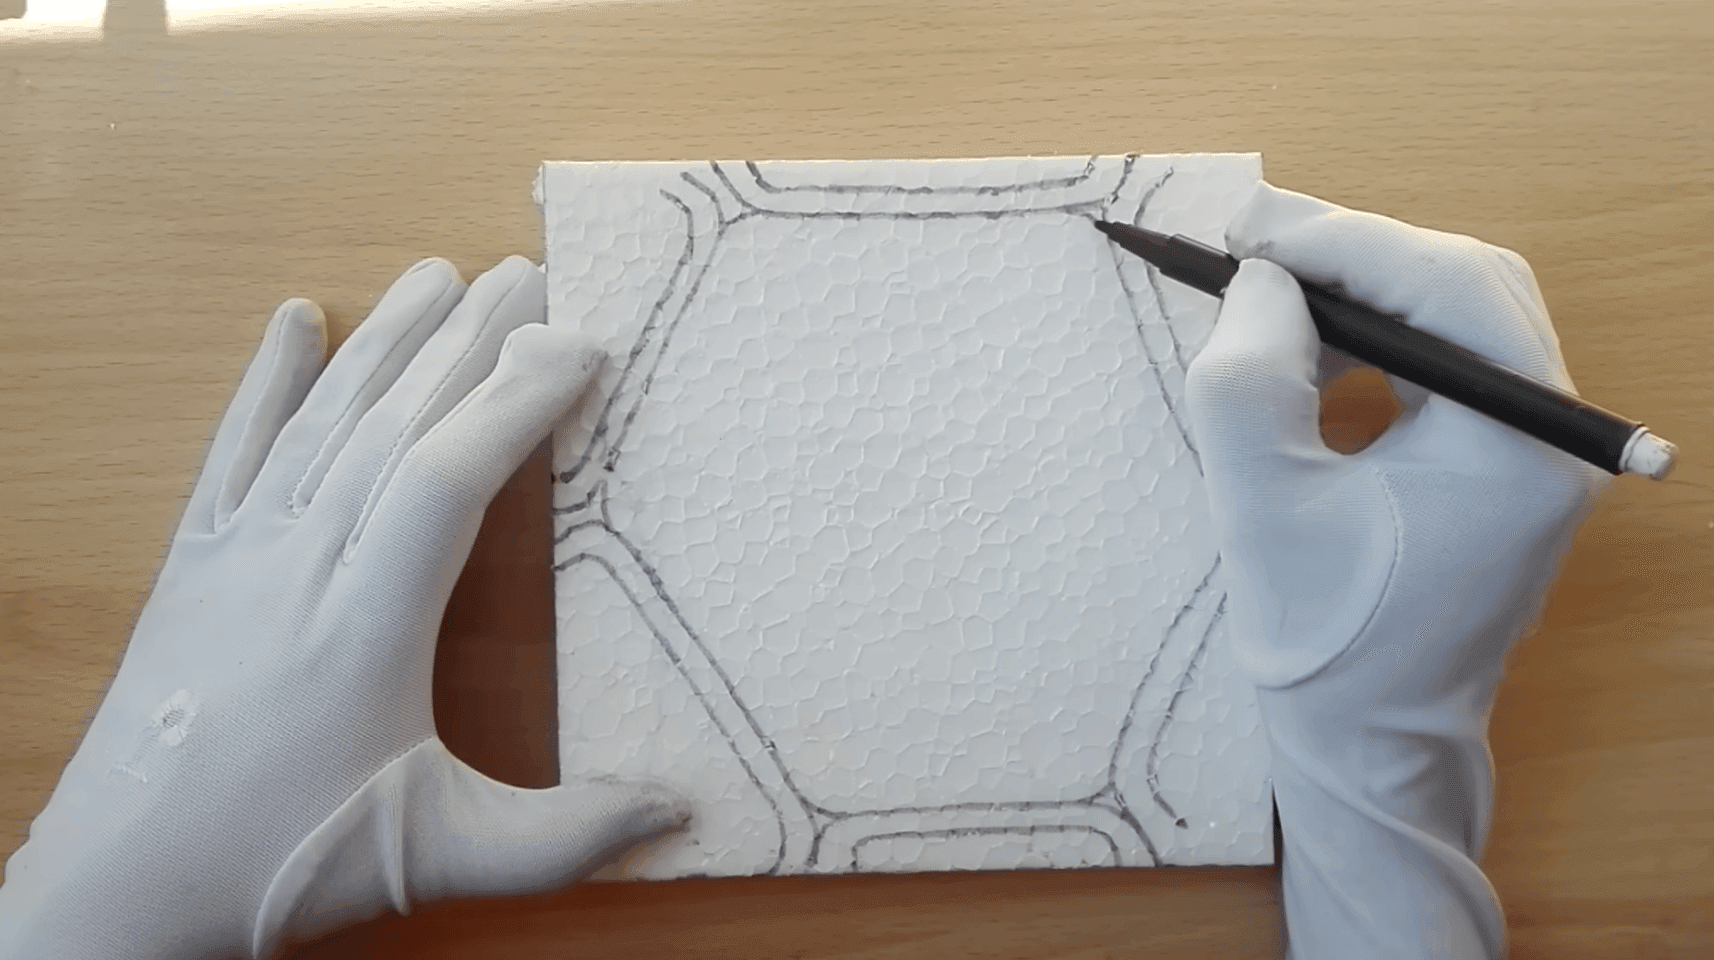
Start with a rectangular container or cardboard base.
This represents the plant cell wall and creates the overall structure of the model. Keep the outer layer thicker than the inside layers to show that the cell wall provides support.
Step 2: Add the Cell Membrane
Place a thinner layer inside the cell wall. The cell membrane should be visible but smaller than the outer cell wall because it sits directly inside the wall.
Step 3: Add the Cytoplasm
Fill the inside area with clay or another soft material. The cytoplasm represents the material that surrounds and supports the organelles inside the cell.
Step 4: Create the Nucleus and Nucleolus
Make a circle for the nucleus. Add a piece inside it for the nucleolus. In grown-up plant cells, there is a huge space called the central vacuole. This big vacuole pushes the nucleus towards the edge of the cell.
Step 5: Add the Chloroplasts
Create several small green oval shapes and place them around the cell.
Chloroplasts are important in plant cells because they contain chlorophyll and help the plant produce energy through photosynthesis.
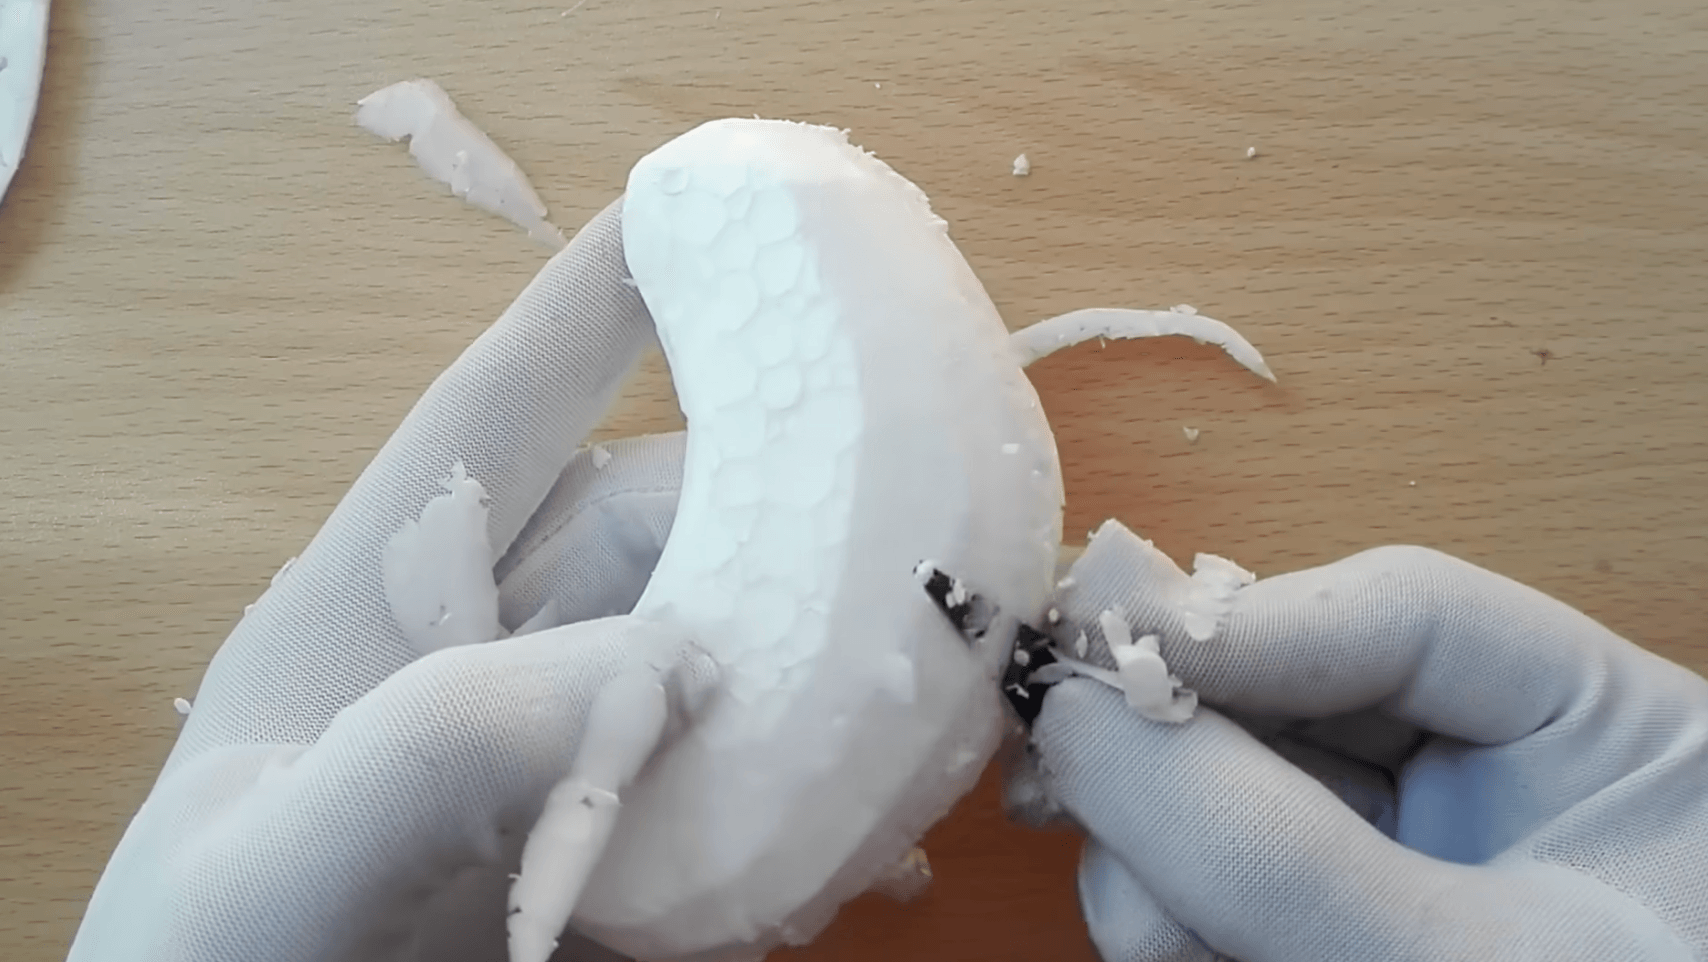
Step 6: Add the Large Central Vacuole
Create a large transparent, blue, or lightly colored section in the center.
The vacuole should be one of the largest structures in the model because it occupies a significant amount of space in many plant cells.
Step 7: Add Smaller Organelles
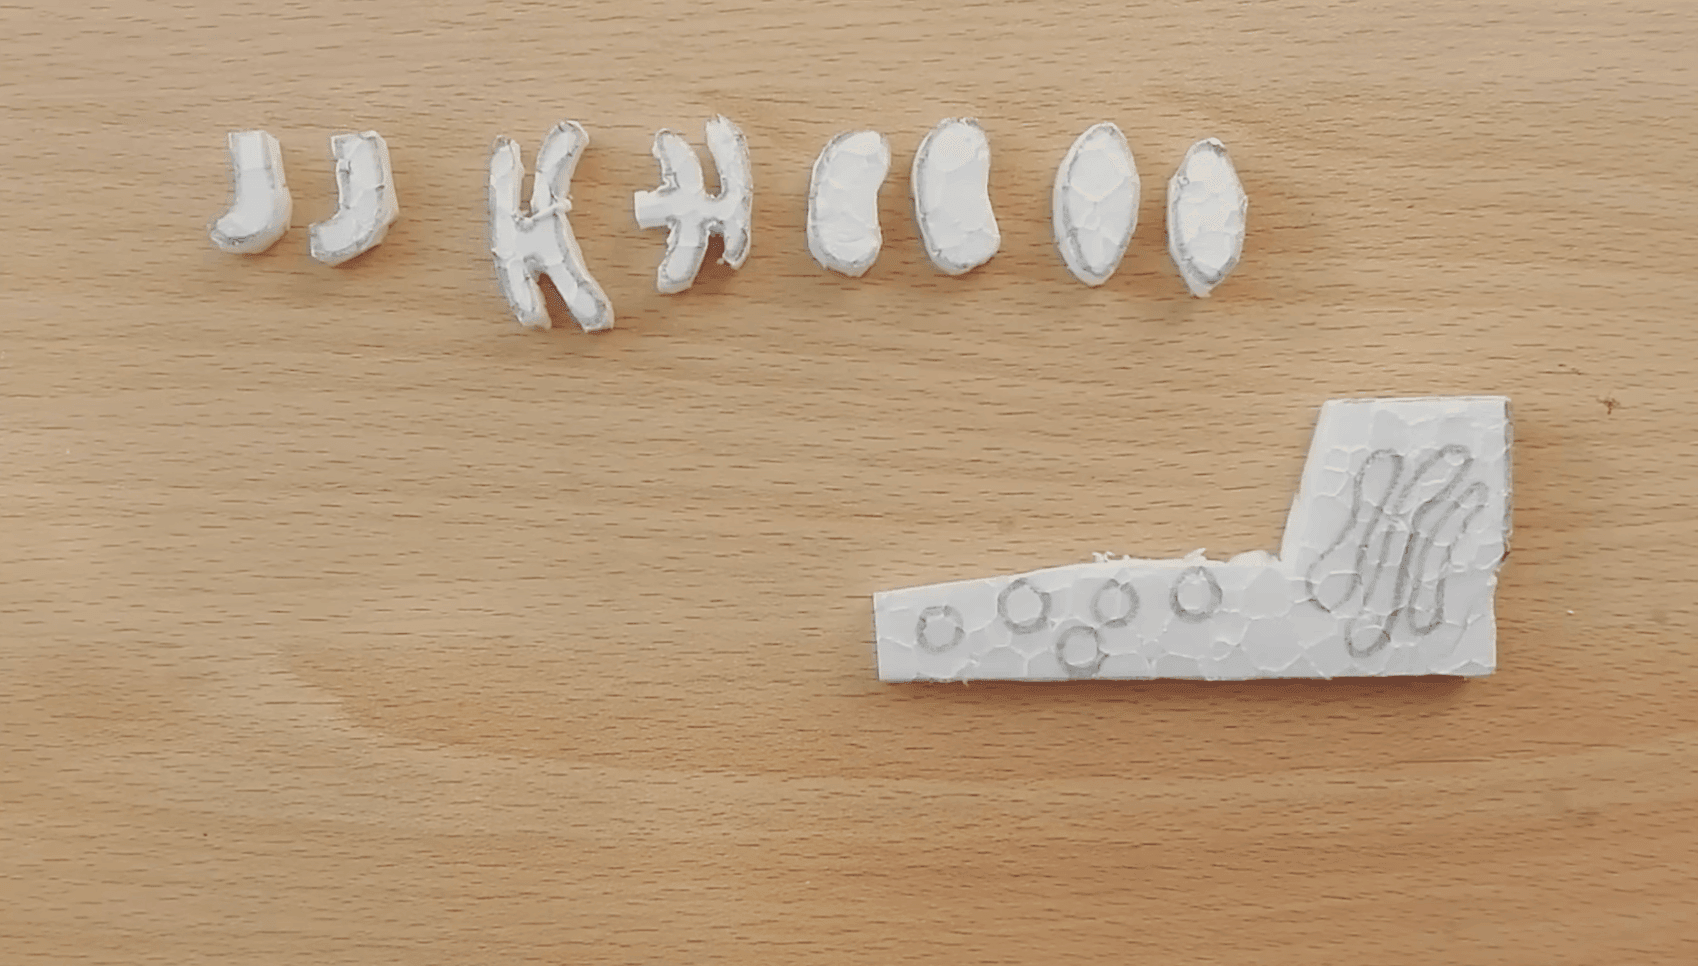
Add smaller pieces to represent:
- Mitochondria
- Endoplasmic reticulum
- Golgi apparatus
- Ribosomes
Arrange them in a way that is scientifically reasonable while keeping the model easy to explain.
Step 8: Label Your Model
Attach labels using toothpicks or small paper cards.
Make sure the labels are readable, do not overlap, and correctly match each organelle.
Source: Screenshot from YouTube video https://www.youtube.com/watch?v=ctuy3x1LqW8
How to Label Your Organelles Professionally
A clean labeling system can make your project look much more organized. Use consistent labels, readable text, and a simple color legend to make your model easier to understand during presentation.
Method 3: Cardboard and Recyclables 3D Plant Cell Model
Estimated effort: Low
Time: 1-2 hours
Cost: $0-5
This is the budget-friendly option. All materials come from things you probably have at home.
Step 1: Build the Cell Frame
Use a cardboard box, about ten by eight by four inches, as the cell wall. Turn it on its side so the open face shows the cell interior. Paint it or cover it with green construction paper.
Step 2: Gather Recycled Items for Organelles
Raid the recycling bin and kitchen for materials that match your color plan:
- A jar lid for the nucleus, painted purple
- Bottle caps painted green for chloroplasts
- A plastic cup cut in half for the vacuole
- Small screws or buttons for mitochondria
- Corrugated cardboard strips stacked for the Golgi apparatus
- Twisted pipe cleaners for the endoplasmic reticulum
Step 3: Attach and Label
Glue each item in its correct position. Label with sticky notes or tape flags. Write the organelle names clearly so they are readable from two feet away.
The cardboard model will not win a beauty contest, but it hits all the rubric requirements at essentially zero cost. It is also the easiest to transport to school.
Method 4: The 3D Printed Plant Cell Model
Estimated effort: Medium
Time: 2-4 hours print time plus one hour assembly
Cost: $3-8 in filament plus electricity
If you have access to a 3D printer at school, library, or makerspace, this method produces the cleanest result.
Step 1: Find a Plant Cell STL File
Several free plant cell STL files are available on Printables and MakerWorld. Search for "plant cell model STL" and you will find multi-part designs where each organelle prints separately and snaps into a base tray. Key sources:
- Printables has a plant cell cross-section by several creators. Look for one with at least eight separate organelle files.
- MakerWorld has multi-color 3MF files optimized for AMS systems.
- Thingiverse has older models, but check the reviews for fitting issues.
Step 2: Slice and Print
Print at 0.2mm layer height with 15 percent infill. Use different filament colors if available, or stick with white and paint afterward.
Step 3: Assemble and Paint
Snap each organelle into its labeled slot in the base tray. If you printed in one color, paint the organelles with acrylic paints for more accurate colors.
The standard approach is a cross-section model. The cell wall prints as a rectangular perimeter, and each organelle is a separate STL file that fits into labeled slots.
Method 5: Digital Plant Cell Model with Tinkercad
Estimated effort: Low-Medium
Time: 1-2 hours
Cost: Free
For students who are comfortable with a computer or want an excuse to learn 3D design, Tinkercad lets you build a plant cell model entirely in the browser. It runs on any device and has built-in shape tools.
Step 1: Create the Cell Wall
Make a box shape sized to 100 by 80 by 50 millimeters. Hollow out the interior with a hole shape, leaving about a 5mm wall thickness.
Step 2: Build the Organelles
Use spheres, ovals, and custom grouped shapes for each part:
- A sphere for the nucleus, 15mm diameter
- Scaled spheres squished for chloroplasts
- A large squished box for the vacuole
- Stacked thin boxes for Golgi
- Tube shapes twisted for ER
Step 3: Arrange and Export
Position each organelle inside the hollow cell wall. Use Tinkercad's color tool to match the recommended colors. Export the model as STL or OBJ for later 3D printing, or keep it as a digital file.
The advantage of a digital model is that you can rotate it, label it in 3D, and export it for 3D printing later if you want. Tinkercad also lets you create cross-section views that show organelle placement more clearly than a solid model.
How to Generate Customized Digital 3D Plant Cell Models
Traditional handmade models are definitely helpful for learning about plant cells, but they come with some frustrating limitations. For one thing, it’s tough to clearly show exactly where all the different organelles sit in relation to each other. Plus, a clay or cardboard model only lets you see one side at a time. You can’t rotate it or peek at the back without physically picking it up and turning it around.
That’s why a digital 3D model makes such a big difference. You can spin it around on screen and examine every angle, which really helps you understand the cell’s structure.
Using an AI-assisted 3D workflow is a great way to create a model that’s actually useful for learning. The finished digital version works well on a computer, and you can also prepare it for 3D printing so students can hold a physical copy in their hands and get a real sense of how all the organelles fit together.
Why a 3D-Printed Cell Model Stands Out in Class
Bringing a 3D-printed plant cell to class really helps your biology project stand out. You’re not stuck explaining from a flat picture or a model you can only show from one side. Instead, you can pick it up, rotate it, point out the different parts, and actually show how the organelles all work together inside the cell.
Another nice thing is that you can save the file and make changes to it later for other projects. Just keep in mind that getting from a digital design to a good print isn’t always easy. You need to double-check the size, make sure the mesh doesn’t have any problems, and confirm everything will print properly on your printer.
Generate a Plant Cell 3D Model with Triverse AI
Triverse AI can help turn a plant cell reference image into a 3D educational model. The workflow starts with preparing a clear reference, generating the model, and refining the result before exporting it for further editing or 3D printing.
Step 1: Prepare Your Reference
Start with a clear plant cell diagram or reference image. Images with simple backgrounds, visible structures, and clear boundaries between different parts usually work better for AI generation.
For a plant cell project, include important details such as the rectangular cell shape, visible cell wall, large central vacuole, chloroplasts, and overall organelle arrangement.
Step 2: Upload and Generate Your Model
Upload your reference image to Triverse AI and generate the 3D model. Before generation, review the available settings and adjust options such as model quality, texture settings, or polygon detail based on your project needs.
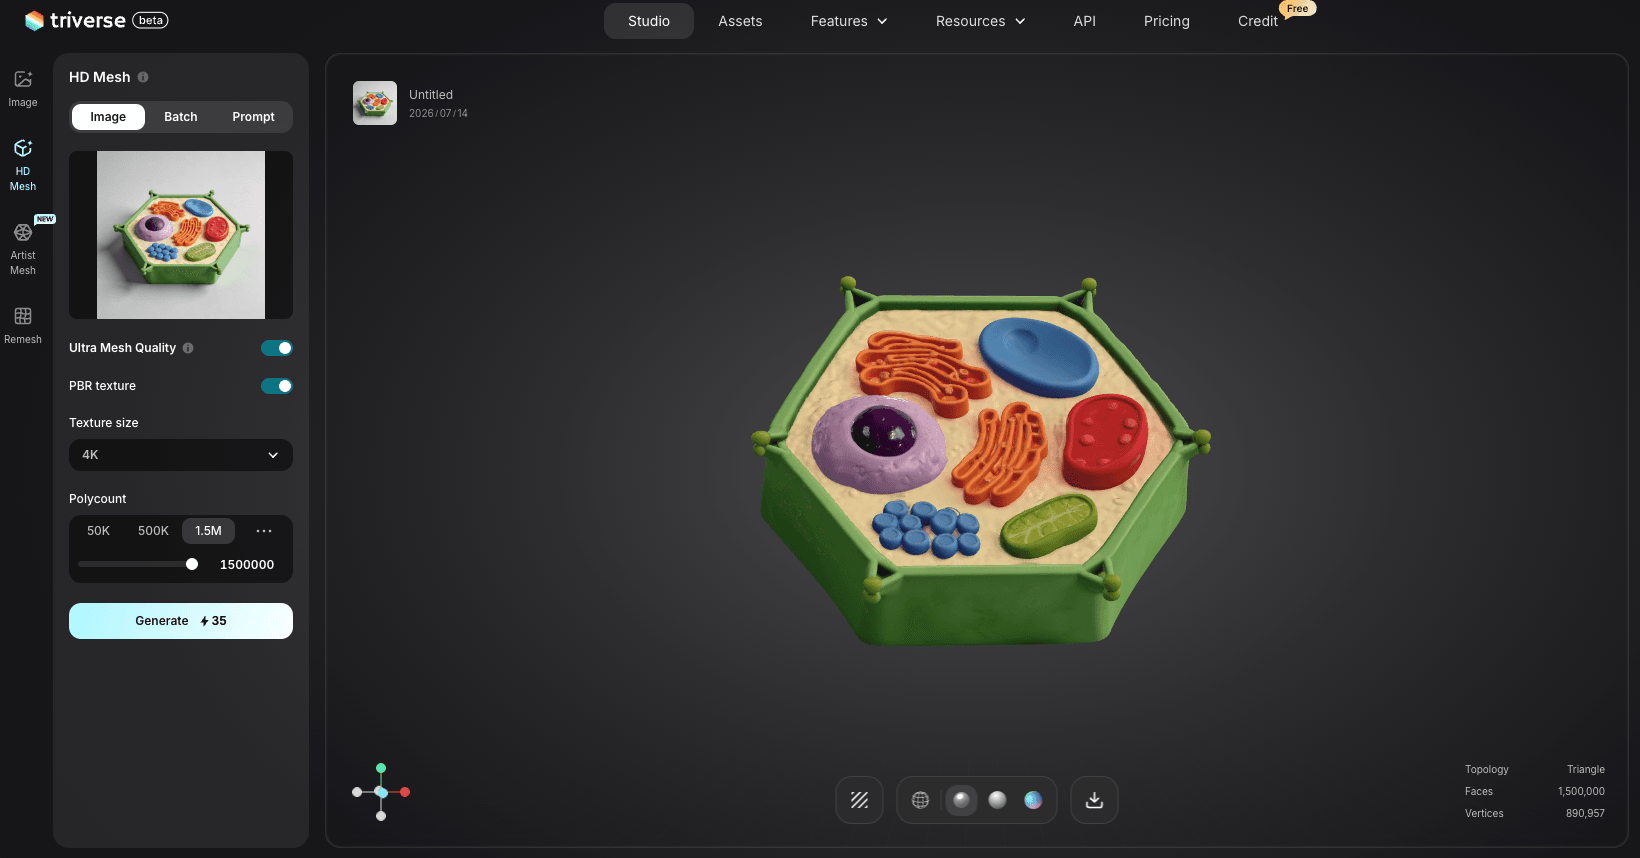
The goal is not to create a perfect scientific simulation, but to create a clear educational model that can be refined for classroom presentation or 3D printing.
Step 3: Review and Adjust the Model
Before printing, check whether the organelles are easy to recognize, whether small or fragile parts need adjustment, and whether the overall size is suitable for your printer. Checking factors such as model scale, durability, and wall thickness can help prevent printing issues, especially for detailed educational models. Some designs may also require additional support structures depending on their shape.
Step 4: Export and Print
After preparing the model, export it for further editing or printing. Depending on what kind of printer and materials you have, you might also need to pick between different printing methods like FDM and resin 3D printing. Triverse AI supports common file formats such as GLB, OBJ, STL, 3MF, FBX, and USDZ, so it’s easy to keep working on the model in Blender or get it ready straight for printing.
For school projects, PLA is usually a really practical choice. It’s cheap, straightforward to print with, and easy to find just about anywhere.
How to Label Your 3D-Printed Plant Cell Model
A printed model can be labeled using printed name tags, color-coded parts, small markers, or engraved labels. Another option is printing separate organelle pieces and assembling them afterward, which can make each structure easier to identify during a presentation.
Plant Cell vs Animal Cell: What to Do Differently for Your 3D Model
Plant and animal cells share many structures, but several key differences affect how you should build your model:
- Cell wall: Plant cells have one; animal cells do not. Your model needs a rectangular outer border.
- Chloroplasts: Present in plant cells only. Add green oval shapes if you are modeling a plant cell.
- Vacuole: Plant cells have one large central vacuole that takes up most of the interior. Animal cells have smaller, scattered vacuoles.
- Shape: Plant cells are rectangular. Animal cells are round or irregular, which is harder to build with clay or cardboard.
If your assignment is specifically for a plant cell model, make sure the rectangle shape is obvious. Many students accidentally build an animal cell and call it a plant cell, which loses points on accuracy.
How to Choose the Right Method for Your 3D Plant Cell Model
The table below compares each approach across the dimensions that matter most for a school project:
Method | Time | Cost | Visual Impact | Durability |
|---|---|---|---|---|
Edible model | 2-3h | $15-25 | High | Low (1 day) |
Clay and styrofoam | 3-4h | $20-30 | Medium | High |
Cardboard and recyclables | 1-2h | $0-5 | Low | Medium |
3D printed model | 2-4h | $3-8 | High | Very high |
Tinkercad digital model | 1-2h | Free | Medium | Digital only |
Triverse AI plus 3D print | 5-10 min design plus 2-4h print | Free to design, $3-8 to print | High | Very high |
If you have three days or less and no budget, go with cardboard. If you have a week and want something impressive, 3D print or use clay. If this is for a science fair with judges, generate a custom model through Triverse AI and print it, then use Tinkercad for a supplementary digital view.
Plant Cell Model Grading Checklist
Before submitting your project, review your model using the same areas teachers usually focus on.
Category | What to Check |
Scientific Accuracy | Make sure the model has the correct plant cell shape, major organelles, and important structures such as the cell wall, chloroplasts, and large central vacuole. |
Labeling | Check that every label matches the correct organelle and that the names are easy to read during a presentation. |
Completeness | Include the structures required by your class and make sure important organelles are not missing. |
Presentation Quality | Keep the model clean, organized, and easy to explain. A clear design is usually more effective than adding too many decorative details. |
A successful plant cell model is not only about making something colorful. The best projects combine accurate biology, clear explanations, and a design that helps others understand how the cell works.
Conclusion
A good 3D plant cell model doesn’t need fancy materials or special skills at all. You can make solid classroom projects with clay, edible stuff, or even a decorated shoebox as long as the organelles are accurate and clearly labeled.
For students who want something more detailed and reusable, digital 3D workflows offer a nice alternative. AI tools can quickly generate a starting model that you can tweak, print out, and use for more than just one presentation.
At the end of the day, what matters most in any plant cell project isn’t how flashy it looks. It’s whether it actually helps people understand how all the organelles work together inside the cell.