PNG to OBJ Guide: How to Convert Your 2D Images into 3D Models
Learn how to convert 2D PNG images to high-quality 3D OBJ models with traditional methods and AI conversion. Learn format differences, image prep tips, and more.
June 4, 2026
You spend three hours in Blender pushing a logo PNG through a Displace modifier, and what you get is a flat relief that only looks right from the front. That is the problem with most PNG-to-OBJ workflows: they extrude; they do not reconstruct. This guide covers what actually works for converting PNG to OBJ in 2026, from Blender heightmap methods to AI-driven 3D reconstruction that generates real geometry you can rotate, print, or drop into a game engine.
What Is PNG to OBJ Conversion and Why OBJ Format Matters
Definition of PNG to OBJ Conversion
PNG to OBJ conversion turns a flat 2D image into a three-dimensional mesh in the Wavefront OBJ format. The process can involve simple heightmap extrusion, manual modeling from a reference image, or AI-based 3D reconstruction that infers depth and structure from a single photo.
The key distinction: extrusion pushes pixels upward based on brightness. Reconstruction builds an actual 3D form, including surfaces you cannot see in the original image.
Why OBJ Format Matters
OBJ is one of the most portable 3D file formats. Its plain-text structure is easy to inspect and debug. OBJ files pair with MTL sidecar files to carry material and texture references, keeping geometry and surface data organized in a single package that works across Blender, Unity, Unreal Engine, and most 3D printing slicers.
Common Use Cases
- Blender sculpting and mesh editing workflows
- Unity and Unreal Engine asset creation
- 3D printing prototypes and decorative models
- Product visualization and concept art
- Animation and motion graphics pipelines
How to Prepare Your PNG Before Conversion
Input quality directly affects mesh output. Before converting:
- Use high-resolution PNG images (1024×1024 minimum; 1024–2048px balances speed and detail)
- Center the subject and remove background clutter with a cutout tool
- Strip noisy or busy backgrounds entirely
- Boost contrast between the subject and the background if the foreground blends into the backdrop
- Avoid blur and compression artifacts. Clean silhouettes with strong lighting produce the best geometry during AI reconstruction.
Traditional PNG to OBJ Methods
Before AI tools existed, PNG to OBJ conversion meant manual work. Two approaches dominated.
Heightmap Extrusion in Blender
This method treats a grayscale image as a heightmap: bright pixels get pushed up, dark pixels stay down. It is fast but limited.
Here is how to turn a logo PNG into a relief OBJ in Blender:
- Open Blender and delete the default cube. Go to File → Import → Images as Planes to import your grayscale PNG. If that add-on is not active, enable it under Edit → Preferences → Add-ons first.
- Select the plane, open the Modifier Properties panel (wrench icon), and add a Displace modifier.
- In the Displace modifier's Texture slot, select the imported heightmap image. Blender uses brightness values to push geometry upward (white = highest, black = lowest).
- Adjust the Strength slider. For a logo relief, start with a low value (0.1–0.3) and increase gradually until the extrusion looks right.
- For smoother results, add a Subdivision Surface modifier above the Displace modifier to increase mesh density before displacement is applied. Set subdivision levels to 3–4 for fine detail.
- When satisfied, go to Object → Convert To → Mesh to finalize the geometry, then export via File → Export → Wavefront (.obj).
Works well for: terrain, relief art, logos, embossed surfaces. Struggles with: organic characters, complex structures, anything that needs to look correct from multiple angles. The output is always a front-facing relief, not a true 3D model.
Manual Modeling from a Reference Image
Artists use PNG images as visual references while building geometry by hand in Blender or ZBrush. Even a simple object from a side-view reference takes several steps:
- Open Blender, switch to front orthographic view (Numpad 1). Press Shift + A → Image → Background and select your side-view PNG.
- Adjust the image position and size in the Properties panel (N key) → Background Images section so it sits centered on the grid.
- Add a base mesh: press Shift + A → Mesh and choose a primitive that roughly matches your subject (Cylinder, Cube, etc.). Switch to Edit Mode (Tab) and reshape vertices to match the reference silhouette.
- Refine with Loop Cut (Ctrl + R), Extrude (E), and Scale (S) to match proportions against the background image.
- Clean up topology, apply Smooth Shading, and export via File → Export → Wavefront (.obj).
Full control over every vertex, but a simple object takes 30+ minutes. Complex characters can take days. Not practical when you need volume or speed.
AI-Powered PNG to OBJ Conversion
This is where the workflow changes. Instead of extruding a heightmap or modeling by hand, AI reconstructs 3D geometry from a single image by inferring depth, occluded surfaces, and structure.
How AI Reconstruction Differs from Extrusion
Heightmap extrusion reads pixel brightness and pushes geometry along one axis. AI reconstruction (using neural radiance fields or diffusion-based approaches) predicts the full 3D shape, including the back and sides of the object that the original image never shows. The output is a model you can rotate 360°, not just a front-facing relief.
Several AI 3D model generators now support image to 3D workflows, including Meshy, Tripo, and Triverse AI. The next section walks through the Triverse pipeline as an example of how this works in practice.
Converting PNG to OBJ with Triverse AI
- Upload your PNG to Triverse Studio. The system analyzes shape contours, depth cues, and surface information. Clear, high-contrast source images produce more accurate meshes.
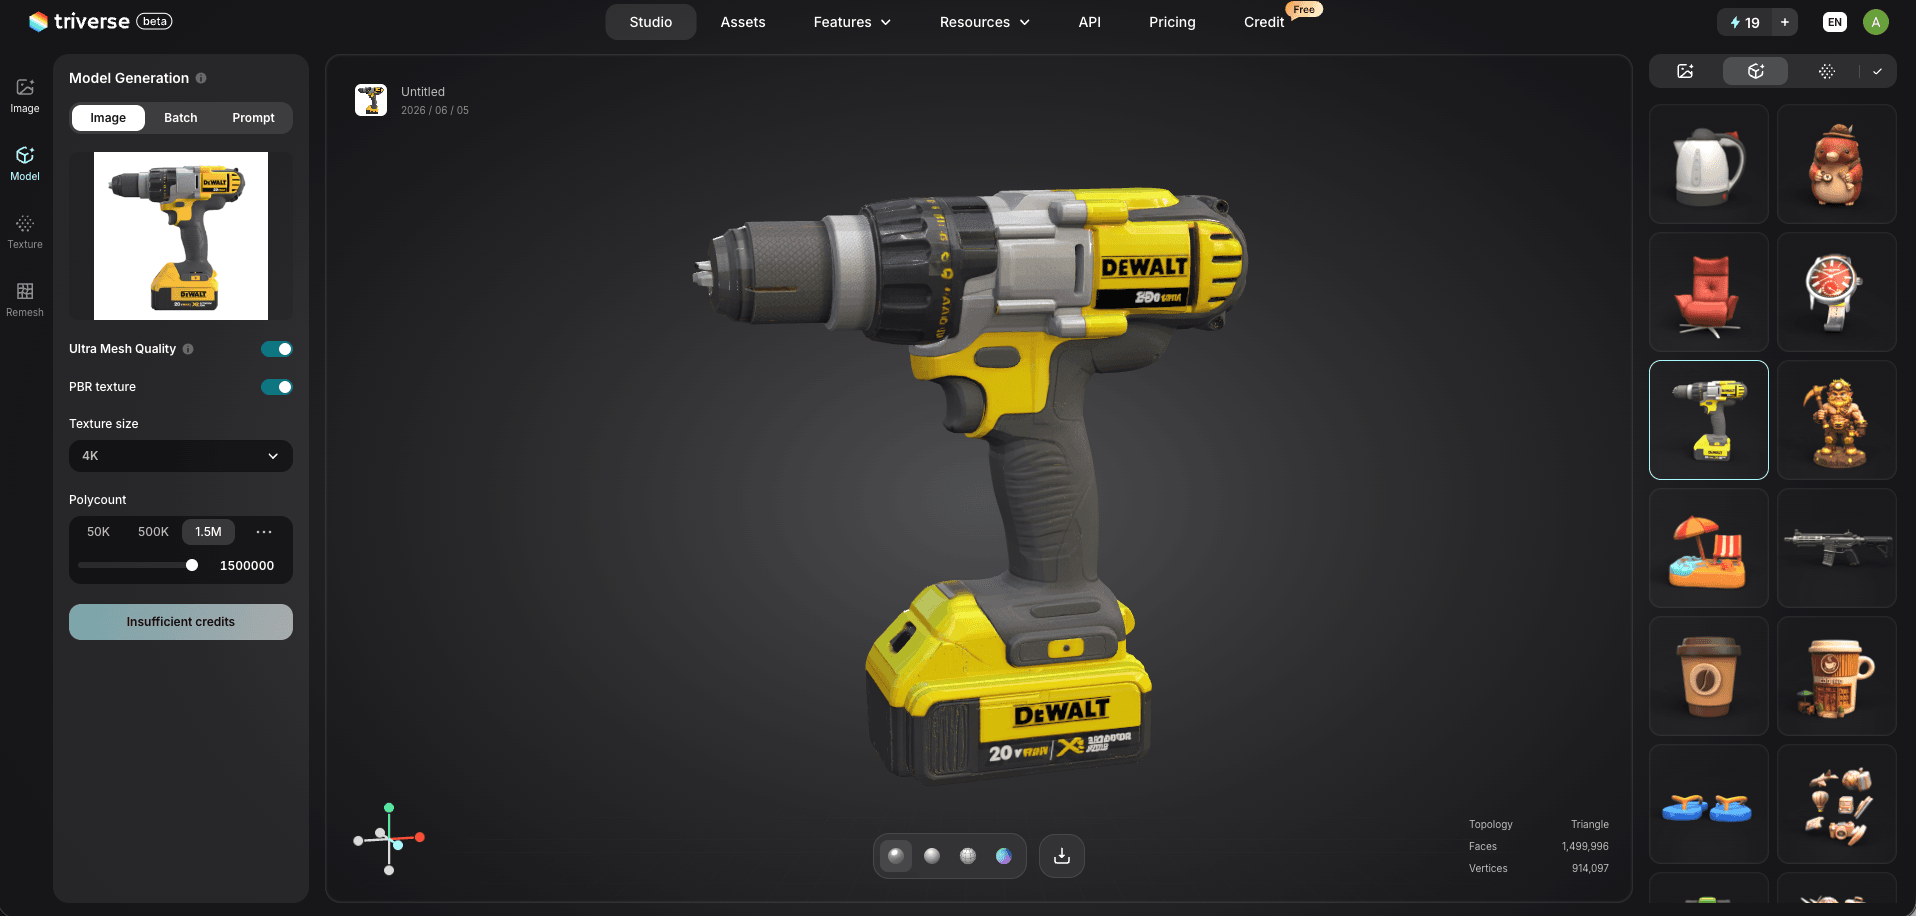
- Preview and adjust the generated mesh. Rotate the model in the 3D viewer, check the wireframe, and use the Remesh tool for topology optimization. AI Texturing lets you adjust surface materials before committing to an export.
- Export as OBJ with settings matched to your use case:
- Games: lower polygon count, optimized topology, efficient UVs
- Animation: cleaner edge flow for better deformation
- 3D printing: watertight geometry, stable wall thickness
The entire process, from upload to downloadable OBJ, takes a few minutes.
Comparison: AI PNG to OBJ Conversion vs Traditional Methods
Triverse AI | Blender (Heightmap) | Blender (Manual Modeling) | |
Workflow | Upload → Generate → Preview → Export | Import → Subdivide → Displace → Convert → Export | Reference → Model → Sculpt → Clean up → Export |
Time to Usable OBJ | Minutes | 15–30 minutes | Hours to days |
Skill Required | Beginner-friendly | Intermediate | Advanced |
Topology Quality | AI-optimized, clean mesh | Flat displacement only | Full control, depends on the artist |
Textures | Built-in PBR output | Manual texturing required | Manual texturing required |
Export Formats | OBJ, STL, GLB, 3MF, FBX, USDZ | OBJ, STL, FBX | OBJ, STL, FBX |
Best For | Rapid prototyping, batch asset creation | Terrain, relief art, logos | Precision modeling, custom topology |
AI tools do not replace manual modeling for every use case. When you need exact control over every edge loop or a specific artistic style, Blender still wins. But for converting PNG images to usable 3D geometry quickly, AI reconstruction is the most practical path in 2026.
What to Do After Downloading Your OBJ File
Import into Blender and Tweak Mesh
Unzip your downloaded archive and keep OBJ, MTL, and texture files in one folder. In Blender, go to File > Import > Wavefront OBJ. If textures are missing, run File > External Data > Find Missing Files to recover them.
Common post-import tasks: delete duplicate vertices, fix flipped normals, and adjust scale. Blender's built-in mesh cleanup tools (found in Edit Mode → Mesh → Clean Up) handle most issues. For more stubborn mesh errors, the same repair workflow applies.
Integrate into Unity or Unreal Engine
OBJ files import directly into both engines. Before dragging assets into your project:
- Optimize polygon count for real-time performance
- Verify UV mapping and texture compatibility
- Confirm scale matches your scene units
For Unity specifically, the import settings dialog lets you configure mesh compression, normal calculation, and material assignment on import.
Prepare Models for 3D Printing
If the destination is a printer:
- Ensure watertight geometry (no holes in the mesh)
- Check that the wall thickness meets your printer's minimum
- Repair non-manifold edges
- Convert to STL if your slicer requires it
- Run mesh inspection in PrusaSlicer or Bambu Studio before slicing
Pro Tips for High-Quality PNG to OBJ Results
1. Prepare the PNG Image for Best Results
Beyond the basics covered earlier, two steps make a noticeable difference: set image resolution to 2048×2048 for crisper edge recognition during AI reconstruction, and replace semi-transparent or messy backgrounds with solid black or white. Strip extra shadows and gradients that the AI might interpret as geometry.
2. Handle Textures Correctly
When AI generates PBR textures alongside your OBJ mesh, sort out texture matching before export:
- Confirm the full UV layout in the preview window before downloading
- Match texture resolution to your target project settings
- Keep OBJ, MTL, and texture PNG files in the same folder after export
Separated asset files or incorrect UV layouts cause texture stretching and missing materials in downstream tools. If you repack UVs in Blender for 2K textures, leave an 8–16px margin between UV islands to prevent color bleeding.
3. Post-Export Quality Checks
Always inspect the OBJ before using it in production. Look for:
- Broken topology
- Non-manifold geometry
- Overly dense mesh areas
- Floating artifacts
A quick cleanup pass in Blender (Mesh → Clean Up → Delete Loose / Make Manifold) catches most problems. Also confirm real-world scale by checking scene unit settings.
Conclusion
Heightmap extrusion gives you a front-facing relief. Manual modeling gives you full control at the cost of hours per model. AI reconstruction like Triverse AI gives you a rotatable, textured 3D mesh in minutes. Pick the method that matches your deadline and quality needs.
FAQs about PNG to OBJ Conversion
What image resolution works best for PNG to OBJ conversion?
Images at 1024×1024 or above generally produce cleaner geometry and sharper detail. For AI-based converters, 2048×2048 gives the best balance of detail and processing speed. Anything below 512×512 tends to produce blocky or oversimplified meshes, regardless of which conversion method you use.
Can I convert multiple PNGs at once?
Some online PNG to OBJ converter tools support batch upload, and developer-oriented platforms like 3DPEA offer API access for automated batch processing. Generation speed depends on image complexity and the platform's queue. For large batches, an API-based workflow is more efficient than manual uploads.
Are exported OBJ files compatible with Blender, Unity, and Unreal Engine?
Yes. OBJ is one of the most widely supported 3D formats. Blender imports OBJ directly via File > Import > Wavefront OBJ. Unity and Unreal Engine both accept OBJ files through their standard asset import pipelines. The MTL material file and associated textures need to stay in the same folder as the OBJ for materials to load correctly.
Can I use AI-generated OBJ models commercially?
Commercial usage rights depend on the platform's licensing terms and your subscription tier. Most AI 3D tools grant commercial licenses on paid plans. Check the specific terms before using generated assets in client work or products for sale.
How large are OBJ files, and do they require optimization?
OBJ files are plain text, so complex models with high polygon counts can grow to tens or hundreds of megabytes. For real-time applications like games, you will likely need decimation or retopology to reduce file size and improve rendering performance. For 3D printing, file size is less of a concern since slicers handle large meshes well.
What is the difference between OBJ and STL, and when should I use each?
- STL: stores only the model’s shape (triangle mesh), best for 3D printing.
- OBJ: stores geometry plus UVs, normals, and material/texture references, best for rendering and model exchange
What does "non-manifold geometry" mean, and how do I fix it?
Non-manifold geometry refers to mesh edges or faces that do not cleanly separate the inside from the outside of a 3D model. Common types include internal faces, open edges, and edges shared by more than two faces. These cause problems in 3D printing (the slicer cannot determine what is solid) and in game engines (rendering artifacts). In Blender, select your model, go to Select > Select All by Trait > Non-manifold, and fix the highlighted areas by deleting internal faces or filling holes.