如何创建可用于 3D 打印的 3D 模型(分步指南)
3D打印模型设计完全指南。掌握关键设计规范、壁厚、公差、Meshmixer模型修复技巧、文件格式及AI辅助工作流,有效避免打印失败。
2026年4月29日
你花了六个小时精心设计出完美的零件。壁厚看起来恰到好处,尺寸也没问题。你点击导出,将模型载入切片软件,然后启动打印。二十分钟后,首层却没能粘牢。一小时后,侧壁开始下垂塌陷。两小时过去,打印平台上只剩下一团乱成一团的耗材。
问题不在打印机本身,而在于屏幕上看起来正确的设计与实际可打印效果之间的差距。本指南涵盖了壁厚、悬垂角度、公差、网格完整性检查、排液孔和最小特征尺寸等内容。让我们深入了解!
为什么多数3D模型打印时失败
3D模型在屏幕上显示可能完全正确,却仍然会打印失败。
这是3D打印中最常见且最令人头疼的问题之一。在Blender、Fusion 360或任何CAD软件中,一切看似顺利。模型显示正确,形状看起来完整,一切完好。
但一旦将其导出到切片器,情况就完全不同了。
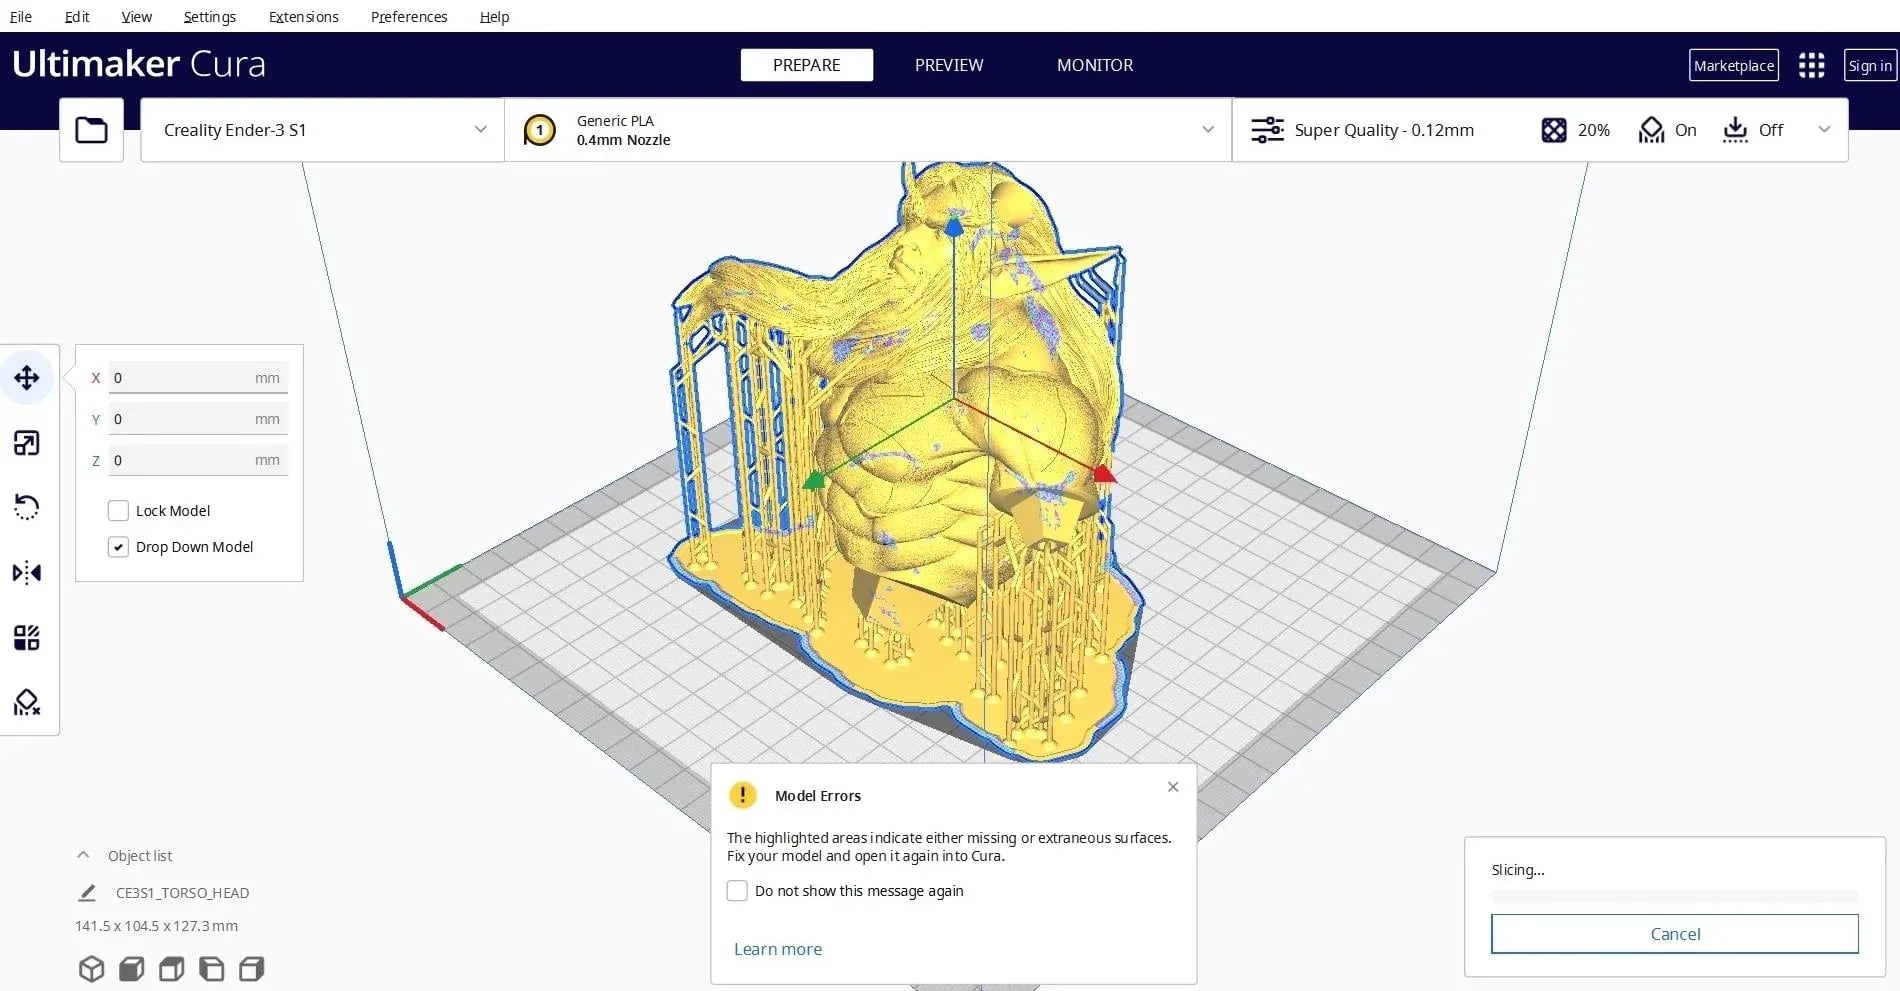
忽然,您可能会看到以下错误:
- 网格模型缺面或破洞
- 切片时可能塌陷的薄壁
- 法线反转或破面
- 打印过程中断
到了这一步,大多数新手会认为是打印机出了故障。
通常并非如此。
真正的问题在于,3D 可打印模型并非由外观定义,而是取决于其在切片后是否能作为符合物理规律的实体存在。
如何让3D模型真正具备可打印性
在建模之前,你需要理解一个核心原则:
3D打印是实体性的,而非视觉的。
可打印模型必须满足以下条件:
- 水密性(网格无孔洞)
- 流形(明确内外几何结构)
- 无自交曲面
- 结构厚度足够,适合印刷
- 真实世界的正确比例
如果任意一项失败,模型在切片或打印的过程中可能会崩溃——即使它在视口中看起来完美无缺。
如今制作 3D 模型的两种主流方式
目前,创建3D打印模型有两种实用的工作流。
传统工作流程:人工建模
这是 Blender、Fusion 360 和 SolidWorks 等工具中使用的标准方法。
涉及以下内容:
- 手动构建几何图形
- 管理拓扑结构和架构
- 反复修复网格错误
- 通过试错迭代
这种方法提供了全面控制,但瓶颈不在于创意——而在于技术配置与清理。
初学者往往在修复几何体上花费的时间比实际设计更多。
如果您正在为此阶段选择工具,请《2026 年最佳 3D 打印 CAD 软件》查看以获取全面的选项解析。
现代工作流程:AI 辅助生成
3D建模的重大变革不在于更好的工具,而在于更快地获取可用几何数据。
在传统工作流程中,每个创意都从零开始。您需要先搭建基础形体,修正初期的拓扑缺陷,然后才能得到可用于细化的模型。这一过程缓慢且重复,往往不利于快速迭代。
AI 工具改变了这一出发点。
无需手动进行几何建模,Triverse AI 等工具可直接根据文本提示词或参考图像生成结构化的 3D 基础模型。这省去了工作流程中最耗时的初始构建环节。
在实践中,其影响更为明显:
- 实现从创意到印刷就绪基础模型的更快转化
- 网格中早期结构性问题较少
- 将更多时间投入设计决策,而非环境配置
这并不意味着模型已经完成或已具备投产条件,而是表示您不再需要从零开始。
当比较图像生成3D与文本生成3D的工作流程时,差异变得更加明显。两者都生成基础几何形状,但它们对输入数据的解析方式不同——基于视觉参考与基于语言驱动生成——从而形成不同的起始结构。
3D 打印逐步工作流
一旦理解了结构和工具,实际工作流就会变得清晰易懂。
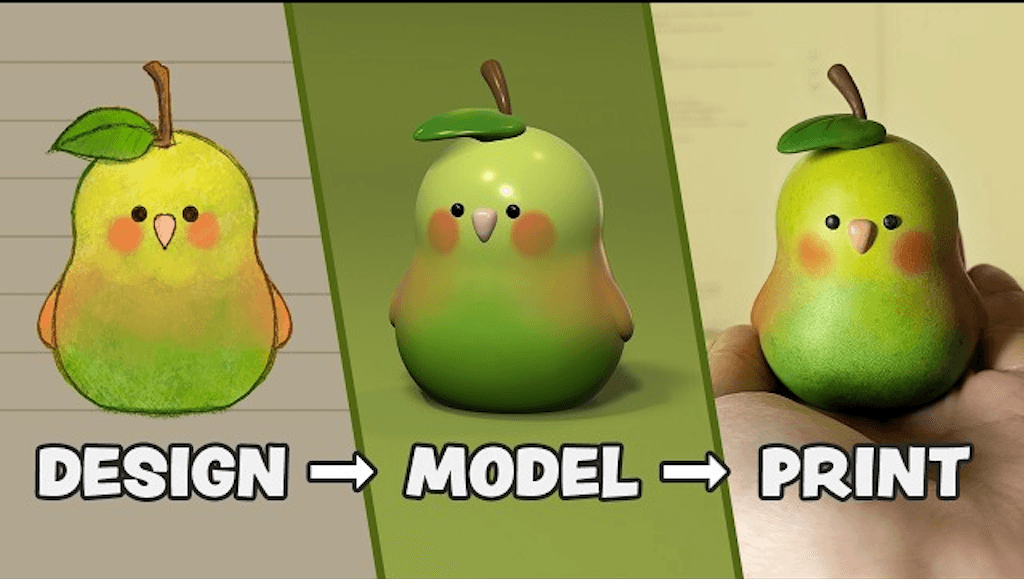
步骤 1:明确你的想法
在启动任何设计软件之前,先在纸上绘制草图,
- 基本形状
- 近似尺寸
- 预期用途(装饰用途或功能用途)
- 页面方向
提前绘制简易草图可省去后续的大规模返工。
步骤2:创建基础模型
AI 工具(例如Triverse AI)可以通过文本或图像在几秒钟内创建 3D 模型雏形。其价值不在于最终质量,而在于迭代速度。
这在以下情况下特别有用:
- 快速验证创意
- 避免CAD初始配置的开销
- 生成概念的多种变体
不妨将此步骤看作避开“空白画布问题”。
步骤 3:在 Blender 或 CAD 工具中精修
创建基础模型后,精修通常在 Blender 或 Fusion 360 等传统工具中进行。
真正的设计工作从此处开始:
- 调整布局比例
- 清除曲面几何体
- 添加功能细节,如接合处或孔
- 提升流畅度与结构性
在此阶段,您正在编辑一个可使用的功能,而非从零搭建。
第四步:验证打印功能
这是很多人都会忽略的最关键的一步。
- 在 {0} 中打开模型Autodesk Meshmixer(欧特克网格混合器)→ 编辑 → 生成实体 → 使用默认设置(可修复约 80% 的问题)。
- 检查非流形边、法线反转、薄壁和孔洞。
- 对于棘手问题,请使用Autodesk NetFabb(欧特克NetFabb) (点击红色叉号)。
以下5条规则是导致打印失败的最常见原因。请在导出文件前遵守这些规则。
规则 1:壁厚
打印失败的首要原因。
材料 | FDM 最低标准 | SLA/树脂最低要求 | 功能部件 |
PLA(聚乳酸) | 1.5毫米 | 0.5mm | 2.0–3.0 mm |
PETG | 1.5mm | 0.6毫米 | 2.0–3.0毫米 |
ABS(防抱死制动系统) | 1.8毫米 | - | - |
TPU(软质) | 2.0mm | - | - |
规则2:45°外悬规则
倾斜度大于 45°的表面需要支撑。使用 45°倒角可使特征自支撑。将支撑接触点放置在隐藏面上。
规则 3:运动部件的公差
- 卡扣配合:每侧留0.2-0.3毫米间隙
- 合页轴:间隙 0.2-0.3mm
- 压配合:0.1-0.2mm 过盈量。务必先打印一个小型测试件并用卡尺测量。
规则4:空心打印件应设排水孔
至少添加两个孔(一个位于最低点)。SLA:直径4-6毫米;FDM:3毫米即可。
规则 5:最小特征尺寸
- 凸字:字高1.5毫米,字厚0.8毫米
- 雕刻文本:高度1.0毫米
- 支柱/销针:直径≥2.0毫米
- 薄壁:厚度 ≥ 1.5 mm
步骤 5:导出与切图
推荐格式:
- STL(标准模板库)通用兼容性(二进制模式导出)。
- 3MF文件格式: 现代切片机 - 保持颜色、材质和设置。
- 对象Blender(三维建模软件)生成的优质中介格式。
在切片软件(Ultimaker Cura、PrusaSlicer等)中:
- 优化打印方向,提高打印平台附着力并减少支撑结构使用。
- 仔细检查前 10 层。
- 使用新材料时,请先打印一个 20mm 的校准方块。
3D打印失败的常见原因
- 几何体完整性问题 - 非流形几何、孔洞、反向法线、自相交网格
- 结构承载限制 - 壁厚过薄、悬垂结构缺乏支撑、内部结构薄弱。
- 数据分片配置问题 - 缩放比例错误、支撑设置不当、温度或速度参数不正确。
- 早期设计错误 - 面向视觉媒介而非印刷物理限制进行设计。
可打印性核对清单(切片操作前)
- 网格是否具有防水性和流形结构?
- 所有墙体是否满足最低厚度要求?
- 悬垂结构 ≤45° 或已正确支撑?
- 空心部件有排水孔吗?
- 模型是在 Meshmixer 中修复的吗?
- 切片预览(尤其是前几层打印效果)看起来是否正常?
为何 Triverse AI 的3D生成技术重塑工作流程
传统建模在获得可用模型之前需要完全手动构建。通过 Triverse AI 等 AI 辅助工作流可消除这一限制。
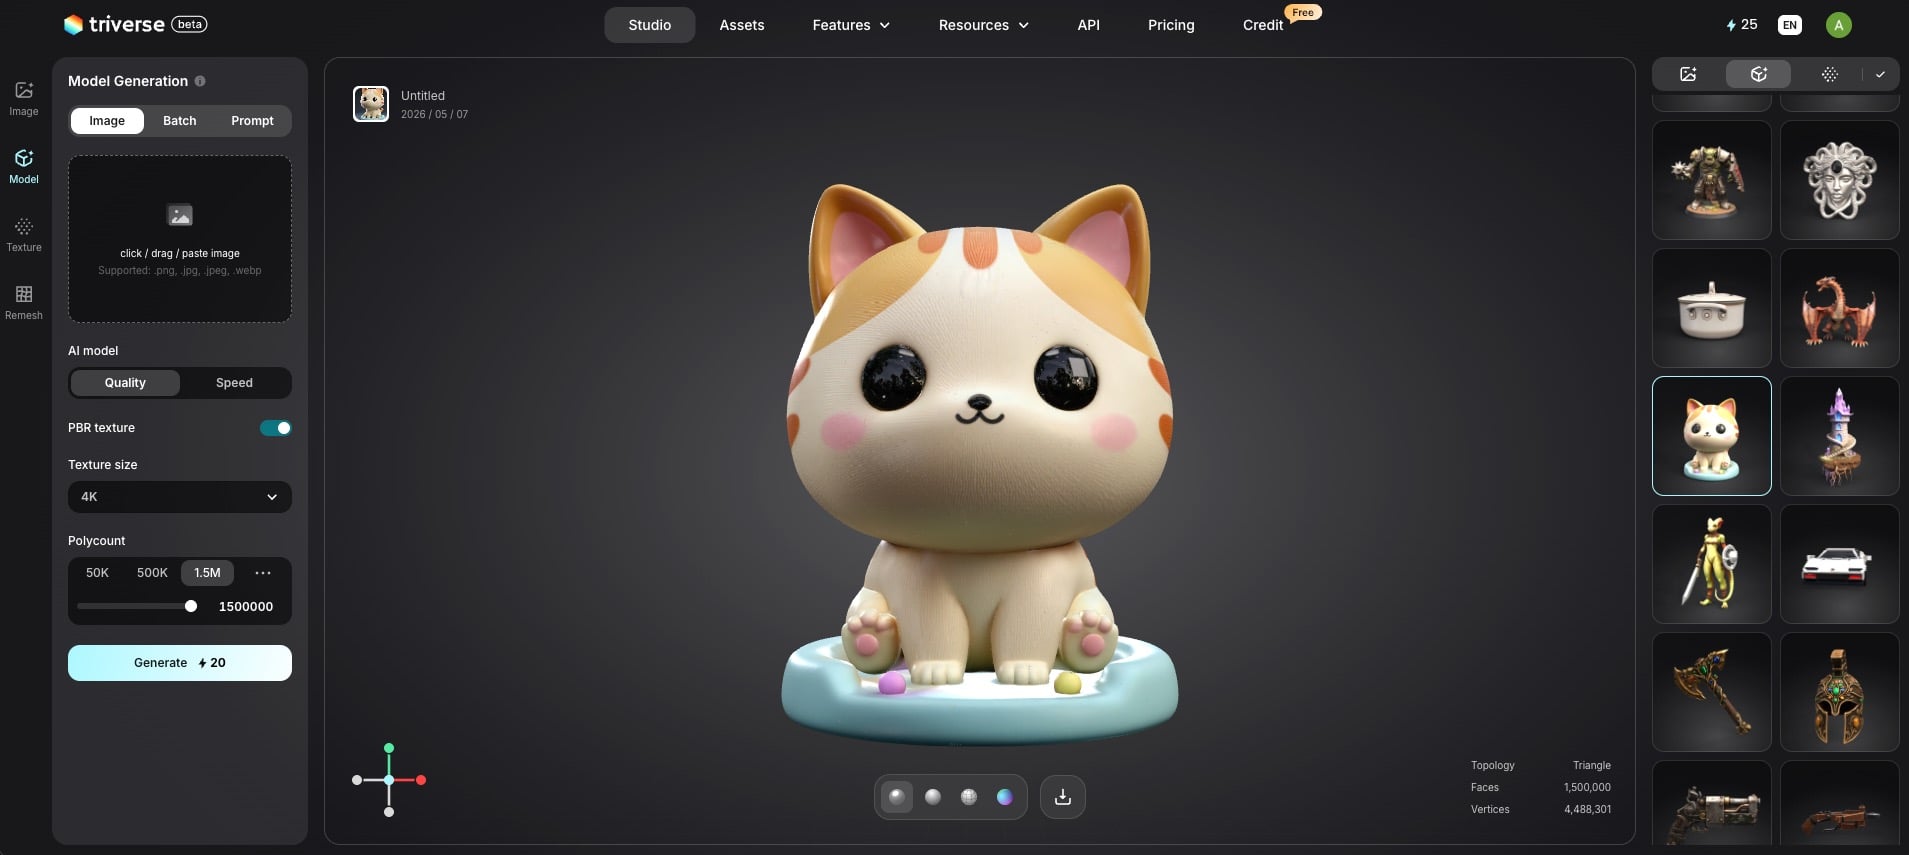
传统方法: 构思阶段 → 人工建模 → 调试
新方式: 创意 → AI 底图 → 精修 → 打印
关键转变并非自动化,而在于缩短获得可用几何体所需的时间。
构建结构所用时间较少,而设计决策所用时间较多。
结论
创建可打印的3D模型不在于使用花哨的软件;而在于理解3D打印物理特性并遵循可靠的工作流程。
利用 AI 提升速度,借助 CAD 确保精度,应用五大关键设计规则,并始终在 Meshmixer 中进行验证。持之以恒地这样做,您的打印成功率将大幅提升。
外观精美的3D模型与实际打印效果良好模型之间的差距,如今已缩小至前所未有的程度。
立即开始,将您的创意转化为实物印刷品。
3D打印建模常见问题解答
为什么我的3D模型在Blender或Fusion 360中看起来完美无缺,打印时却依然失败?
因为屏幕上显示正常并不等于可打印。诸如破面、非流形几何体、法线翻转、壁厚过薄或表面破损等问题,在建模软件中往往难以察觉,却会在切片或打印过程中导致失败。
究竟是什么让3D模型真正具备可打印性?
一个可打印的模型必须是封闭无孔的(水密)、流形的(内外分明)、非自相交的、具备适合该材料的结构厚度,并且具有合适的现实世界尺寸。这些物理要求比模型在视口中的外观更为重要。
我应该从传统CAD建模入手,还是使用AI工具?
现代推荐的工作流程是AI辅助流程。使用Triverse AI等AI工具从文本或图像快速生成基础模型,然后在Blender或Fusion 360中进行优化。这避免了从零开始建模,并大幅减少了前期的技术阻力。
如何在打印前修复常见的网格错误?
使用Autodesk Meshmixer:导入模型后,依次点击编辑 (Edit) → 实体化 (Make Solid),并接受默认设置。这可以解决大多数孔洞、非流形边和法线翻转问题。您也可以使用切片软件的修复工具进行额外修正。
3D打印应导出哪种文件格式?
- STL:兼容性和普及度最高的格式。
- 3MF:一种可携带更多元数据的现代格式。
- OBJ:适用于需要保留Blender材质的场景。请根据您的切片软件和需求进行选择。
我应该在什么时候检查模型是否可打印?
在第4步:验证可打印性阶段——即模型优化完成后、导出之前。检查是否存在非流形边、法线翻转、网格孔洞及壁厚过薄等问题。务必在切片前修复所有问题。
AI生成技术如何助力创建可打印的3D模型?
AI极大地加速了初期几何造型阶段。它无需手动从头建模,即可在数秒内生成可用的基础模型,让您能将更多精力集中在细节优化、比例调整、功能设计及可打印性验证上。