How to Fix STL File Errors for 3D Printing: Complete Repair Guide (2026)
STL file errors don’t have to ruin your print. This step-by-step guide shows how to fix errors such as non-manifold edges, holes, and inverted normals. Both automatic and manual fixing methods are provided.
May 28, 2026
STL files are the standard format for 3D printing, but they're also the most common source of print failures. A single mesh error can cause slicing crashes, missing walls, weak structures, or a print that fails halfway through.
This guide explains the most common STL errors, how to diagnose them, and, most importantly, the exact steps to fix them using powerful tools.
Why STL Files Break in the First Place
STL is a simple file format. It only stores the surface shape of a model using triangles. It does not contain material data, textures, object hierarchy, or advanced topology information. For an STL to print correctly, the mesh needs to be manifold, which means every edge connects to exactly two faces.
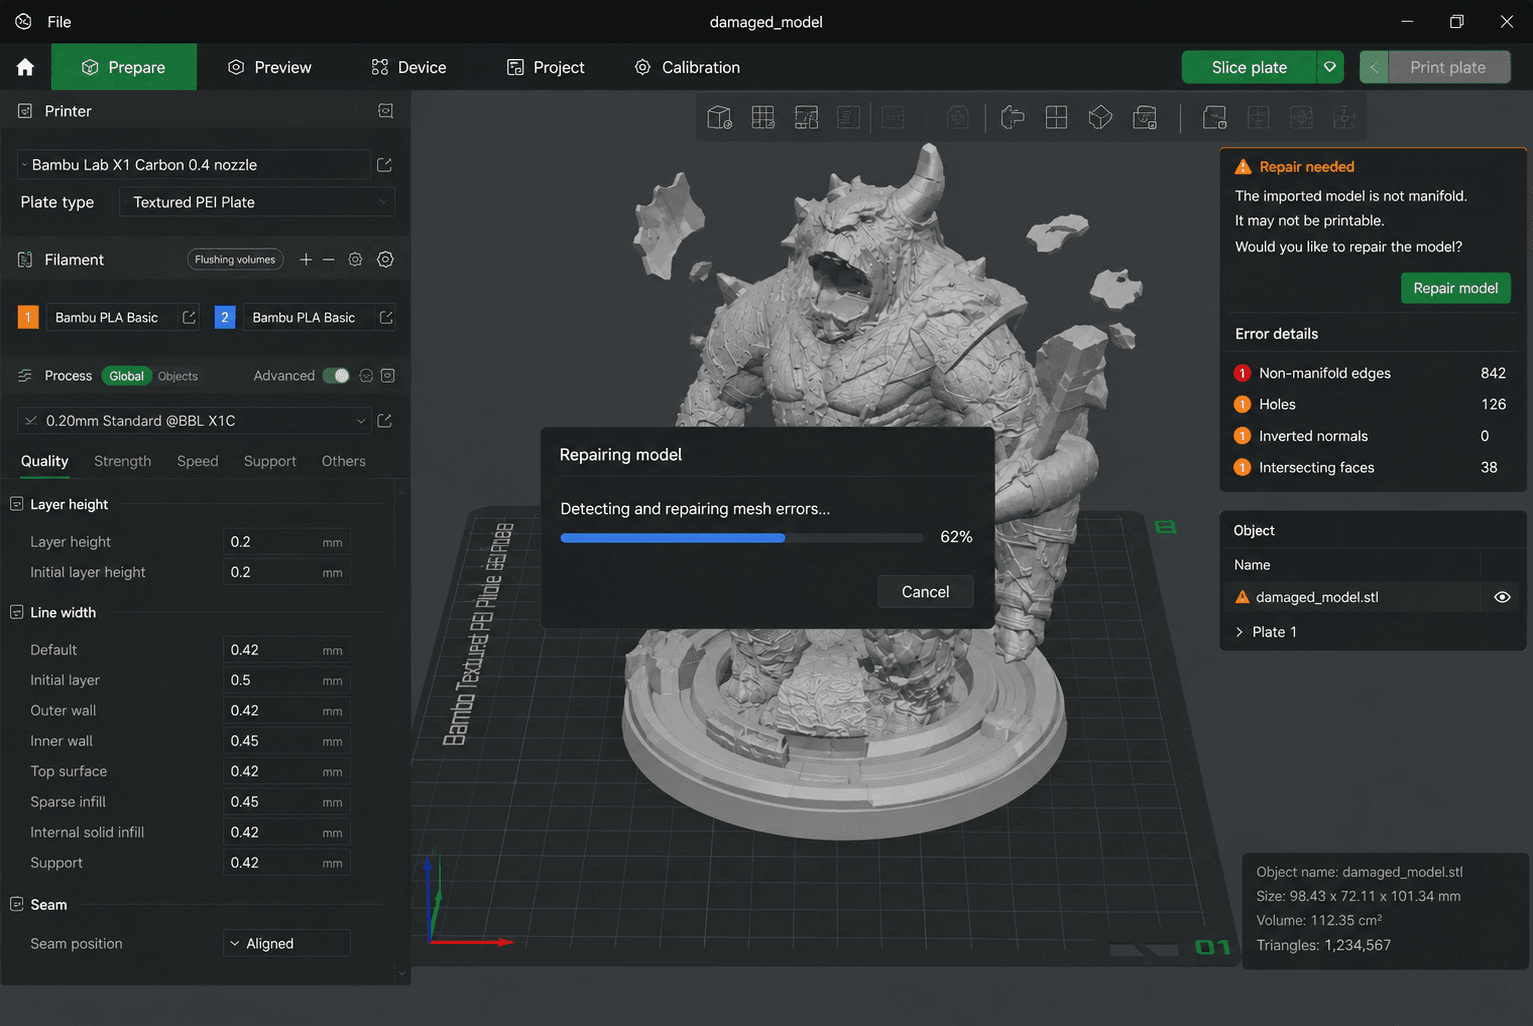
Problems can happen at almost any stage of the workflow:
- During export from the modeling software
- During file conversion
- When importing the model into a slicer
- During slicing
- Or even during printing itself
In many cases, the issue is not the file format alone. Weak geometry, thin walls, bad scaling, overlapping faces, poor orientation, or messy topology can all cause print failures.
Understanding what causes these problems makes them much easier to prevent.
Five Common STL Errors
Topology Errors: Non-Manifold Geometry
A manifold mesh is one where every edge is shared by exactly two faces, and every face has a consistent normal direction. Non-manifold geometry breaks that rule.
What it looks like:
- An edge shared by more than two faces
- A vertex with no connected faces
- Internal geometry trapped inside the mesh
- Duplicate faces occupy the same space
How to diagnose:
- Blender:
Edit Mode → Select → Select All by Trait → Non-Manifold - Meshmixer:
Analysis → Inspector(red markers appear) - Netfabb:
Part → Repair → Detect
Topology Errors: Holes / Missing Faces
An STL file must be watertight — every edge must connect to exactly two faces, closing the surface completely.
What it looks like:
- Missing faces on part of the model
- Gaps along seams or edges
- "Open" edges that don't connect to a second face
How to diagnose:
- Blender:
Edit Mode → Select → Select All by Trait → Non-Manifold(holes show up as open edges) - Meshmixer:
Analysis → Inspector(orange markers) - Check in wireframe mode — any open edge is visible as a gap
Topology Errors: Reversed Normals
Normals define which direction a face is pointing. In a correct STL, all faces point outward.
What it looks like:
- Part of the model appears "inside out" in the slicer
- Surfaces that should be solid show as hollow
- Slicer treats the inside as the outside
How to diagnose:
- Blender: enable
Overlays → Face Orientation(blue = correct, red = inverted) - Most slicers will highlight inverted normals during import
Topology Errors: Intersecting Meshes
Intersecting faces happen when two surfaces pass through each other instead of meeting at a clean boundary.
What it looks like:
- Overlapping geometry that was never booleaned or merged
- Internal intersections inside the mesh
- "Z-fighting" artifacts in the slicer
Printability Issues: Thin Walls
Thin walls aren't a "mesh error" in the strict sense, but they're a leading cause of print failure.
What it looks like:
- Geometry narrower than your nozzle diameter (FDM) or pixel size (resin)
- Walls that the slicer marks in red as "too thin"
How to diagnose: Most slicers (Cura, PrusaSlicer, Lychee) will flag thin walls in red during preview.
Four Methods to Fix STL File Errors
Not all repair methods work the same way. Some tools fix your mesh automatically — upload, click, done. Others require you to identify problems and apply fixes manually. Automatic repair is faster and easier, but it can fail on complex or heavily damaged meshes. Manual repair gives you full control and works when auto tools give up, but it takes more time and some learning.
Here's how the four methods break down:
Method | Repair Type | Best For |
Slicer built-in | Automatic | Simple errors, quick first check |
Online repair tools | Automatic | Fast fixes without installing software |
Blender | Both (automatic + manual) | Full control, complex meshes, free |
Fusion 360 / Meshmixer | Both (automatic + manual) | Severe damage, professional workflows |
Method 1: Try Your Slicer's Built-In Repair Tool (Automatic)
This is the fastest option and should almost always be your first step.
Steps:
- Import the STL into your slicer (Cura, PrusaSlicer, Bambu Studio, or equivalent).
- If the slicer shows a repair warning, click the repair option and let it process.
- Preview the sliced model before printing.
When this works: Simple errors — small holes, minor mesh issues, slightly inverted normals. If the model is badly damaged, the slicer may freeze, fail silently, or only fix part of the problem.
Method 2: Use an Online STL Repair Tool (Automatic)
If your slicer can't fix the file, an online repair service is the next fastest option.
Steps:
- Upload your STL to an online repair service (e.g., Formware STL Repair).
- Let the tool scan and repair the mesh, then download the repaired file.
- Re-import into your slicer and preview before printing.
When this works: Quick fixes for holes, non-manifold geometry, and minor topology problems. Most online tools have file size limits (typically ~50MB) and may struggle with heavily damaged or extremely complex meshes.
Method 3: Repair the STL in Blender (Automatic + Manual)
Blender gives you both automatic and manual repair options. Start with automatic cleanup, then switch to manual if problems remain.
Automatic Repair in Blender
Steps:
- Import the STL into Blender (
File → Import → Stl). - Enable the 3D Print Toolbox add-on (
Edit → Preferences → Add-ons → search "3D Print"). - Select the model, open the 3D Print Toolbox panel (right sidebar,
Nkey), and click Check All. - Click Clean Up, then click Make Manifold — Blender automatically closes holes and fixes non-manifold edges.
- If the steps work, export the repaired STL (
File → Export → Stl) and verify in your slicer.
If automatic cleanup works: You're done. Re-import into your slicer and print.
If problems remain: Switch to manual repair.
Manual Remesh: Voxel Remesh
If the automatic tools can't fix the mesh, use Voxel Remesh to rebuild it from scratch.
Steps:
- In Object Mode, select the model.
- Add a Remesh Modifier (
Modifiers → Add Modifier → Remesh). - Set Voxel Size:
0.05–0.1→ light file, less detail (good for large prints)0.01–0.02→ more detail, heavier file (good for small or detailed prints)
- Click Apply.
- Run Check All to verify the mesh is now manifold.
- Export the STL.
Warning: Very small voxel values (below 0.01) can generate millions of triangles and make the file unsliceable.
💡 Bonus: Want More Precise Results?
Voxel remesh is fast and effective, but it can soften edges and remove small details. Manual cleanup in Edit Mode gives you finer control over specific problem areas while preserving more of the original geometry.
- Switch to Edit Mode (
Tab).
- For holes and open boundaries:
- Select the open edge loop (
Alt + clickon an edge. - Press
Fto fill with a new face, or useGrid Fillfor larger gaps.
- Select the open edge loop (
- For non-manifold edges:
Select → Select All by Trait → Non-Manifold.- Delete the problem geometry (
X → Vertices/Edges/Faces). - Rebuild a clean topology manually using
F(fill) andK(knife tool).
- For inverted normals:
- Select all faces (
A). Mesh → Normals → Recalculate Outside(Shift+N).
- Select all faces (
- For intersecting faces:
- Identify overlaps visually in wireframe mode (
Z → Wireframe). - Delete intersecting faces and rebuild with clean geometry.
- Identify overlaps visually in wireframe mode (
- Run Check All again to verify no errors remain.
Method 4: Use Advanced Repair Tools for Severe Problems (Automatic + Manual)
If the STL is still broken, you'll need a more capable repair tool, such as Fusion 360 and Meshmixer.
Take Fusion 360 as an example.
Automatic repair:
- Insert the STL into Fusion 360 (
Insert → Mesh). - Right-click the mesh body → Repair.
- Enable Close Holes and click OK.
- If problems remain, try Rebuild for stronger automatic repair.
- Export the repaired STL and test in your slicer.
Manual repair (when auto fails):
- Enter Mesh Edit mode.
- Manually select and delete problem faces.
- Use Fill Hole to close gaps.
- Use Merge Vertices to clean up duplicates.
Note: Fusion 360 handles serious mesh problems well, but some repair features require a paid plan.
Reduce Repair Work: Generate Print-Ready Geometry Up Front with Triverse AI
Every extra step in your workflow is a chance for something to go wrong. Export with the wrong settings, skip a merge step, forget to recalculate normals, and your STL arrives at the slicer broken.
A better approach is to generate print-aware geometry up front using Triverse AI, so the mesh errors that cause slicing failures simply never appear in the first place.
Steps to generate a 3D model and export as an STL file in Triverse AI:
- Upload a 2D image in the 3D Model Generation of Triverse Studio.
- Click Generate.
- Download the STL file.
💡 Tips for Workflow integration:
- Generate a 3D model from an image or text prompt in Triverse AI.
- Download the STL (already watertight in most cases).
- Import directly into your slicer.
- If needed, run a quick check in Meshmixer or Blender — most repairs are unnecessary.
Final Thoughts
STL repair is a skill every 3D printing user eventually needs. Most errors are fixable with free or inexpensive tools, and the process becomes faster once you’ve done it a few times.
That said, not all repair methods are equal. Start with your slicer’s built-in repair — it’s the fastest and often enough for simple problems. If that fails, online repair tools can handle quick fixes without installing anything. Blender offers the most control for complex repairs, but takes time to learn. For severe mesh problems, tools like Fusion 360 and Meshmixer provide professional-grade repair options.
Fixing errors matters, but preventing them matters more. Every extra step in your workflow — format conversions, boolean operations, manual cleanup — is a chance for something to go wrong. If you can generate print-aware geometry from the start, you skip entire categories of problems. For concept models, rapid prototyping, or 2D to 3D workflows, tools like Triverse AI can save hours of repair work downstream.
FAQs about How to Fix STL File Errors for 3D Printing
What are the most common STL errors that cause print failures?
Non-manifold edges, holes/open boundaries, inverted normals, and walls thinner than the printer's minimum capability. Most slicers will flag these during import.
Which repair tool is the fastest and easiest for beginners?
Meshmixer. It's free, visual, and the Inspector tool can auto-repair most common errors in one click. For even less friction, online tools like Netfabb Online Repair require no installation at all.
Can AI-generated models avoid STL repair entirely?
Not always — but tools that prioritize manifold, watertight geometry (like Triverse AI) significantly reduce or eliminate the need for manual cleanup in most cases.
How do I check if my STL is watertight?
Import it into Blender and run Select → Select All by Trait → Non-Manifold. If nothing highlights, the mesh is watertight. Meshmixer's Inspector tool also visually marks any non-watertight areas.
Are repaired STLs as reliable as originally clean ones?
Yes — if the repair correctly restores manifold geometry and closes all open boundaries. Always re-import a repaired STL into your slicer for a final preview before printing.
Are there file size limits for online STL repair tools?
Most online repair platforms impose file size limits (typically 50MB) and may restrict complex geometry. For large files, desktop tools (Meshmixer, Blender, Magics) are necessary.
What's the fastest way to repair an STL online?
Upload the file to Netfabb Online Repair, select the repair options you need, and download the result. The entire process takes under two minutes for most files under 50MB.
Why do STL files from scans or AI tools often need repair?
Scanned assets often have noise, gaps, and non-manifold geometry from imperfect capture. Many AI 3D tools prioritize visual appearance over printability, producing meshes with internal faces, open boundaries, or inconsistent normals.