Turn Any Image Into a 3D Relief Model — STL Conversion Guide
Learn the best methods to convert JPG/PNG images to print-ready STL files. AI generation tools, heightmap converters, Tinkercad, and Blender workflows explained.
April 22, 2026
You have a photo, a logo, or a drawing. You want a physical 3D print of it.
Here's the catch. A 2D image has no depth. No elevation data. Nothing that tells software what should be raised and what should be recessed. Converting it to STL isn't just "save as".
Do it wrong, and your slicer throws errors about non-manifold edges, inverted normals, or holes in the mesh. Do it right, and you get a clean, printable relief model.
This guide shows you the complete pipeline for converting images to STL files. Not just which tools to use, but how to prepare your image before you upload it, which method matches your specific use case, and how to fix the resulting mesh when it breaks.
Why Image to STL Conversion Needs Depth Data
Let's start with something most guides skip.
An STL file is a mesh, a collection of triangles that define a 3D surface. A JPG or PNG is a grid of pixels with color values. There's no depth information in a photo. Nothing that says "this part should stick out."
Conversion tools solve this by inventing depth. They do it in different ways. That's where quality diverges.
Heightmap vs. Silhouette vs. AI Relief
This is the single most important concept in image to STL conversion.
Heightmap conversion reads pixel brightness as elevation. White equals the highest point, black equals the lowest. This works beautifully for terrain data, texture maps, and grayscale images designed for this purpose. Feed it a regular color photo, and you get garbage. The depth is random noise based on color intensity, not actual geometry.
Silhouette extrusion traces the outline of shapes and extrudes them to a fixed thickness. Works for logos, text, and simple line art. Doesn't work at all for photos.
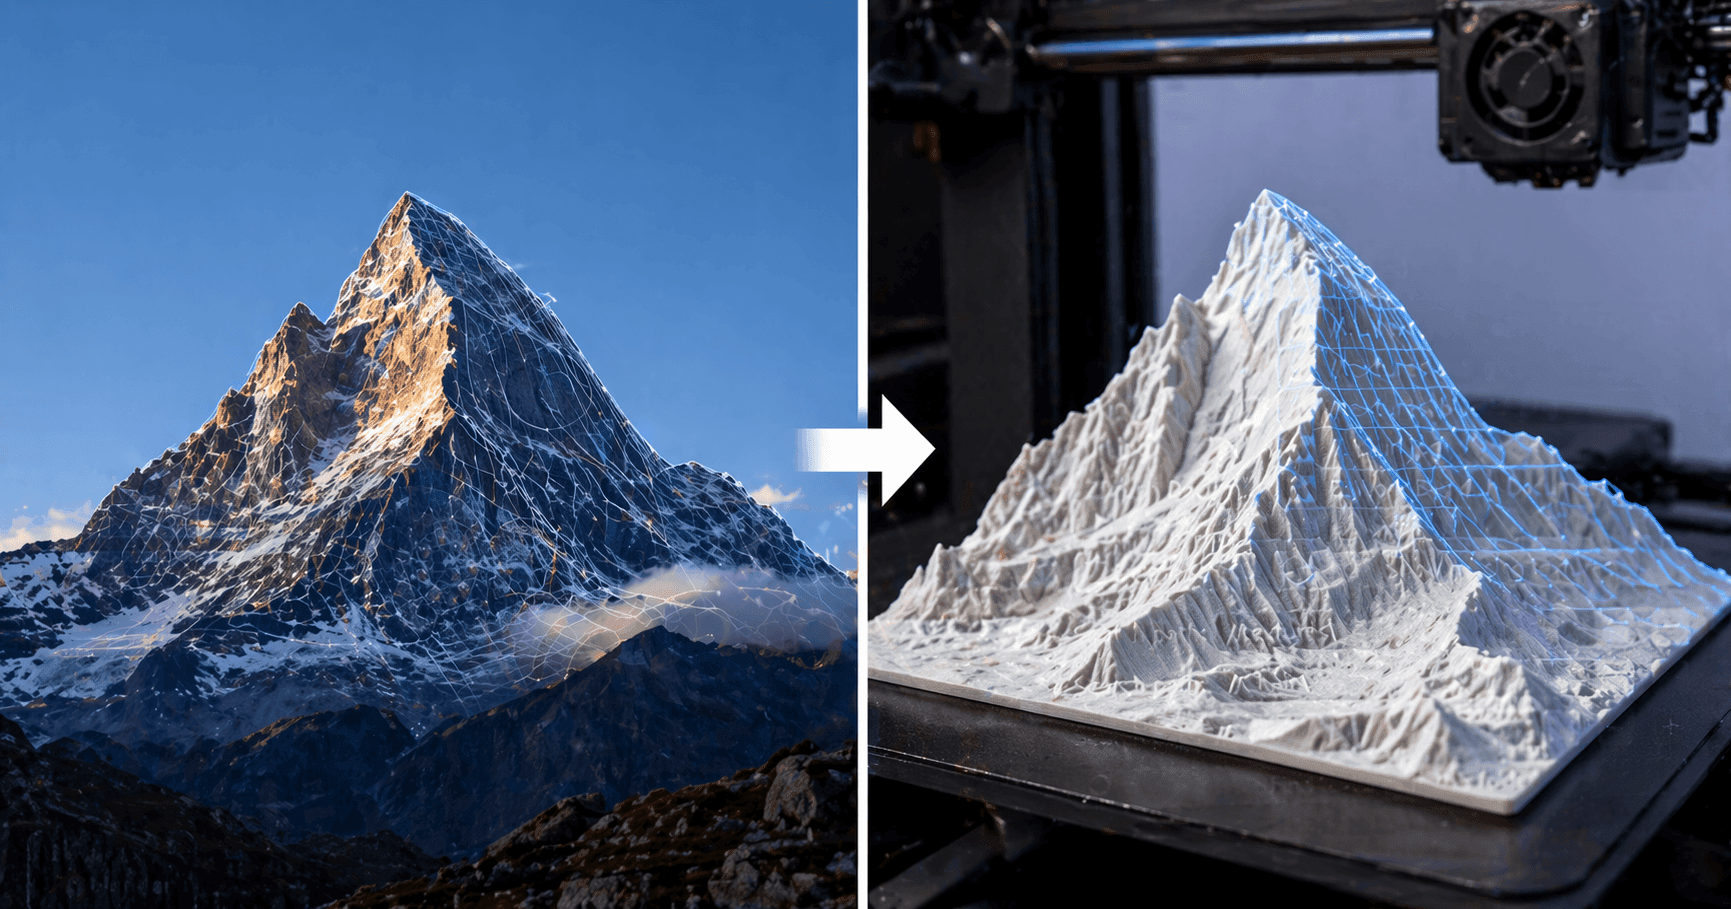
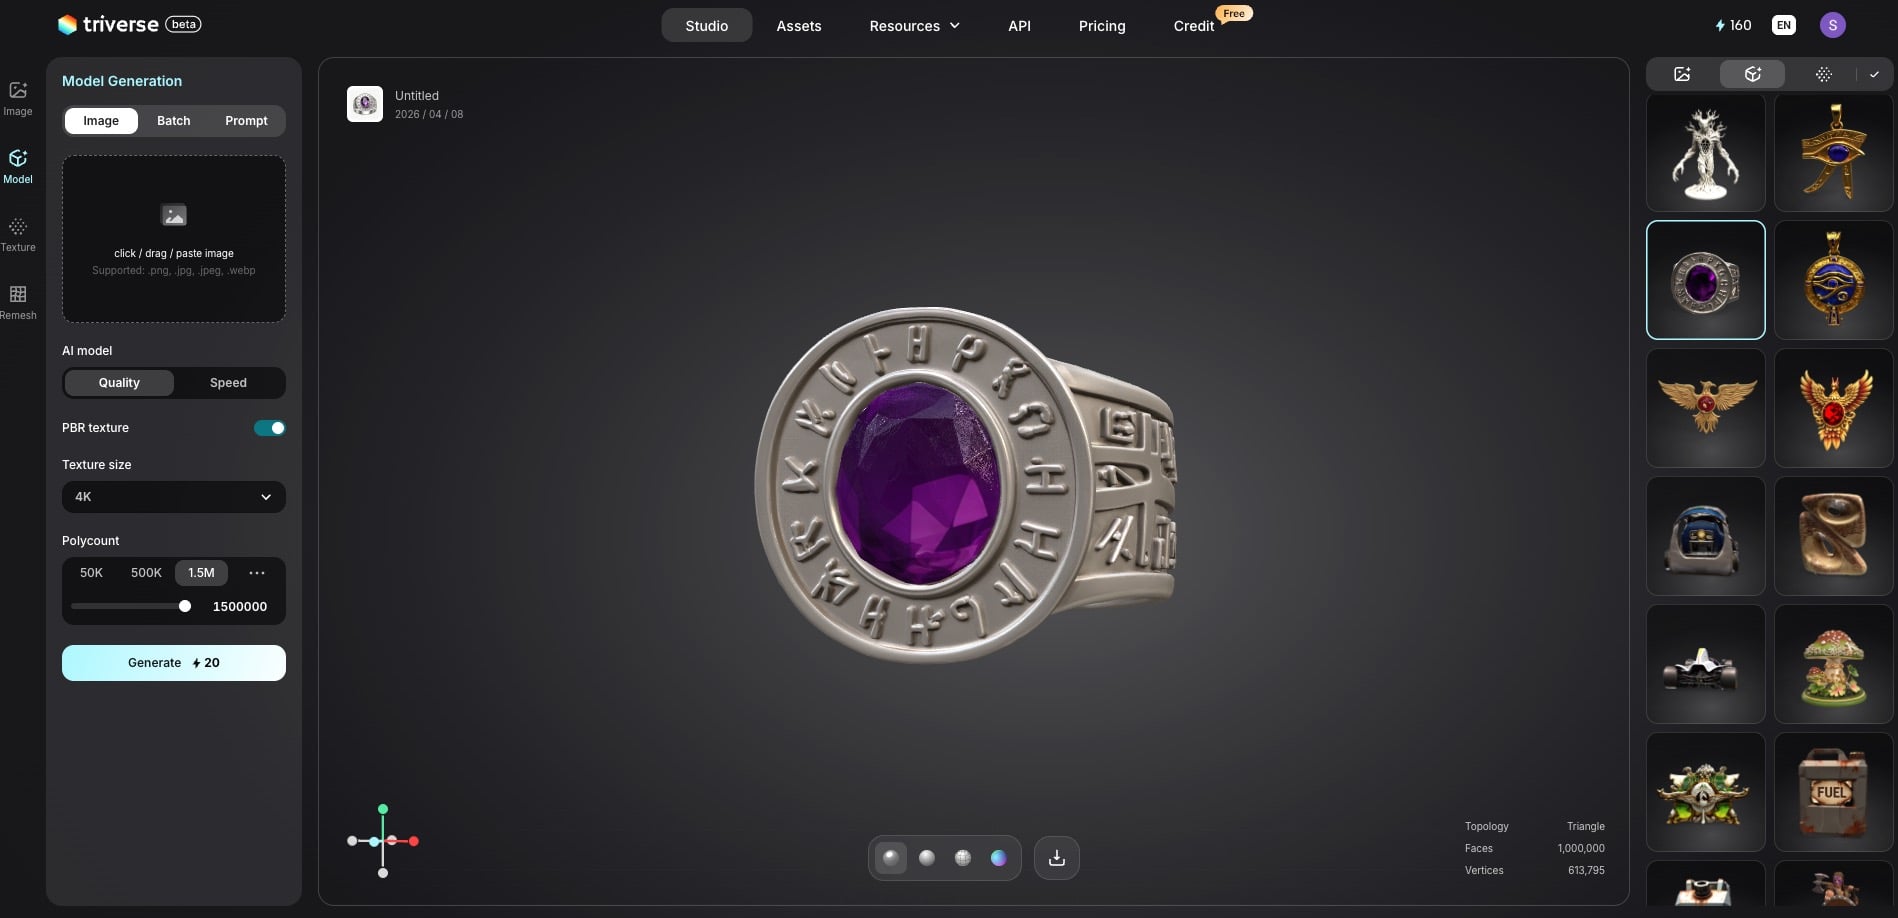
AI relief generation is the newest approach. Tools like Triverse AI or Meshy AI analyze the image semantically and generate proper 3D relief geometry. Not just pixel displacement. Actual intentional topology that follows the contours of your subject.
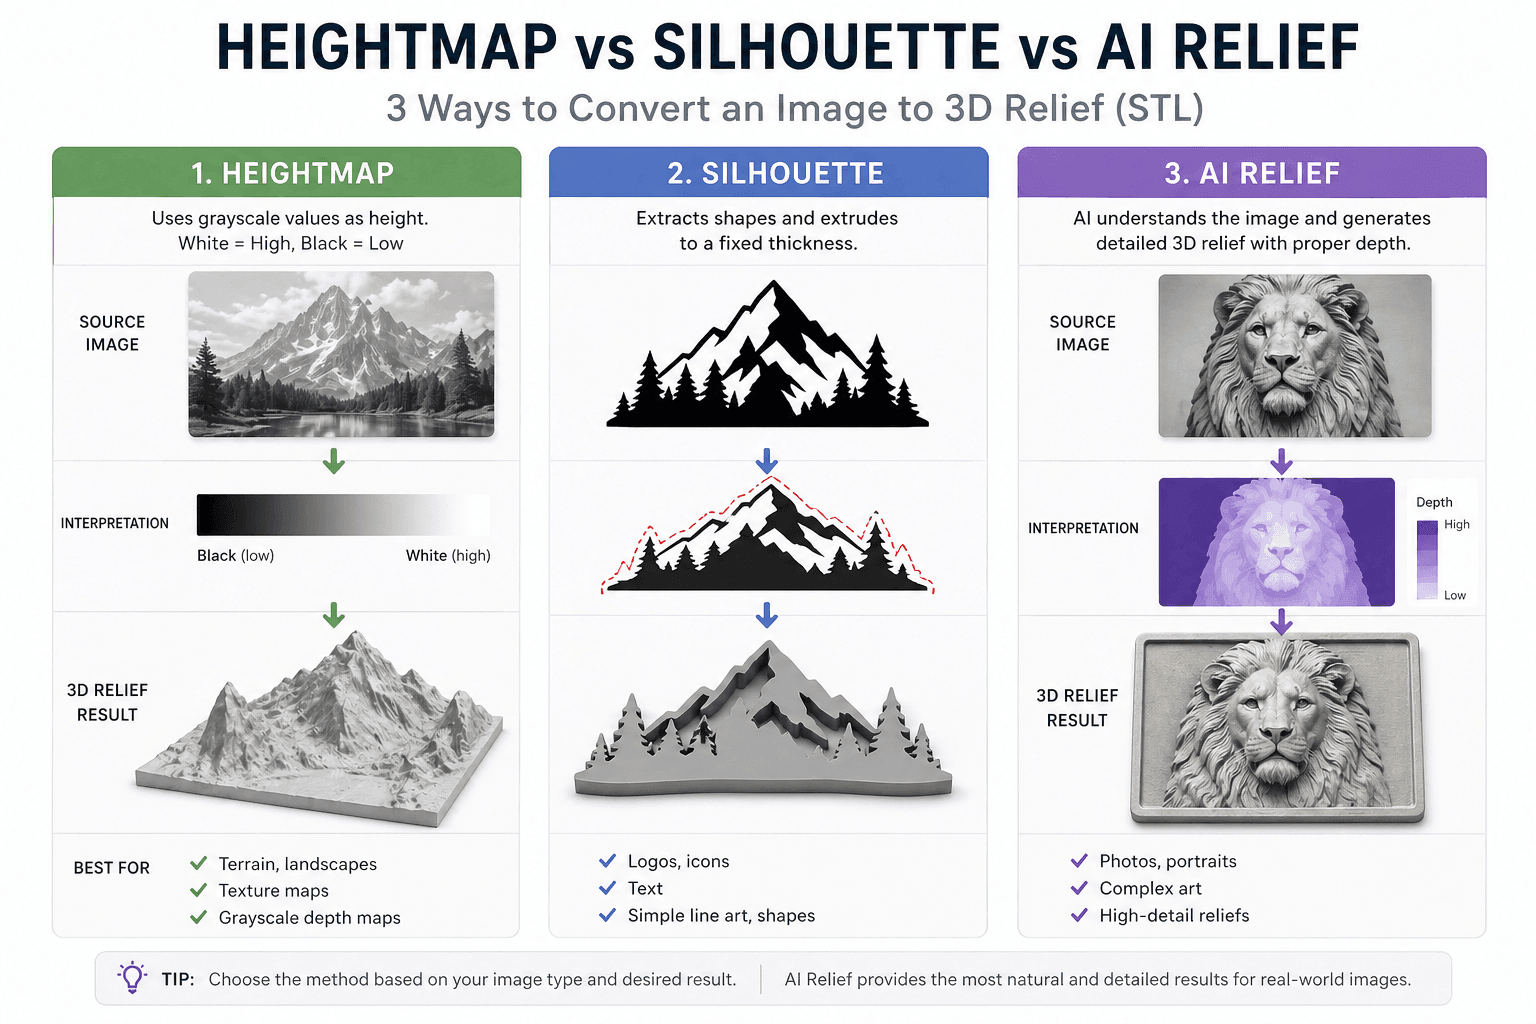
Most people skip understanding this distinction. Then they wonder why their conversion looks terrible.
What a Good STL Actually Needs
Before diving into conversion, know what you're aiming for.
Your mesh needs to be watertight, meaning no holes. Every edge should connect exactly two faces. If water leaks through, your slicer will complain.
Surface normals need to face outward. Inverted normals cause rendering artifacts and print failures.
Mesh density matters too. Too few polygons means blocky, faceted surfaces. Too many means huge files and slow slicing. The sweet spot depends on your print size and detail level.
And scale. STL files are unitless. Your slicer interprets them in millimeters by default. A model that looks right in Blender might be 100x too small when imported to Cura.
Prepare Your Image for STL Conversion
This is the number one reason conversions fail.
Most people upload a raw image and hope for the best. Then they blame the tool when the result looks wrong.
Grayscale Conversion for Heightmap STL
If you're using a heightmap-based, tool, your image must be grayscale. Not mostly grayscale. Not converted automatically in the tool. Pre-convert it yourself so you control the mapping.
In GIMP or Photoshop, go to Image, then Mode, then Grayscale. Adjust levels to spread brightness across the full 0 to 255 range. Save as PNG, which is lossless, or a high-quality JPG.
Push Contrast for Silhouette Work
For silhouette extrusion, you need absolute black and white. No gradients. No gray areas.
Convert to grayscale first. Then adjust the threshold until your shapes are solid black on white. Clean up any stray pixels with the brush tool.
This step alone determines whether your STL will have clean edges or jagged noise.
Image Resolution for Quality STL Output
Your image pixel density determines the mesh vertex density. Low-res image means a blocky mesh. You cannot add detail that wasn't in the source.
Print Type | Min Image Size | Recommended |
Small badge / coin (20–50mm) | 512×512px | 1024×1024px |
Medium relief (50–150mm) | 1024×1024px | 2048×2048px |
Large wall art (150mm+) | 2048×2048px | 4096×4096px |
CNC routing | 300 DPI at final size | 600 DPI for fine detail |
The rule is simple. Your image pixel density determines your mesh vertex density. Low res image means blocky mesh. You cannot add detail that wasn't in the source.
Common Mistakes in Image to STL Workflows
Using a low contrast photo. Heightmap converters interpret subtle brightness differences as elevation noise. The result is bumpy, chaotic surfaces.
Not cropping to your subject. Background elements become unwanted geometry. Crop tightly before converting.
Ignoring aspect ratio. Your image ratio should match your intended print shape. Stretching afterward distorts depth.
Saving as compressed JPG. Compression artifacts become surface artifacts. Use PNG for intermediate steps.
Below, we'll introduce 4 ways to convert images to STL. Not all conversion methods are equal. Here's how they stack up for different use cases.
Method 1: Convert Images to STL with AI 3D Model Generator
This method is best for photos, complex images, portraits, and art pieces.
AI 3D model generation tools analyze your image semantically and generate proper 3D relief geometry. Not just displacement based on pixel brightness. The result is a cleaner topology and smoother surfaces.
The workflow is simple: Upload your image to Meshy AI or Triverse AI. Wait 60 seconds for processing. Download the STL. Import to your slicer.
Pros are high quality, handles complex images, minimal post-processing. Cons are requires internet, some tools have usage limits, and sometimes the mesh needs to be repaired. Cost is freemium with free tiers available.
Use this when you have a photo or complex image and want the best possible result without manual work.
Method 2: Use Online Heightmap STL Converter
This method is best for grayscale heightmaps, terrain data, and simple embossed designs.
These tools take your image and displace a grid of vertices based on pixel brightness.
Go to ImageToStl.com or 3Dforprint. Upload your grayscale PNG or JPG. Adjust settings like height scale and mesh density. Download the STL. Then run it through mesh repair, which I'll cover in the next section.
Pros are fast, free, and no software install. Cons are produces non watertight meshes and limited control. Cost is free.
Use this when you have a proper heightmap image and need a quick conversion. Accept that you'll need post processing.
Method 3: Convert Images to STL in Tinkercad
Best for logos, text, simple shapes, and beginners.
Tinkercad has a built-in image to 3D feature that works in your browser. No install required.
Important note. Older guides, including Prusa's popular blog post, recommend Selva3D. That service no longer works. Registration emails aren't being sent. Use Tinkercad instead.
Create a free account at Tinkercad. Create a new design, then Import, then choose a file. Select your image. PNG with transparency works best. Adjust dimensions and height. Export as STL.
Pros are free, browser-based, and forgiving for beginners. Cons are limited quality and are not suitable for photos or complex images. Cost is free.
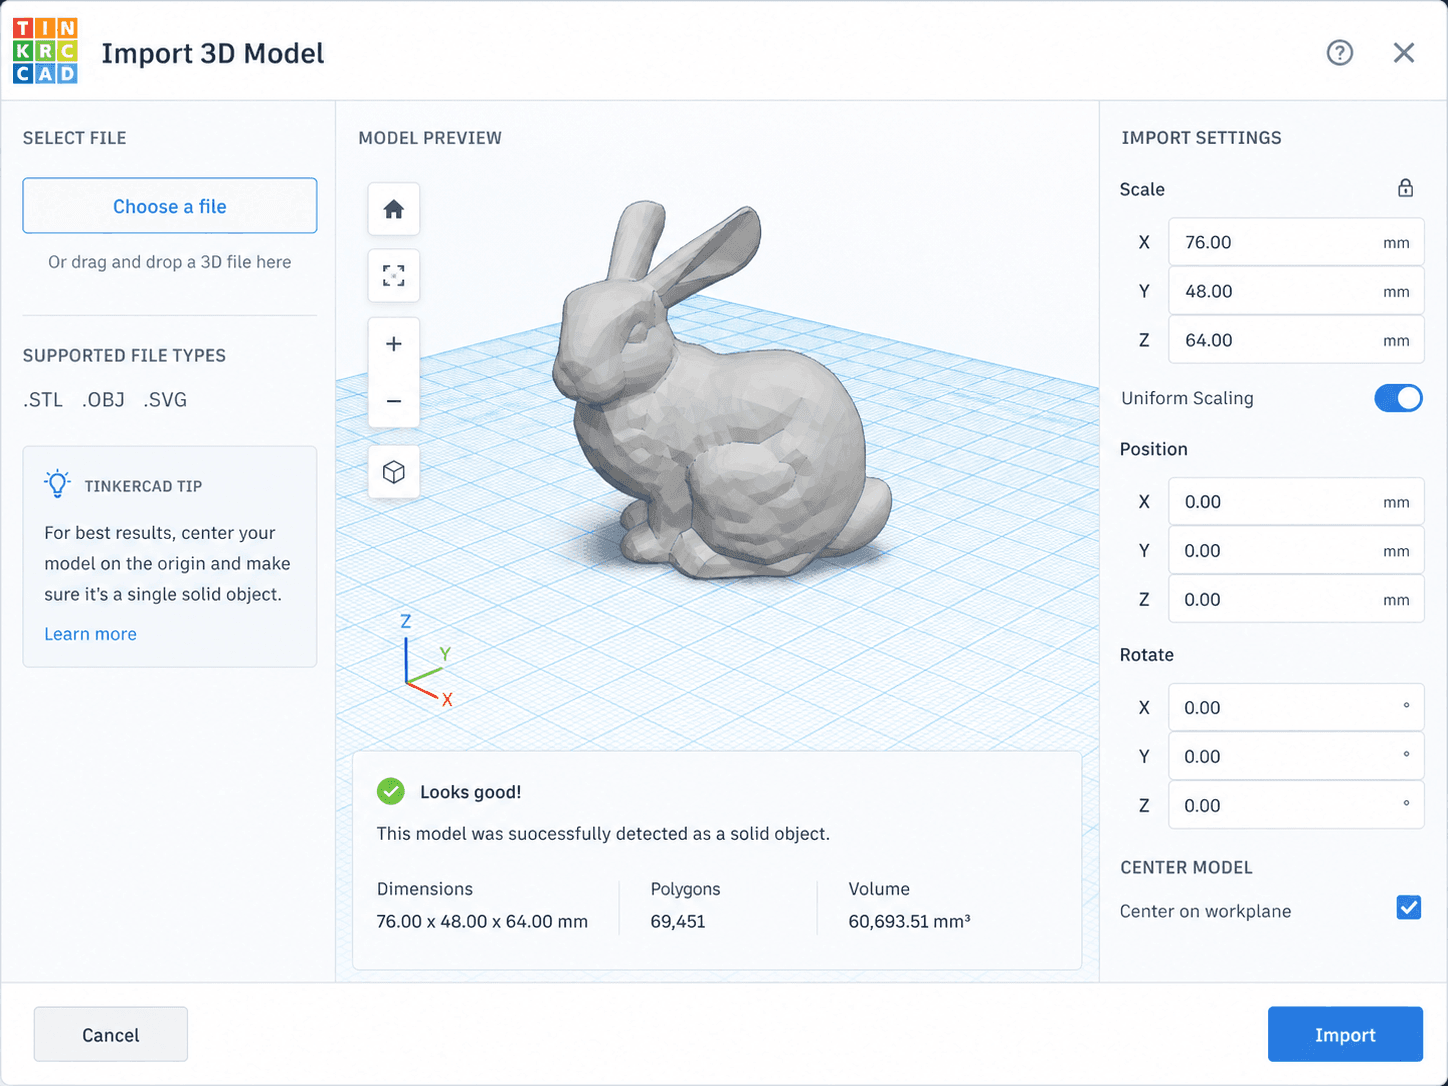
Use this when you have a logo or simple line art and want to extrude it into 3D.
Method 4: Blender Displacement for Image to STL
Best for advanced users who want maximum control.
Blender has built-in displacement capabilities. The workflow gives you precise control over every aspect.
Add a plane mesh. Subdivide heavily, at least 500 subdivisions for detail. Add Displace modifier. Load your image as texture. Adjust strength. Apply the modifier and export as STL. Use the 3D Print Toolbox addon to check and repair mesh.
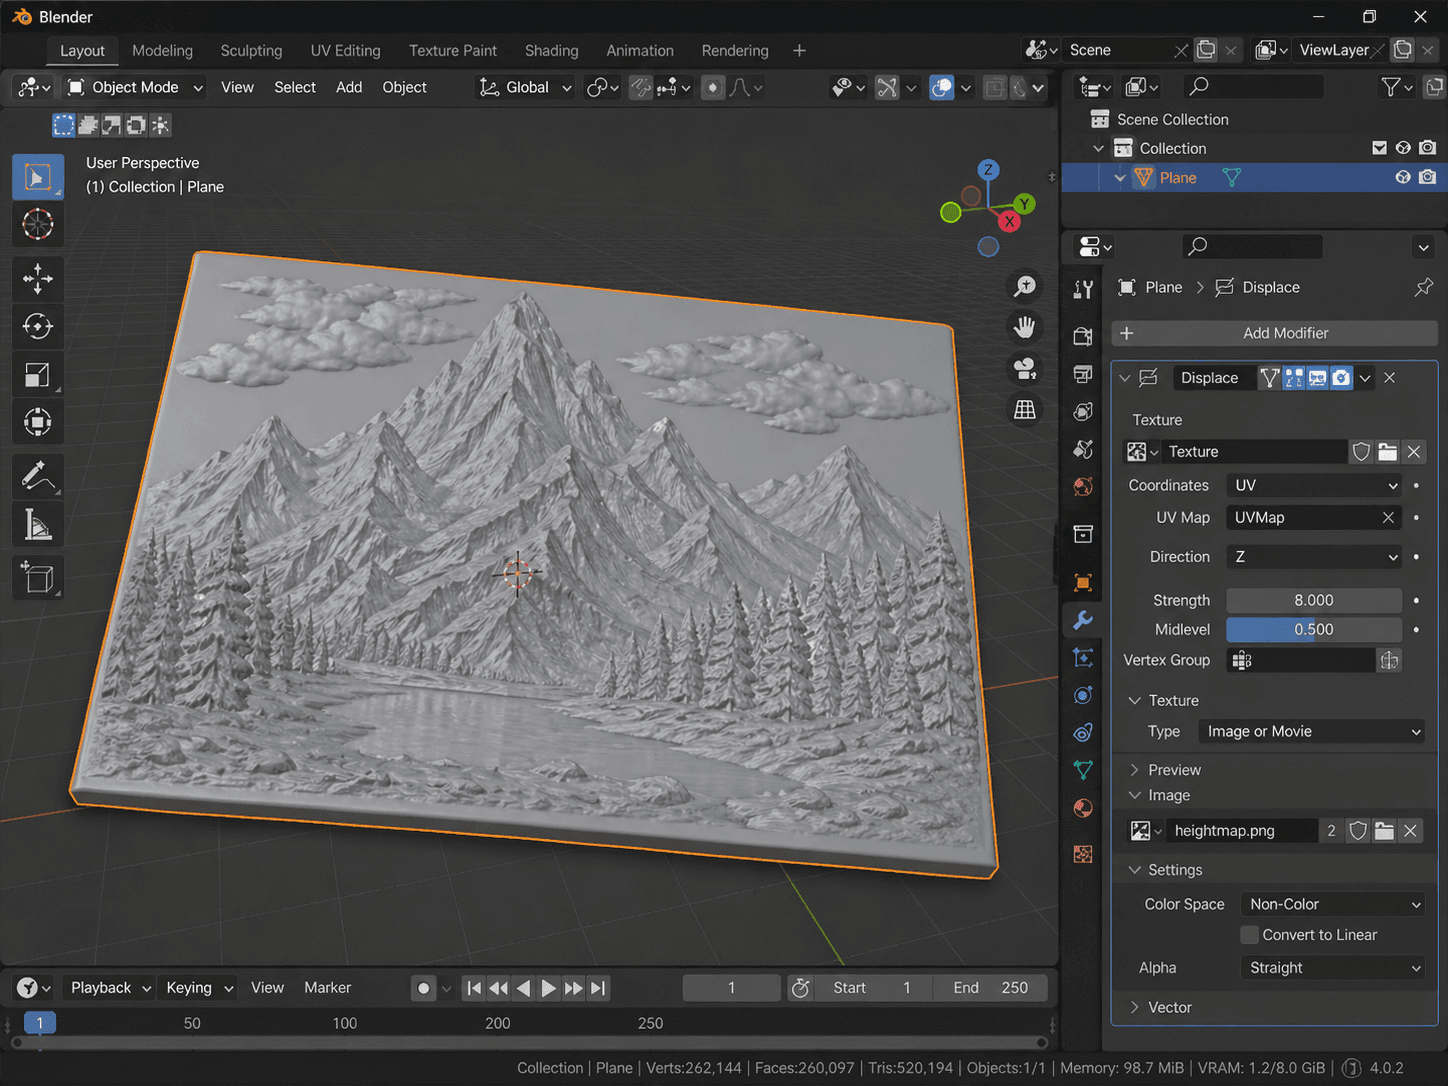
Pros are full control, free, and scriptable for batch processing. Cons are a steep learning curve and require mesh repair knowledge. Cost is free.
Use this when you're comfortable with Blender and need precise control over the conversion.
Image to STL Method Quick Comparison
Method | Best For | Quality | Time | Post-Processing |
AI Generator ( Meshy / Triverse) | Photos, complex images | High | ~1 min | Usually none |
Heightmap converter | Terrain, simple relief | Medium | ~2 min | Always needed |
Tinkercad | Logos, text, shapes | Medium | ~3 min | Sometimes |
Blender | Advanced users, full control | High | 15+ min | Depends on skill |
What High Fidelity Relief Actually Looks Like
Heightmap conversion displaces a flat grid. Every pixel becomes a vertex. The result is either too dense (huge file, slow slicing) or too coarse (visible stair-stepping artifacts).
AI-generated relief produces intentional geometry. The mesh follows the contours of your subject, not the pixels of your image. Fewer polygons. Smoother surfaces. Actual 3D form instead of a bumpy picture.
This is the quality difference you're paying for with AI tools. It's also the reason most heightmap conversions need mesh repair before they can slice properly.
Fixing Your STL After Conversion
Most online converters produce meshes that technically work but fail when you try to slice them. Here's how to fix the common issues with a converted STL file.
Why Converted STLs Fail Slicing
There are three main problems:
- NNon-manifold: An edge connected to more than two faces. Slicers don't know which side is inside and which is outside.
- Holes in the mesh: Missing faces create gaps. Even a single missing triangle breaks watertightness.
- Inverted normals: The surface is facing inward instead of outward. The model looks inside out to the slicer.
These errors are invisible in preview but cause silent failures. Missing layers. Incomplete infill. Slicer crashes.
Repair STL Files with Meshmixer MakeSolid
Autodesk Meshmixer is free and has the best one click repair function for this use case.
Download and install Autodesk Meshmixer. Import your STL. Select the model with Ctrl A. Go to Edit then MakeSolid. Adjust Solid Accuracy and Mesh Density, start with defaults. Click Update then Accept. Export as STL.
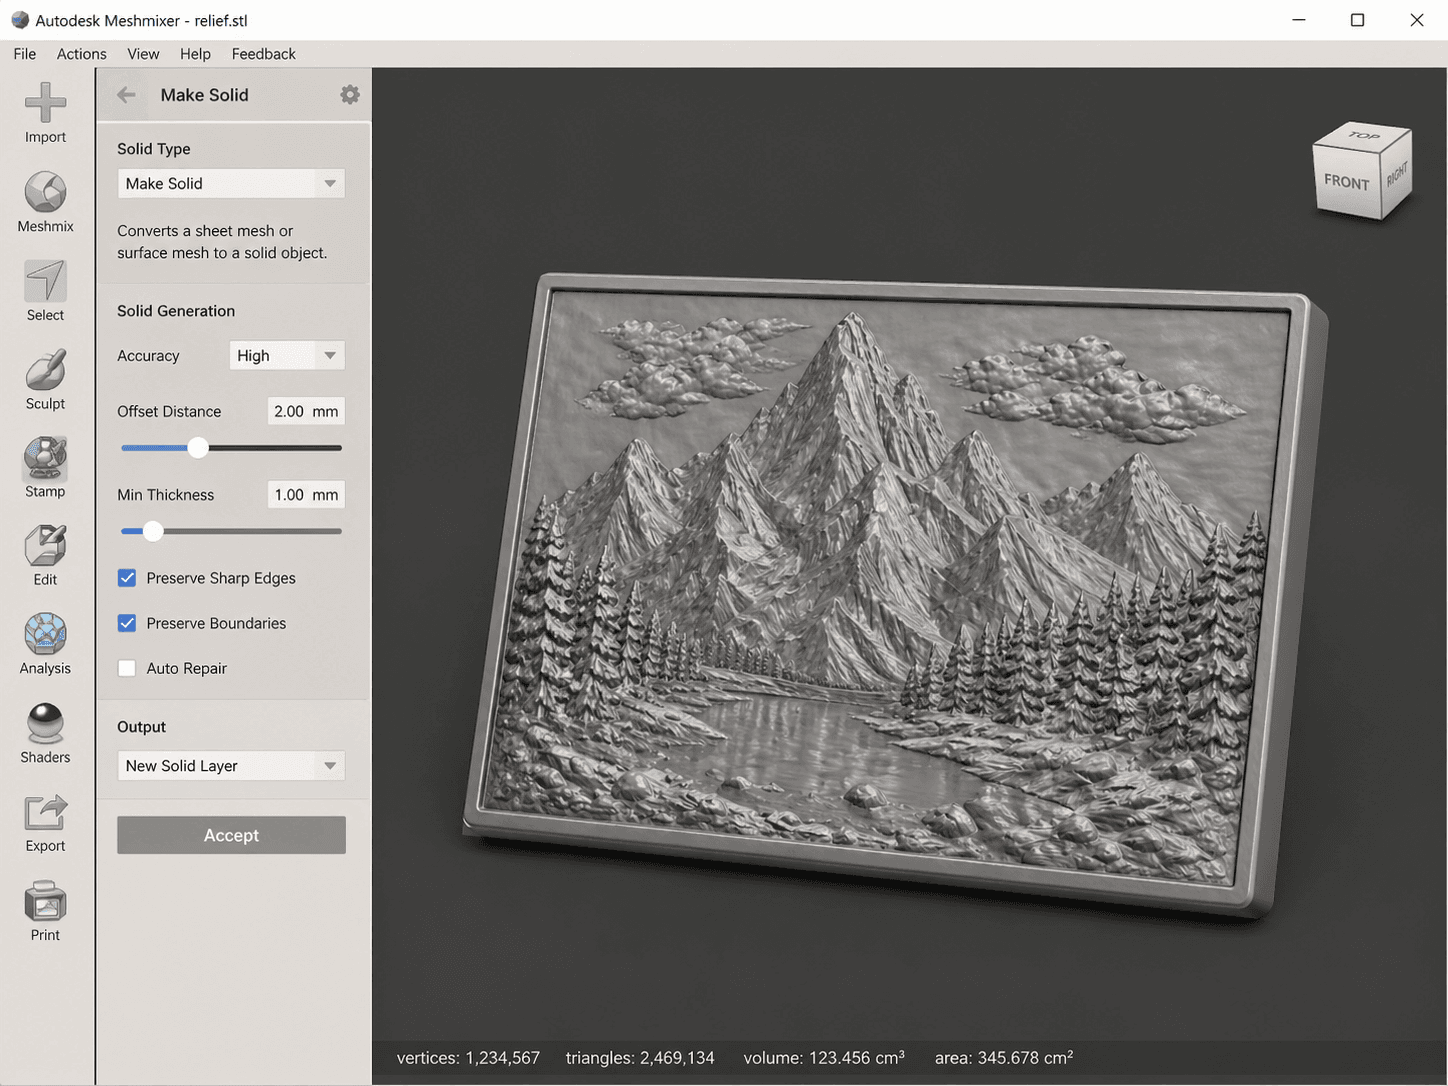
MakeSolid rebuilds your entire mesh from scratch. It guarantees a watertight result. It's the nuclear option. For converted STLs, that's usually what you need.
Fix STL Mesh Online with Netfabb
If you can't install software, use Netfabb's free online repair.
Go to Netfabb Online Repair. Upload your STL. Click Repair, the wrench icon. Wait for processing. Download the repaired file.
It's slower than Meshmixer and has file size limits. But it works from any browser.
Blender 3D Print Toolbox
For Blender users, install the 3D Print Toolbox addon. It's built into Blender. Import your STL. Open the 3D Print panel in the sidebar. Click Check All. Use Make Manifold and Clean Up to fix issues. Export as STL.
This gives you more control but requires understanding what each error means.
How to Check Mesh Quality
Before sending any converted STL to your slicer, check it.
Import to Meshmixer and go to Analysis then Inspector. Red lines mean non manifold edges. Blue dots mean holes. Green means good.
Or use your slicer's built in check. PrusaSlicer shows errors in the plater. Cura highlights problem areas.
Or upload to Netfabb Online for an automated check.
If your slicer says the model is non manifold, fix it first. Don't hope it will print anyway. It won't.
STL Slicing Checklist for Relief Prints
Run through these checks before you hit Slice.
STL Scale and Units Setup
STL files are unitless. Your slicer assumes millimeters. If your model looks tiny, like 0.1mm, or enormous, like 1000mm, check the source scale.
Heightmap converters often output at a 1-to-1 pixel scale. A 1024 pixel image becomes a 1024mm model. Scale down in your slicer.
AI tools usually output at a reasonable print scale, between 50 and 150mm. Verify before printing.
Tinkercad lets you set dimensions during import. Check that they match your intent.
Mesh Density and File Size
Under 100,000 triangles means fast slicing and is acceptable for simple prints. Between 100,000 and 500,000 triangles is a good balance for detailed relief. Over 1,000,000 triangles means slow slicing and is only for high detail work.
If your file is bloated, use Meshmixer's Reduce function to decimate the mesh without visible quality loss.
Supports for Relief Prints
Relief models typically print flat with the relief facing up.
Flat relief under 5mm depth usually needs no supports. Deep relief over 5mm needs supports on overhangs steeper than 45 degrees. Portraits and art relief might benefit from tree supports for minimal contact marks.
Print with the relief face up and flat back down. This preserves surface detail on the visible side.
Generate 3D Relief Models Without Conversion
Everything above is reactive. You're fixing a problem that wouldn't exist if you started with proper 3D data.
The reality is that converting 2D to 3D is inherently lossy. You're inventing depth that wasn't there. The results range from acceptable to garbage depending on your source image and method.
If you need reliable, print ready 3D models from images, especially for professional work or customer facing products, consider skipping the conversion step entirely.
Triverse AI generates 3D models directly from images or prompts with proper topology. Not just displaced grids. The output is watertight, correctly scaled, and ready for slicing or import into game engines.
For studios without dedicated 3D artists, this is a practical workflow upgrade. You only need to upload an image, and Triverse AI handles the rest.
Frequently Asked Questions about Image to STL Convertor
Can I convert a JPG or PNG directly to STL?
Yes, but results depend heavily on your method. JPG works as a heightmap in most converters. Expect mixed results. PNG supports transparency, which is useful for silhouette extrusion. For photos, use 3D AI generation tools like Triverse AI for significantly better quality.
What type of image is best for STL conversion?
Grayscale heightmaps at least 1024 pixels for terrain, textures, and embossed designs. High contrast black and white images for logos and line drawings. Complex photos work best with AI generation tools. Traditional heightmap converters produce poor results with color images.
Why does my converted STL have holes or look broken in the slicer?
Most image to STL converters produce non watertight meshes. This isn't a problem with your image. It's a limitation of the conversion method. Run your STL through Meshmixer's MakeSolid or Netfabb Online Repair before slicing. This single step fixes 90% of conversion related print failures.
Is Selva3D still working?
No. Multiple users report the registration system is broken. Verification emails aren't being sent. For the Tinkercad based workflow described in older guides including Prusa's popular blog post, use Tinkercad's built in image import instead. It's free, browser based, and actually works.
What resolution image do I need for a good STL?
Minimum 1024 by 1024 pixels for acceptable results. For detailed prints like jewelry, miniatures, and intricate art, use 2048 pixels or higher. The pixel density of your source image directly determines the vertex density of your mesh. You cannot add detail that wasn't in the original.
Can I convert a color photo of a person into a printable STL?
Standard heightmap converters don't handle organic subjects well. The depth mapping is based on brightness, not actual geometry. Results look distorted. For portraits and people photos, use AI tools like Triverse AI or Meshy AI, which generate proper 3D topology rather than just displacing pixels.
Is there a completely free image to STL converter?
Yes. Tinkercad is browser based with no installation. Autodesk Meshmixer MakeSolid is a free desktop app. Netfabb Online Repair is browser based repair. All are free. Online converters like ImageToStl have free tiers but may limit resolution or add watermarks. AI tools typically offer free trials with usage limits.
What's the difference between a heightmap and a relief model?
A heightmap is a grayscale image where brightness equals elevation. Converters displace a flat grid based on these values. A relief model is an actual 3D geometry with intentional contours, not just pixel displacement. Heightmap conversion is fast but limited. AI relief generation produces cleaner, more printable results.
Bottom Line
Converting images to STL isn't magic. It comes down to three things: prepare your image (grayscale, contrast, resolution), match the method to your content (AI for photos, extrusion for logos, heightmap for terrain), and repair the mesh before slicing.
Or skip the entire pipeline. Triverse AI generates print-ready 3D models from any image — no preprocessing, no mesh repair, no trial and error. Your 2D image can become a 3D print. Now you know how.