AI 3D Generation Troubleshooting: Fix Mesh, Topology, and UV Problems
Learn how to diagnose and fix the most common AI 3D generation problems, from triangle soup and non-manifold geometry to UV overlap and watertight failures.
September 7, 2026
You uploaded a concept sketch. The preview looked right. Then you rotated the model and found a fused arm, a missing half, or a triangle count that would crash a mobile frame rate. The generation did not lie to you. It showed you what it could reconstruct from the input. The problems appeared when you looked closer.
This is the gap between a generated mesh and a usable one. Most guides walk through what went wrong in individual cases. This guide walks through the diagnostic thinking first: find the symptom, trace the cause, then decide whether to fix it in place or go back and regenerate. The fixes exist. The harder skill is knowing which one applies.
Why AI 3D Generation Fails Upstream of Where You Notice It
A generated mesh looks finished from the outside. It fails from the inside out. The AI optimizes for how the model appears from the viewing angle it was given. It does not optimize for manifold geometry, clean edge flow, or a UV layout that survives a texture map. Those are downstream concerns that generation does not account for.
Three upstream decisions decide whether the output is fixable or a dead end.
The input image is the most common failure point. If the concept art or photo does not clearly show the silhouette, the separation between overlapping parts, or the full extent of the form from a given angle, the model fills in what it cannot see. No amount of post-generation repair fixes a generation that guessed wrong.
The model and generation mode is the second decision. Some tools are built for stylized props. Others handle characters. Some modes generate from a single image and others reconstruct from multiple angles. Selecting the wrong mode for the subject produces a mesh that looks close but behaves wrong. Our comparison of image-to-3D versus text-to-3D generation breaks down which mode suits which asset type.
The cleanup sequence is the third. Mesh repair has an order. Running steps out of sequence causes problems to cascade, where fixing one issue rebreaks what you just fixed. Understanding the sequence prevents wasted effort and tells you which stage to revisit when something goes wrong. Wikipedia's entry on mesh topology covers the structural concepts behind manifold geometry and edge flow if the terms are new.
If any of those three upstream decisions is wrong, no post-generation cleanup solves it cleanly. You are managing a symptom rather than the cause.
The Cleanup Sequence: Fix in Order, Not in Reaction
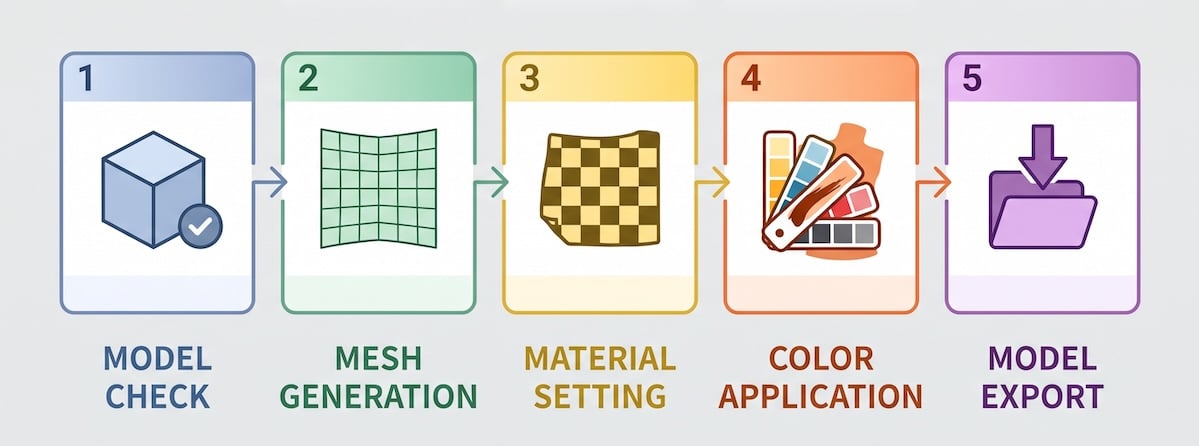
When a mesh needs repair, the steps have a specific order because each stage prepares the mesh for the next one. Skipping or reordering steps creates rework.
The sequence is: check for non-manifold geometry first, then retopology and polygon reduction, then UV unwrapping, then texture mapping, then export. Each stage makes the mesh ready for the one that follows.
Run a manifold check before anything else. Non-manifold edges, open holes, and internal faces break UV unwrapping and texture baking silently. A mesh that looks clean can produce stretched or misaligned textures because of an internal geometry error you never saw.
Retopology or decimation comes second, after the mesh is closed and manifold. If you decimate before closing holes, the hole fills but the surrounding geometry changes and the fix collapses. If you retopologize before the mesh is watertight, the new topology inherits the original errors.
UV unwrapping comes third, after retopology changes the surface. If you unwrap before retopology and then rebuild the topology, the UV islands no longer match the new surface. You unwrap again.
Texture mapping comes last. It is downstream of everything else and will reproduce every upstream error in the final look of the asset.
This sequence is not a suggestion. Each step invalidates the work of the steps before it if run out of order. Export at each stage as a GLB file so you can step back without regenerating from scratch. A backup at every stage means a failed retopology does not mean a failed generation.
The Diagnostic Tree: Symptoms, Causes, and Fixes
Not every generation problem has the same solution. The table below maps seven common failure modes to their root causes and the appropriate response. For a deeper walkthrough of each cleanup step in Blender, see our full guide to repairing mesh geometry.
Symptom | Most Likely Cause | Fix It Here or Regenerate? |
Model looks wrong from the back | Single-image generation guessing the hidden half | Small gaps: fix in Blender. Large missing or fused sections: regenerate with better input |
Triangle soup, too dense to rig | Surface extraction not structured topology | Fix: retopology. Decimate only works for simple static props |
Texture smeared or misaligned | Overlapping UV islands after retopology | Fix: re-unwrap after any retopology |
Parts fused into a blob | Single image cannot separate overlapping elements | Cannot split in Blender: regenerate with separated input or multi-view mode |
Not watertight or manifold | Open edges, internal faces, duplicate verts | Fix: Blender 3D Print Toolbox or Make Manifold |
Thin parts disappear (straps, fingers, wires) | Single-image reconstruction misses unsupported geometry | Regenerate with closer-angle input or rebuild thin parts in Blender (often faster than repeated retries) |
Different result every time | Platform generating at a random seed | Cannot lock seed on most platforms: try to isolate other variables |
Generation rejected or credits lost | File size limit exceeded or content filter triggered | Reduce texture resolution or file size; review prompt for filter triggers |
The sections below walk through each failure mode in detail.
The Back Is Fuzzy or Parts Are Missing
You rotate the model and find geometry you did not ask for on the hidden side. Or you find entire sections missing where the front looked complete. This happens because a single-image generation has to reconstruct what it cannot see. The AI fills in the gaps based on what similar objects look like, which is often wrong.
How you fix this depends on the scale of the problem. Small gaps and stray geometry are repairable in Blender. Use the Bisect tool to cut away unwanted geometry, then fill the resulting holes with F and clean up the surrounding edges. If the back is mostly missing but the front is correct, you can rebuild the missing section by extruding from the visible edge and shaping it to match.
Large-scale missing or fused sections are not repairable in a meaningful way. You would spend hours rebuilding geometry by hand that the generation already failed to construct correctly. Regenerate with a better input image or switch to a multi-image generation mode if your tool supports it.
The diagnostic rule: if the shape is correct but incomplete, repair it. If the generation made structural assumptions that are wrong, repair is the long way around a problem that starts at the input.
The Mesh Is Dense Triangle Soup
The mesh looks fine from a distance but close up it is a field of tiny triangles that looks like digital noise. Rigging this mesh causes the surface to ripple and deform unpredictably because the edge flow does not follow the form.
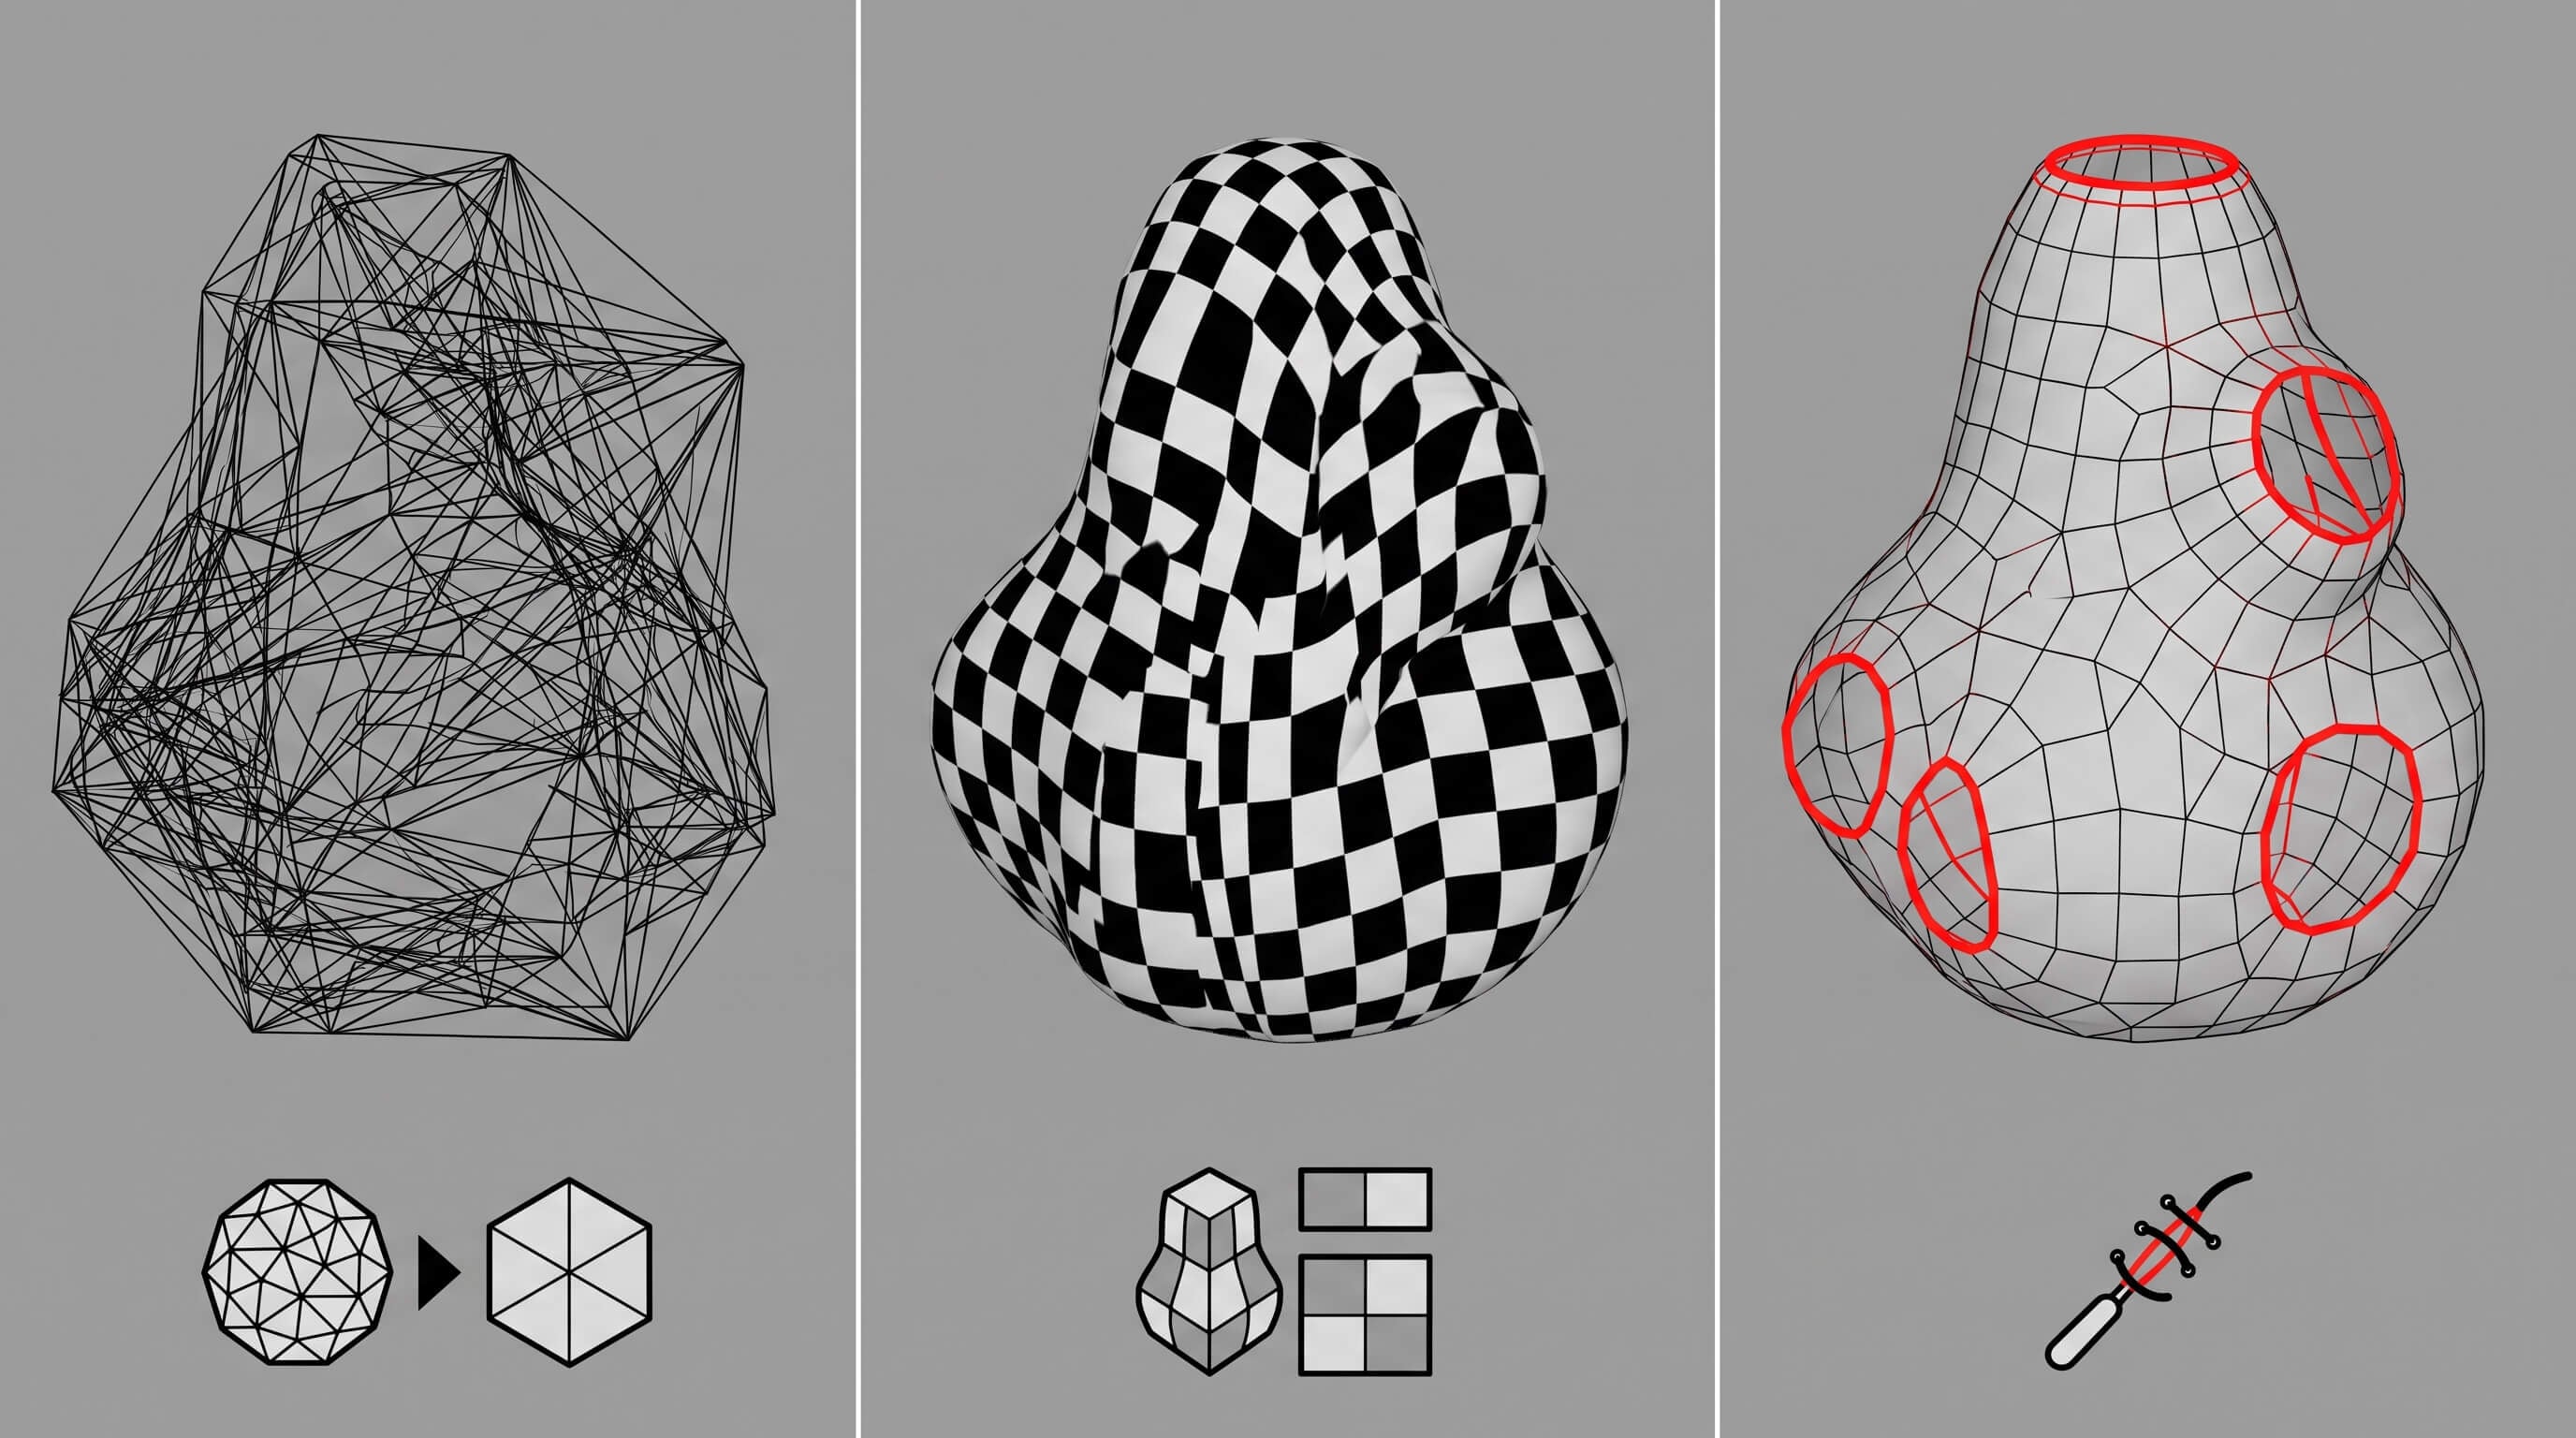
The root cause is that AI generation optimizes for visual match, not geometric structure. The surface looks right because the outside faces are positioned correctly, but the interior is a dense cloud of triangles that has no coherent structure. Decimating a triangle soup produces a smaller triangle soup. You cannot fix the structure by reducing the count.
The fix is retopology: rebuilding the mesh as clean quad topology that follows the form. In Blender, use the RetopoFlow add-on or the Quad Remesher add-on to generate a new clean mesh over the existing surface, then transfer the detail back as a normal map. For simple props that do not need rigging, the Decimate modifier works if the silhouette survives the reduction. For anything rigged or animated, retopology is the only path.
If your generation tool offers quad topology output, that option eliminates the retopology step entirely. Try it before rebuilding the mesh by hand. Some platforms expose a built-in Remesh step with Quad or Triangle topology modes and a polycount slider that runs inside the editor, so the cleanup pass does not require Blender for assets generated on those platforms.
The Texture Looks Smeared or Misaligned
The model looks right in the preview. You apply a texture map and the surface looks smeared, with color bleeding across edges or textures appearing on the wrong faces. This is almost always a UV problem.
The most common cause is running UV unwrapping before retopology. When you change the surface geometry with retopology or decimation, the UV islands no longer match the new surface. The texture follows the UV coordinates, not the visual surface.
The fix is to re-unwrap after any geometry change. Select the mesh in Edit Mode, open the UV Editor, and run UV unwrapping again. For simple props, Blender's Smart UV Project produces workable results without manual seam placement. For assets with hard surface transitions or intended deformation, mark seams manually and control the island layout so the UV grid aligns with the surface logic.
After unwrapping, always check for UV overlap in the UV Editor using the Overlap display mode. Overlapping islands silently produce smeared textures that do not look wrong in a still render and look completely wrong in engine.
Parts Are Fused Together
A character that should have separate arms and torso comes out as a single fused mass. Separate objects that were visible in the input image collapse into one another. The AI could not separate the overlapping elements and treated them as a single continuous surface.
This cannot be repaired in Blender. The geometry is genuinely fused at the polygon level. You can use a Boolean operation to cut the shape apart, but the resulting meshes will not look like the separate parts you intended. Boolean subtraction is a blunt instrument on fused geometry.
The real fix is to regenerate with input that makes the separation clearer. If the input image shows overlapping limbs, try editing the image to create a clear gap before uploading. Some platforms offer a part separation mode that treats objects in the input as separate targets. If your tool supports multiple input images, use them. If not, and the tool does not offer part separation, switch to a tool that does.
The Mesh Is Not Watertight or Manifold
The mesh has open edges, internal faces, or duplicate vertices. A slicer for 3D printing refuses to process it. A game engine flags an import error. The surface is not fully closed, and the software cannot determine what is inside and what is outside.
These are the most straightforward repair targets. Blender's 3D Print Toolbox addon handles the most common cases in a few steps.
Select all vertices in Edit Mode and run Mesh, Clean Up, Merge by Distance to collapse duplicate vertices. Open the 3D Print Toolbox and run Check All to see what remains. Use Make Manifold to close holes and rebuild the surface as a closed shell. Recalculate normals with Shift-N to point them outward, then verify with the normals display.
If Make Manifold produces artifacts on complex geometry, a two-step approach works: flip all normals inward with Shift-CTRL-N, use F to fill holes while the normals point in, then flip normals outward again with Shift-N. For remaining degenerate faces, use Select All by Trait, then Delete Loose. iamRapid's free STL repair tool handles the same non-manifold and watertight fixes in a browser if you prefer not to open Blender for quick validations.
After the mesh is watertight, export as a GLB and run it through the 3D Print Toolbox again to confirm it passes all checks before moving to UV work.
The Same Input Produces Different Results Every Time
You run the same image through the same settings and get a different mesh each time. Small variations in pose, proportion, or detail make it impossible to iterate toward a specific direction.
This is usually a seed problem. Most platforms generate with a random seed by default. Each run produces a slightly different reconstruction because the underlying randomness is not locked. You are not comparing generation modes or input qualities. You are comparing random samples.
Check whether the platform offers seed control or an image-to-image continuation mode. If seed locking is available, set it to the same value for each run and note the seed that produced the best result. If the platform does not offer seed control, the generation is fundamentally non-deterministic. Lock in every other variable you can: the input image, the generation mode, and the resolution settings. This narrows the variance even if it cannot eliminate it.
The Generation Was Rejected or Credits Were Lost
The generation fails with a rejection message or the platform shows an error state. Credits may or may not have been charged.
File size is the most common cause of rejection. A compressed texture alone can account for 70 to 80 percent of the total GLB file size. Export the geometry without textures first and try again. If the geometry-only export succeeds, the problem is the texture, not the mesh.
For oversized textures, resize to a power-of-two resolution like 2048 by 2048 or 1024 by 1024, convert to a compression format like Basis Universal, and reimport. If the texture is not oversized, review the input for branded logos, recognizable characters, or other elements that may trigger content filters. Adjust the prompt or image and resubmit. Blender's 3D Print Toolbox documentation covers the full audit and repair workflow if you are new to the process.
For server-side generation failures, check the platform documentation on credit refunds. Some platforms refund automatically on error. Others require a support request. A 24-hour hold on credit return is common on platforms that do not guarantee immediate refunds.
Fix It Here or Generate Again? The Decision Framework
Not every generation problem is worth fixing. Some meshes need to go back to the input stage.
Fix the existing mesh when the problem is in the topology, the UV layout, or the texture alignment. These are surface-level issues that exist on top of a fundamentally correct structure. The shape is right. The execution is wrong.
Generate again when the problem is at the concept level. Wrong proportions or silhouette, hallucinated geometry that does not match the input, or a platform that cannot produce the subject you are asking for. If you would spend more time repairing than rebuilding, rebuild.
AI Image-to-3D generation has clear boundaries. It works fast for prototyping props, environment dressing, and concept visualisations where rough geometry is acceptable at the draft stage. It works less well for hero characters that need anatomically correct topology for rigging, subjects with high transparency or mirror-finish surfaces, or any situation where the asset needs exact real-world dimensions from the start. Knowing the difference prevents spending hours repairing geometry that started in the wrong place.
The experience rule is this: if you regenerate, change only one variable. Change the input image, or change the generation mode, or change the platform. Change one thing so you can see what actually moved the result. Changing multiple things at once makes it impossible to learn what the generation tool can and cannot do.
The Fastest Fix: Prevention at the Input Stage
Most generation failures are downstream of a decision made before the first generation attempt. If the input image does not clearly show the silhouette, the separation between overlapping parts, or the full extent of the form from the chosen angle, no cleanup workflow fully compensates.
Before you upload, check whether the image has a clear outline with strong contrast between the subject and background, whether overlapping parts like limbs are visually distinguishable from each other, whether the background is plain or removed entirely, whether the long edge is at least 1024 pixels, and whether the subject faces a three-quarter angle rather than straight on. Each of these reduces the reconstruction burden on the AI and makes the output easier to clean up.
Our guide on what makes a good input image for AI 3D generation walks through this checklist with annotated examples and explains why each factor shifts the generation result.
Fix and Clean AI 3D Models in Blender: Step-by-Step
Once you have a mesh that needs repair, Blender handles most of the work. The steps below cover the most common cleanup workflow for a generated mesh that is mostly correct but needs surface work before it is game-ready.
- Step 1: Import and audit.
Open Blender, delete the default cube, and import the mesh. Switch to Edit Mode and open the 3D Print Toolbox from the sidebar or the Add-ons menu. Run Check All and review the non-manifold edges, holes, and loose geometry counts. This audit tells you exactly what needs fixing before you start.
- Step 2: Repair manifold issues.
Work through the 3D Print Toolbox results in this order: merge by distance, delete loose, recalculate outside normals, and make manifold. For remaining artifacts, use the Bisect tool to cut unwanted geometry and F to fill small holes. Export as GLB at this stage as a rollback point.
- Step 3: Control polygon count.
For simple props that do not need rigging, apply a Decimate modifier and reduce the ratio while watching the silhouette in the 3D Viewport. For characters or any mesh that will be rigged, run retopology with RetopoFlow or Quad Remesher. After retopology, re-unwrap the UVs since the surface geometry has changed. Our guide on quads versus triangles in game retopology explains why edge flow matters for rigged assets and when triangles are acceptable.
- Step 4: UVs and texture.
Select the mesh and enter Edit Mode. Unwrap with Smart UV Project for simple geometry or mark seams manually for complex shapes. Check for overlap in the UV Editor. For baking high-poly detail onto a retopologized low-poly mesh, set up a bake with the original high-poly as source and the retopologized mesh as target. Bake the normal map, apply it to the material, and verify in the viewport. Blender's UV mapping documentation covers seam placement and island packing in more detail if the UV step is new to you.
- Step 5: Export for your engine.
Export as GLB for static props and web delivery, or as FBX if the asset carries rigging and animation. The Khronos Group glTF 2.0 specification is the authoritative reference for what the format supports and what game engines expect on import. Confirm the polygon count in the export dialog matches your project budget. Our checklist for what makes a 3D model game-ready covers the import checks that matter most before the asset enters the scene.
If the mesh came from a platform that does not offer clean topology output, our tutorial on cleaning up AI models in Blender walks through the same workflow with annotated screenshots.
Beginner shortcut:
5 things to check after export. If you are new to 3D and the full workflow above is daunting, run this shorter checklist first. It will not replace the full cleanup, but it catches most issues before the model reaches an engine or slicer:
- Smooth normals: in Edit Mode, select all and press Shift-N. Fixes most lighting artifacts on flat surfaces.
- Fill obvious holes: in Edit Mode, press Alt-H to reveal hidden geometry, then use F to fill small gaps. Larger holes need the 3D Print Toolbox.
- Light decimation: for game assets, apply a Decimate modifier at a conservative ratio. A 50 to 75 percent reduction often lands the mesh in a usable polygon range without destroying the silhouette.
- Set scale and pivot: in Object Mode, press Ctrl-A to apply scale, then position the origin at the base or centre of mass. Correct pivot and scale before import prevents objects landing at the wrong size or origin in the engine.
- Quick export test: export the mesh as GLB and re-import it. If the re-import shows errors, the export itself introduced a problem.
For game assets, prioritise silhouette accuracy and polygon budget. For 3D printing, prioritise watertight geometry and minimum wall thickness.
Why Artist Mesh Changes the Troubleshooting Math
The cleanup workflow above assumes the mesh needs significant repair. The reason it often does is that most AI tools generate surface geometry without optimizing for what comes after. The triangle soup, the non-manifold edges, the missing backs: these are side effects of a generation process that was not designed to produce game-ready topology.
Artist Mesh on Triverse AI generates mesh geometry directly as clean triangular topology from a single input image. For props and environment dressing, this means the output arrives already manifold and structured for engine import. The cleanup sequence above shortens from six steps to three: check the polygon count against your budget, export, and import.
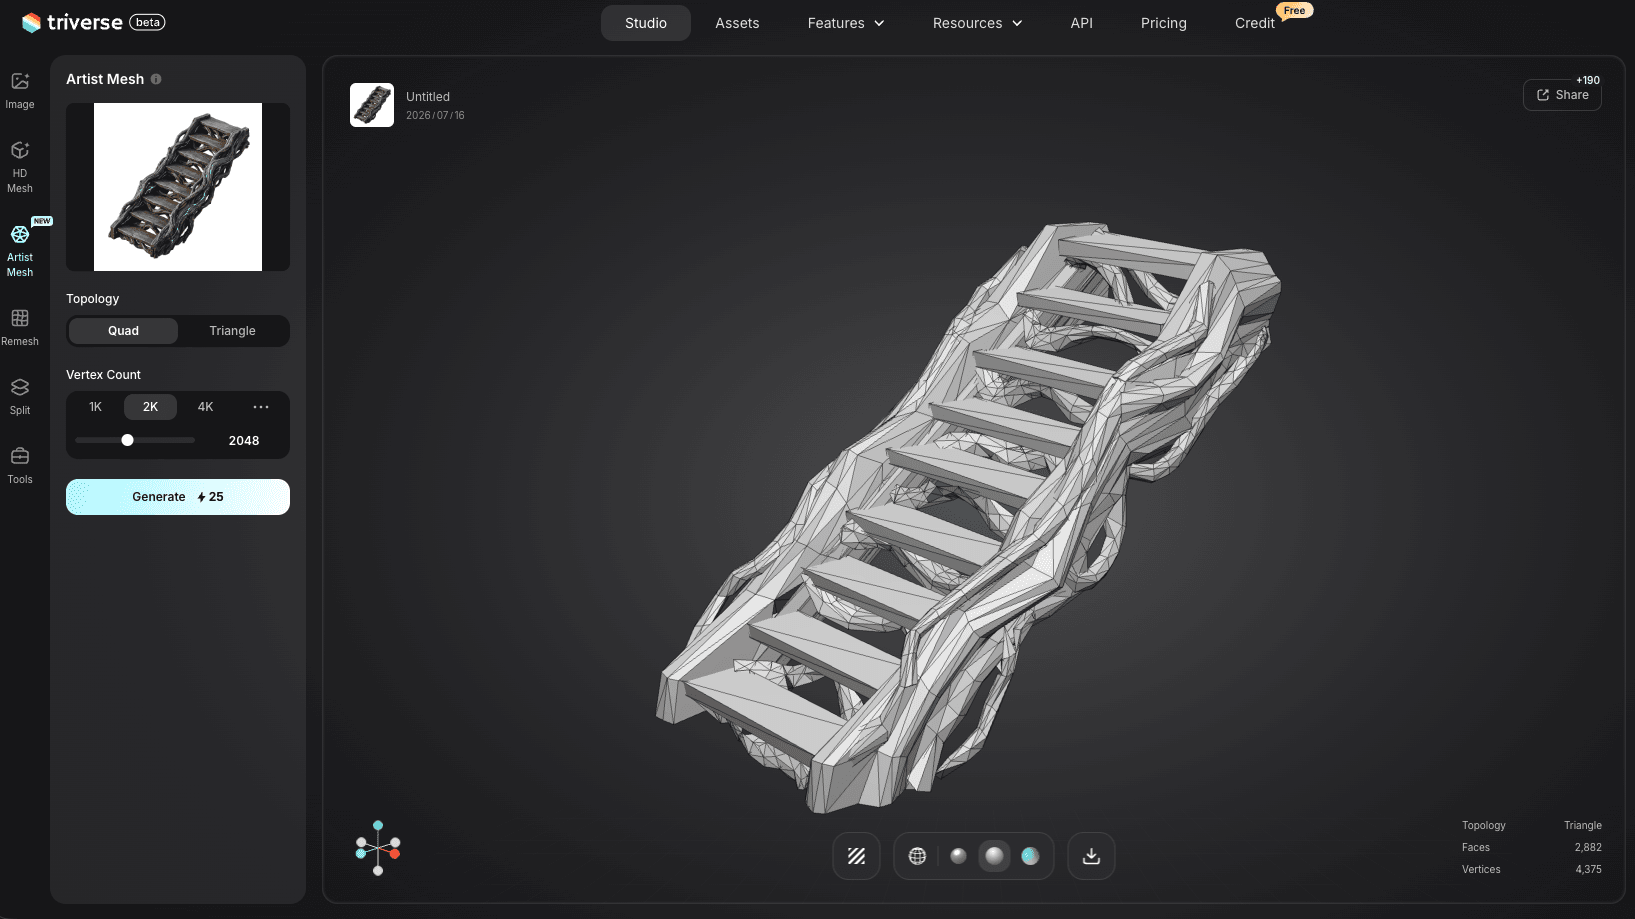
The practical implication is that the retopology step drops out for most static assets. The manifold repair step shrinks to a quick verification rather than a reconstruction. For a prop that needs to land at under 10,000 triangles for a mobile build, you check the count, decimate to target if needed, and export. No retopology. No manual hole-filling.
For hero assets where you need actual baked surface detail, Triverse's other mesh mode, HD Mesh, produces a high-poly source mesh suited for normal map baking rather than direct engine import. Generate the high-poly, retopologize it to your target budget, then bake the detail down as a normal map. This is the traditional workflow, but the HD Mesh source is faster to generate than a manual sculpt.
When the cleaned mesh still has too many faces for the target budget, or you need quad topology for rigging, Remesh tool in Triverse Studio runs the retopology pass without leaving the platform. It exposes a Quad or Triangle topology toggle, polycount presets at 10K, 20K, and 50K, plus a free slider, so you can land the mesh at your target budget in one pass. The output then exports to GLB or OBJ for engine import.
The honest boundary: Artist Mesh removes the most common failure modes from static prop generation. The Remesh tool covers the polycount and topology control for static assets and most simple rigs. It does not remove the need for hand-crafted retopology on complex rigged characters where edge flow drives deformation, nor for normal map baking on hero assets where surface detail matters. The tool reduces the problem surface. It does not eliminate the process. If you are starting from a reference photo rather than a polished concept sketch, generating 3D props from images runs the same cleanup loop with a shorter prep stage.
Bottom Line
Most AI 3D generation problems are fixable. The harder skill is knowing whether the problem is in the generation itself or in the cleanup stage that follows. Triangle soup and non-manifold edges are surface problems with a surface fix. Wrong proportions and hallucinated geometry are generation problems that need a new input. The diagnostic tree above tells you which category you are in before you open Blender.
Prevention at the input stage catches more failures than any cleanup workflow repairs. If you are reading this after a failed generation, the decision tree tells you whether to fix or regenerate. Change one variable if you regenerate, so you can actually learn what the tool needs from you.
The cleanup sequence is not optional. Manifold, retopology, UV, texture, export. Every stage is there because the previous stage prepared the mesh for it. Skip a step, and you carry the error forward. Follow the order and the mesh gets game-ready without wasted effort.
FAQs about AI 3D Generation Problems
What are the most common AI 3D generation problems and how do I fix them?
The most frequent issues are non-manifold geometry with open edges or holes, overlapping UV islands that cause texture bleeding, excessive triangle count that exceeds performance budgets, and meshes that are not watertight for 3D printing. Most of these are repairable in Blender using the 3D Print Toolbox to audit and close manifold issues, then decimating or retopologizing to reach the target polygon count, then re-unwrapping UVs after any geometry change.
Should I fix the mesh or regenerate it?
Fix the mesh when the geometry is fundamentally sound but needs cleanup on topology, UVs, or texture alignment. Regenerate when the proportions or silhouette do not match your input, when parts are fused beyond separation in Blender, or when the same input keeps producing different results and the platform does not offer seed control.
How do I fix bad topology on an AI-generated mesh?
For simple props, apply a Decimate modifier and verify the silhouette survives the reduction. For rigged characters or animated assets, run retopology using RetopoFlow or Quad Remesher in Blender to rebuild the mesh as clean quad topology, then re-unwrap the UVs after the surface geometry changes. Bake the original high-poly detail onto the retopologized low-poly mesh as a normal map if surface detail matters.
Why does my AI 3D model look wrong from the back?
Single-image generation reconstructs the hidden side based on what it infers from the visible surface. This often produces phantom geometry or fused sections. Small gaps are repairable with Blender's Bisect tool and manual fill. Large missing or fused sections require regeneration with a better input image or a multi-view generation mode.
Can AI 3D models be used for 3D printing?
Yes, once the mesh is watertight and manifold. Run Blender's 3D Print Toolbox to audit the mesh, repair non-manifold edges and holes with Make Manifold, recalculate outward normals, and verify the closed result before sending it to a slicer.
Why does the same input produce different results every time?
Most platforms generate at a random seed by default, which makes each run a different sample. Check whether the platform supports seed locking or image-to-image continuation for reproducibility. If seed control is unavailable, lock in every other variable, including the input image, generation mode, and resolution settings, to narrow the variance between runs.
How do I prevent AI 3D generation failures?
Start with a high-quality input: a clear silhouette, distinguishable separation between overlapping parts, a plain or removed background, a resolution of at least 1024 pixels on the long edge, and a three-quarter view rather than a straight-on angle. Prevention at the input stage catches the majority of failures before the first generation attempt.