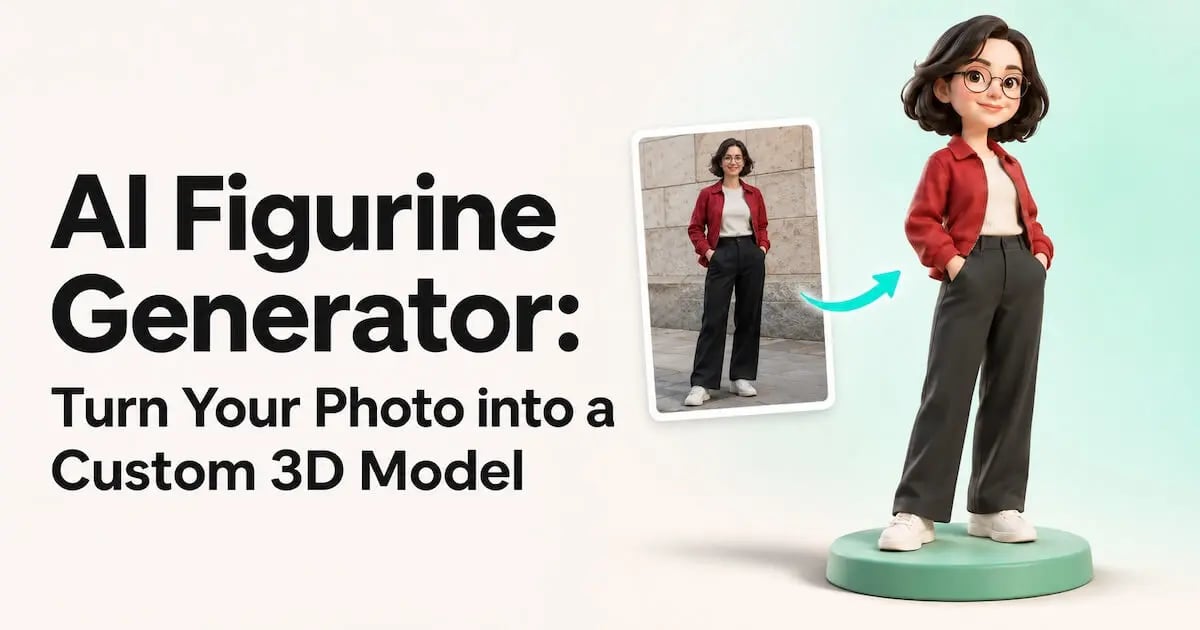
AI Figurine Generator: Turn Your Photo into a Custom 3D Model
Turn your photo into a custom 3D figurine. Keep your original look or create a chibi design, add a base, and download a model for 3D printing.
You might want a keepsake of yourself in your graduation outfit, a reminder of a favorite trip, or a miniature version of a friend to give as a gift. A photo gives you a starting point for that personal figurine, capturing the hairstyle, clothes, and pose associated with the person or occasion.
With an AI figurine generator, you can turn that image into a 3D model without sculpting from scratch. Use the original photo to keep the person's natural appearance, or create an anime or chibi version in Triverse AI's Image Generation first. Then use Photo to Figure to prepare the figurine reference before generating a model you can download and prepare for printing.
Prepare Your Photo or Stylized Character Image
Keep the Person's Original Appearance
For a full-body figurine, choose a photo that shows the person from head to toe with clearly visible facial features. If the person appears too small in a landscape photo to make out their face, choose a closer full-body shot.
A front-facing or slightly angled standing pose helps show the outfit and body shape. When choosing the photo, also look for visible hands and feet, with the arms easy to distinguish from the torso. If a bag, furniture, or another object hides the clothing or limbs, the generator has less visible information about those areas, so prioritize a photo with fewer obstructions.
Choose soft, even lighting so the face and clothing are easy to see, and avoid strong filters that blur facial features or noticeably change the outfit's colors. If you want to preserve a particular outfit, use a complete photo of the person wearing it. When the lower body is cropped out, look for another full-body shot so the reference shows the actual clothes and proportions.
You can leave background removal to Photo to Figure. Focus on a clear, unobstructed view of the person. For more advice on lighting, framing, and subject visibility, see our guide to choosing a clear image for 3D generation.
Create an Anime or Chibi Figurine Design
For a stylized version, open Image Generation in Triverse AI Studio. Upload your photo as a reference, then describe the target style and the personal features you want to retain.
For example, if the person has a short bob, round glasses, and a red jacket, you could use:
Transform the person in this photo into a chibi collectible figurine with a large head and compact body. Keep the short bob haircut, round glasses, red jacket, and original outfit colors. Show one full-body character in a simple standing pose, with both feet visible and arms slightly away from the body. Use a plain background and soft, even lighting. Do not add text, packaging, furniture, or extra characters.
Replace those details with features from your own photo. For an anime figurine, adjust the style and proportions while keeping the instructions about the person's hairstyle, accessories, and outfit.
Generate the images and compare them with the original. For a chibi design, the larger head and smaller body are intentional, so focus on whether the features you wanted to preserve are still recognizable. If a result changes an important detail, revise the prompt to specify it more clearly and generate again. Once the style and personal features look right, use that image in Photo to Figure.
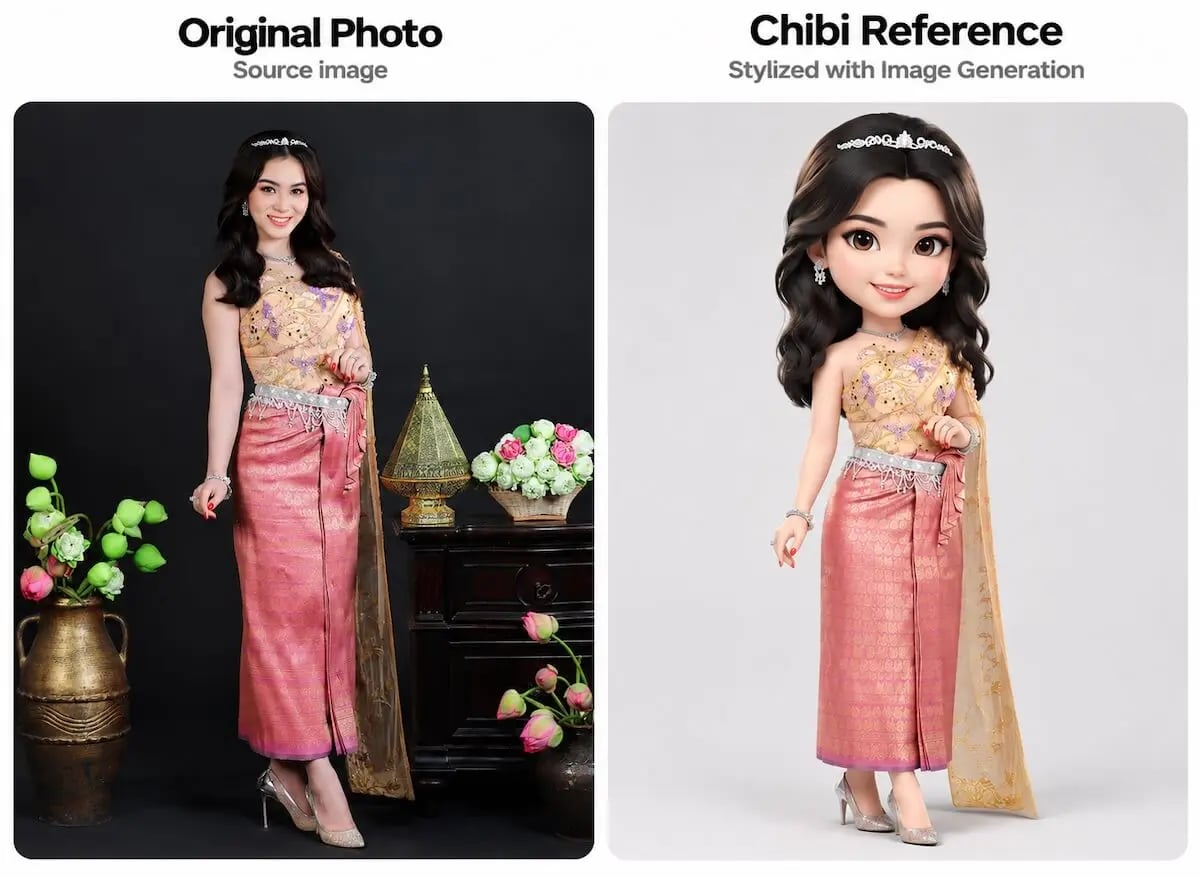
If you want to make a figurine from an existing OC illustration or anime character image, see our guide to turning character artwork into anime figures for 3D printing.
Create a Figurine Reference with Photo to Figure
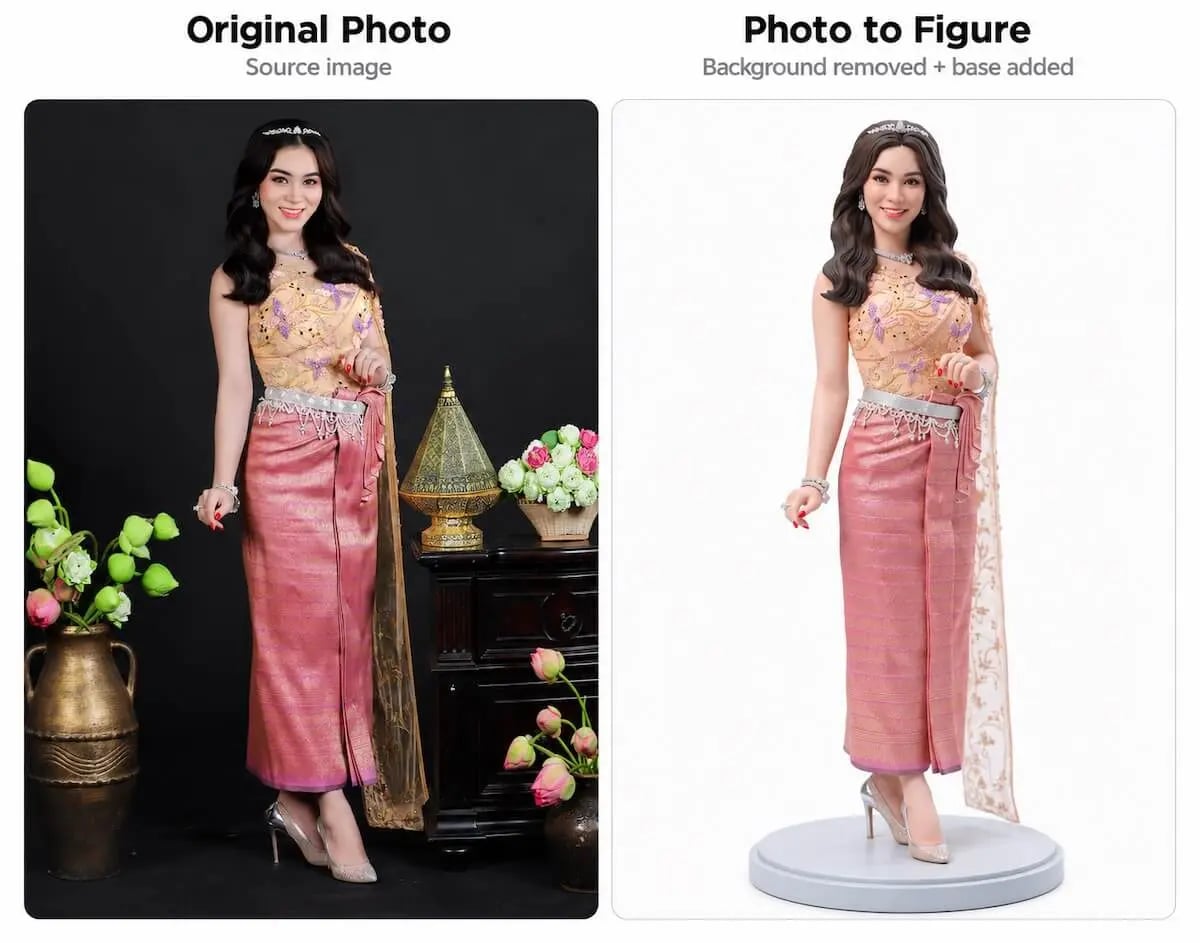
Photo to Figure turns your selected image into a standalone figurine reference. For an everyday photo, it removes the surrounding scene and presents the person as a figurine, bringing the hairstyle, outfit, and pose together in an image you can use for modeling.
If you want a display base, you can add one during this step so the reference shows the figure and base together.
Upload Your Photo or Finished Design
Open Photo to Figure in Triverse AI's Image Tools and upload the original photo or the stylized image you've selected. Keep the full person and any accessories you want in the figurine visible, then open the generation settings.
Choose the Photo to Figure Settings
Setting | Options | What it controls |
|---|---|---|
Figure Base | Yes / No | Whether the generated figurine image includes a display base. |
Resolution | 1K / 2K / 4K | The resolution of the generated image. |
Images to generate | 1 / 2 / 3 / 4 | The number of candidate images generated in one run. |
Generate and Select Your Figurine Reference
Generate the images, then compare the candidates with your uploaded picture. With several results, you can choose the version that best retains the person's recognizable features and complete outfit. For a stylized input, also check that the chosen proportions and overall design have carried through. If you included a base, choose a version whose base suits the figure.
If one candidate changes an important feature, look for another that preserves it. If none fits your intended design, generate another set before continuing to 3D.
Download the selected result. It is a 2D figurine reference image, which you'll use next to generate the model. For more help using the image tools, see the Image Tools guide.
Generate Your 3D Figurine with Triverse AI
Use Triverse AI's Image to 3D to turn the selected reference into a model. References prepared from an original photo and those based on an anime or chibi design use the same generation steps.
Use HD Mesh for Your Personal Figurine
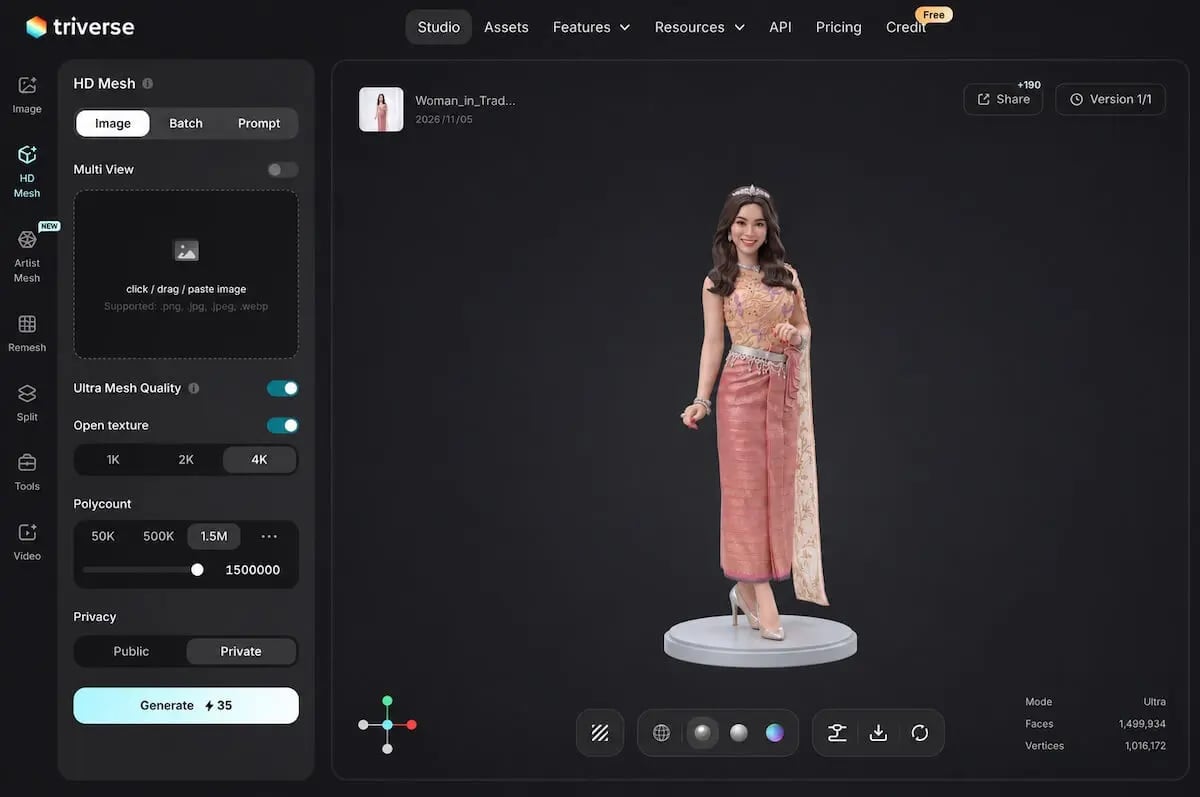
Open Triverse Studio, select HD Mesh, and choose the Image input. Follow the Image to 3D guide to upload the complete figurine reference, including the base if you added one.
A personal figurine is often viewed up close, where the shape of a familiar hairstyle and the details of a distinctive outfit become part of its appeal. HD Mesh is a suitable choice for representing those forms. For Polycount, prioritize a higher setting to give the face contours, hair volume, and clothing folds more geometry.
Next, keep texture generation enabled if you want a colored digital figurine. The colors of a graduation gown or a favorite travel outfit may be part of the look you want to remember, so preserving them helps carry that appearance into the model.
Generate and Preview the Figurine
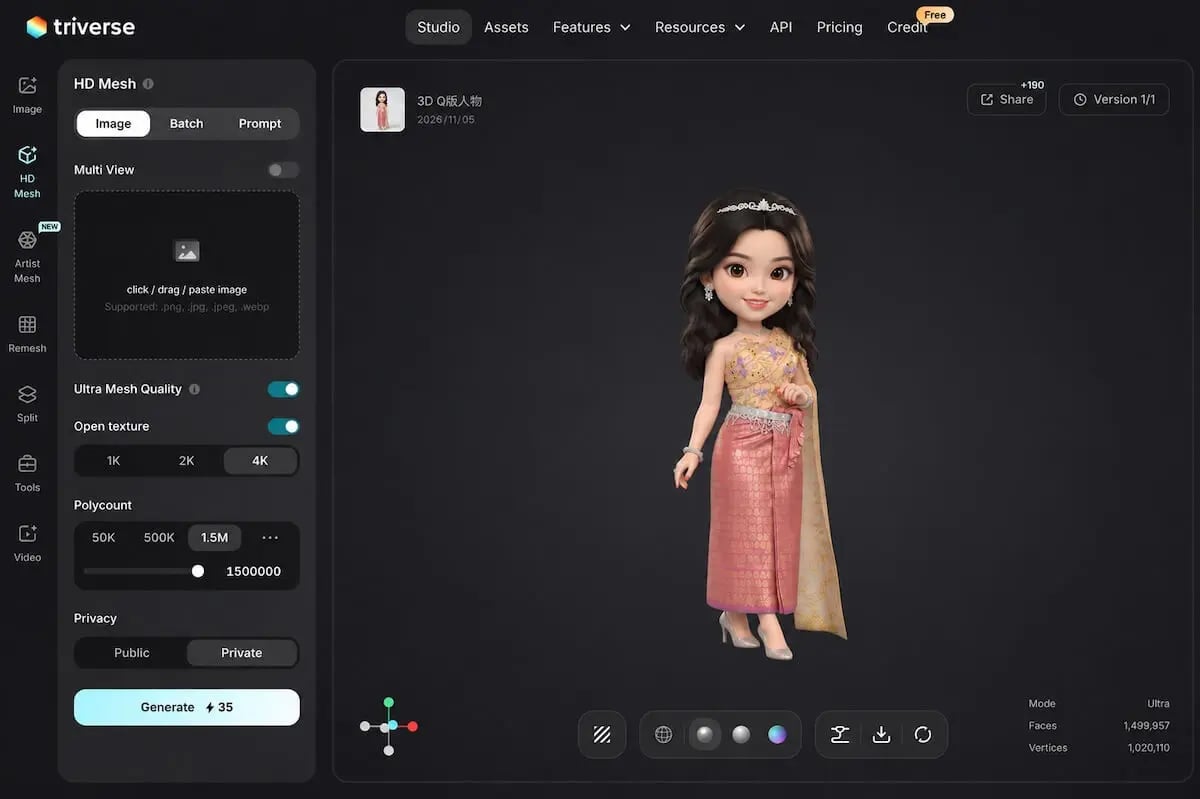
Select Generate, then open the completed model in the 3D preview and rotate it.
For a figurine based on the original photo, look at whether the distinctive hairstyle, outfit, and pose have carried through. For a stylized figurine, compare it with the chosen anime or chibi reference, paying attention to both the redesigned proportions and the personal features you kept.
If an important feature is clear in the reference but changes in the model, try another generation. If the reference itself already changed it, return to the Photo to Figure results and choose another candidate, or generate a new reference before creating another model.
If the model has fused limbs, missing parts, or smeared textures, use our AI 3D generation troubleshooting guide to identify the problem and decide whether to regenerate or prepare the exported mesh for repair.
Export Your Figurine for Display or 3D Printing
For a colored digital keepsake, export GLB. It packages the mesh and appearance data in one file, making it convenient to save and view your figurine in a compatible 3D viewer. After downloading it, open the file to confirm that the colors and materials appear as expected.
For a physical keepsake, first check which format your printing service or slicer accepts. STL is a common choice for single-color printing because it stores the model's shape without colored textures. If you want a colored figurine, you can paint the printed piece or ask your provider which file format and color-printing process it supports. For help choosing a format, see our STL, OBJ, and 3MF comparison.
Set the intended printed height before having the model assessed. As the figure is scaled down, fingers, glasses frames, and other small details shrink too, so ask your printing service whether those parts need preparation at your chosen size. If you're printing it yourself, follow the mesh preparation and slicing steps in our 3D printing preparation guide.