How to Prepare Images for 3D Generation with Triverse AI Image Tools
September 24, 2026In AI 3D generation, the quality of the input often determines how much trial and error comes later. If the reference image does not show the subject's structure clearly enough, the generated model may end up with incorrect proportions, fused parts, or missing details. Instead of regenerating over and over or spending a lot of time fixing the model afterward, it is often more efficient to prepare the reference image first.
Triverse AI Image Tools are designed for this step. They do not generate 3D models directly. Instead, they use AI to improve the pose, composition, and material presentation of the source image, giving HD Mesh or Artist Mesh a clearer and more complete reference to work from.
Which Image Tool Should You Use?
Start by identifying what you want to change in the reference image.
What you need | Tool | Main output |
Turn a real-person photo into a cleaner figure-style reference | Photo to Figure | Figure-style character image on a clean background |
Give a 2D illustration clearer volume, materials, and lighting | 3D Enhance | 3D-render-style reference image |
Open up a character with a complex pose or overlapping limbs | T-Pose | Front-facing character in a standard T-pose |
Generate reference views from different angles using a single character image | Multiview | Front, side, back, and other multi-angle character views |
Turn a colorful or highly textured subject into a white-model look | 3D Print-Ready | Monochrome sculpt or white-model reference |
Extract the head from a full-body or half-body character image | Head Extraction | Close-up focused on the face and hair |
Complete body parts or accessories cropped out of the image | Character Completion | More complete full-body character reference |
A single image may have more than one issue, but there is no need to run it through every tool. Use only the tools that solve a specific problem. Each AI regeneration can slightly change local character details.
How to Use Triverse AI Image Tools
Open Triverse AI Image Tools and select the tool you want to use.
All seven tools follow the same basic workflow:
- Select the tool you want to use.
- Upload the image you want to process.
- Click the generate button.
- Compare the generated results and choose the one that best matches the original design.
- Download the processed image and use it with HD Mesh or Artist Mesh to generate a 3D model.
Projects you have created remain in the list on the left, so you can reopen them later or generate new results.
Why Prepare the Image Before Generating a 3D Model?
Image Tools do more than improve image quality. More importantly, they can help save time and reduce the cost of trial and error later in the workflow.
- Reduce downstream editing. Adjusting a character’s pose, completing cropped body parts, or preparing a clearer reference image is usually far more efficient than fixing major structural problems after the 3D model has already been generated.
- Avoid unnecessary regeneration. A clearer reference provides more usable visual information, making it easier to get a workable result without repeatedly regenerating the model.
- Make 3D reference preparation more accessible. Tasks such as creating a T-pose, extracting the head, completing a cropped character, generating multiview references, or preparing a sculpt-style reference can all be handled before moving into a 3D editor.
What Should You Check Before Uploading an Image?
Image Tools regenerate the subject based on the information already visible in the source image. The clearer the original image is, the easier it is to preserve the original design.
In general:
- Keep the main character or object large enough to occupy most of the frame.
- Minimize overlap from other people or objects.
- Avoid heavily blurred, low-resolution, or visibly compressed images.
- Keep text, watermarks, and foreground elements away from important parts of the subject.
- When possible, use an image with a single main subject.
The ideal input depends on the tool. Character Completion, for example, is specifically designed for cropped characters, so the source image does not need to show the full body.
Photo to Figure: Turn Real Photos into Figure-Style References
Photo to Figure works well with everyday photos, travel photos, and other images that place a person or character in a real-world environment.
It regenerates the subject while trying to preserve the original pose, clothing, and main visual features, and reduces or removes the surrounding background. The result is closer to a clean standalone figure presentation. Clothing, hairstyle, pose, and accessories from the source image usually remain the main reference.
Photo to Figure is useful when:
- The character appears against a busy background such as trees, streets, or indoor environments.
- You want a cleaner single-subject reference image.
- You want to turn a regular photo into something closer to a collectible figure presentation.
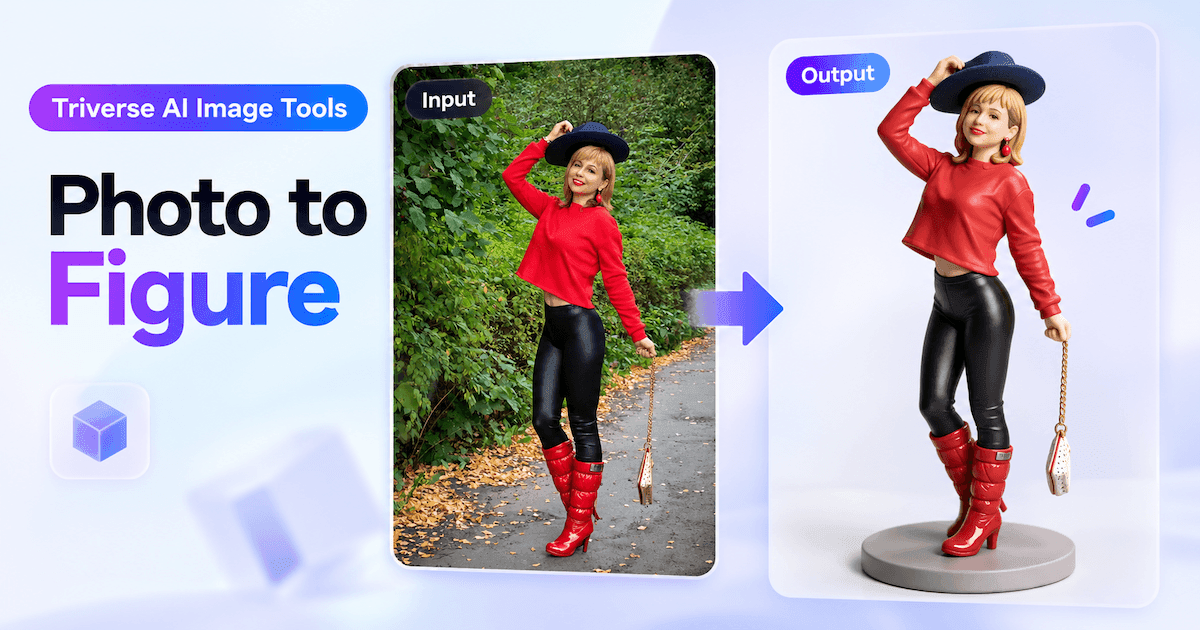
After generation, check whether the face, hairstyle, clothing colors, major accessories, and pose still resemble the original image. Because the result is regenerated rather than simply cut out, facial features, clothing textures, and smaller structural details may change.
3D Enhance: Turn 2D Artwork into a More Dimensional Reference
3D Enhance is designed for flat-color illustrations, anime characters, concept art, and other images that rely mainly on linework and color blocks to describe form.
It keeps the main shape and color scheme of the subject while adding clearer volume, material definition, lighting, and spatial depth. The result looks closer to a 3D render.
For example, a head, limb, or larger structure that is defined mostly by outlines in the source image may gain smoother shading, contact shadows, and material highlights after processing. This can make thickness and front-to-back relationships easier to read.
3D Enhance is especially useful when:
- The character design is clear, but the image still looks visually flat.
- The subject is described mainly through linework and flat color.
- You want a reference with more obvious volume before moving into 3D generation.
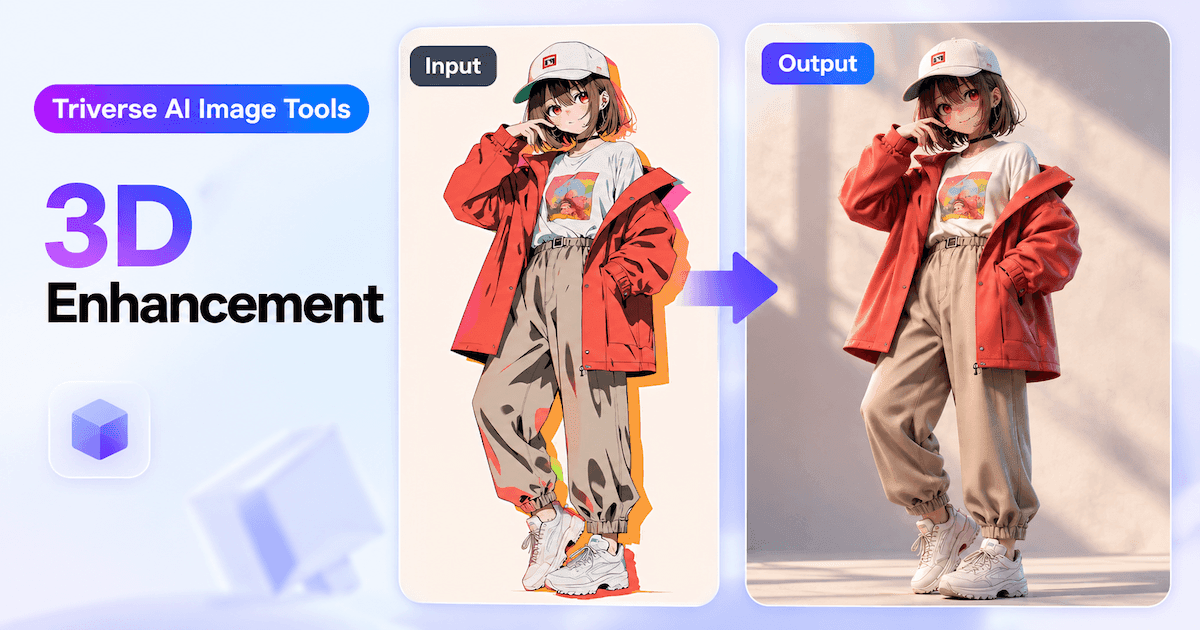
The result is more than a simple lighting pass. Some shapes and materials may be reinterpreted during generation. Check whether the silhouette, color scheme, signature features, and smaller design details still match the original.
T-Pose: Convert a Character into a Standard Open Pose
When a character is shown in a strong action pose, the arms, legs, clothing, and accessories can overlap and make AI-based 3D generation less reliable. T-Pose regenerates the character in a front-facing, upright pose with both arms extended to the sides, making the head, torso, arms, and legs easier to see separately.
T-Pose is useful when:
- Limbs are close to the body or cover the torso.
- The character is fighting, sitting, or shown in another complex pose.
- You want a cleaner, more standardized character reference.
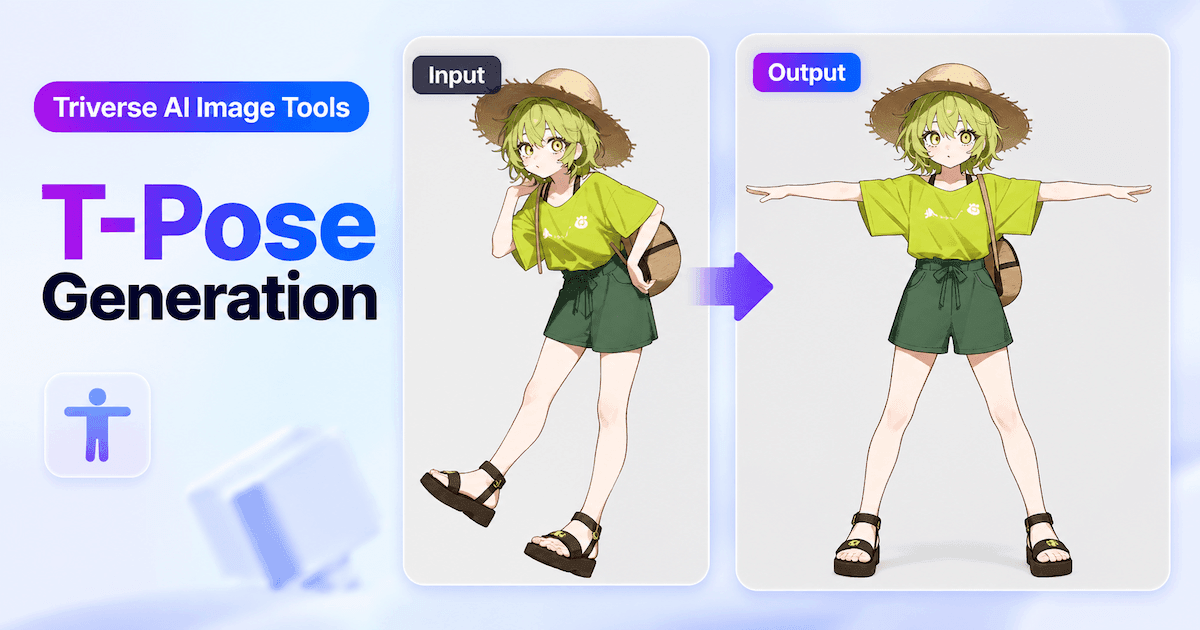
The more complete the source image is, the easier it is for the generated result to preserve the original clothing and accessory design. Hands, body parts, or decorations that are completely hidden still need to be inferred by AI.
After generation, check whether the main clothing, hairstyle, color scheme, and signature accessories still match the original character. Also look for missing, fused, or noticeably distorted limbs.
If the character is already cropped by the image boundary, use Character Completion first, then use T-Pose to adjust the pose.
Multiview: Generate Multi-Angle References from a Single Character Image
Multiview generates front, right, back, and left views from a single character image, adding visual information that cannot be seen from one angle alone.
These additional views make it easier to examine the character’s body proportions, hairstyle, clothing, and accessories from different directions. They can be used as references during character design and modeling, and later as visual guides for checking and refining the silhouette, proportions, and local details of a generated 3D model.
Multiview is useful when:
- You only have one character image and want front, side, and back references to better understand the character’s overall structure and design.
- You need multi-angle references during modeling or later 3D editing to check and refine proportions, silhouette, and local details.
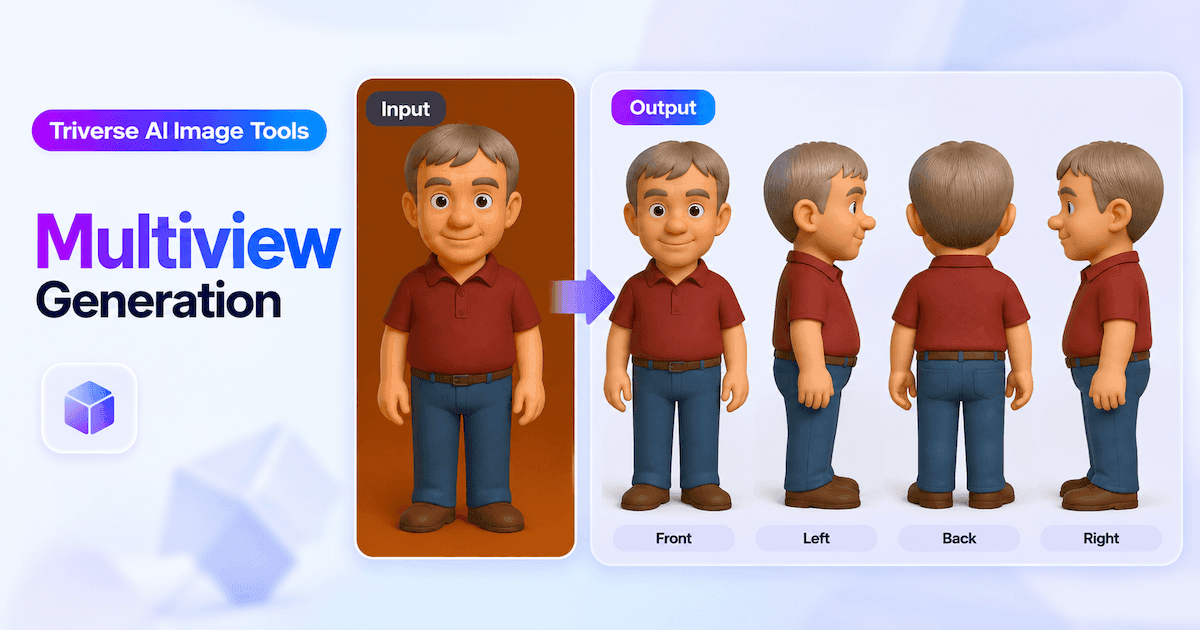
After generation, compare the views to make sure the body proportions, hairstyle, clothing, accessories, and signature design elements remain consistent. Side and back details that are not visible in the original image will be inferred from the existing character design, so choose the result with the most natural transitions and the strongest consistency across views.
3D Print-Ready: Create a White-Model or Sculpt-Style Reference
3D Print-Ready regenerates a colorful, textured, or material-heavy subject into something closer to a monochrome sculpt, white model, or untextured model preview.
By reducing color and material variation, it makes the silhouette, major forms, surface relief, and shape transitions easier to read. This makes it particularly useful for statues, monsters, collectible figures, and other subjects where physical form matters more than color.
Common visual changes include:
- Colorful or weathered materials become white or light gray, with form defined mainly through lighting and shadow.
- The background is simplified into a cleaner studio-like setting.
- Geometric details such as facial structure, muscles, and folds become easier to inspect.
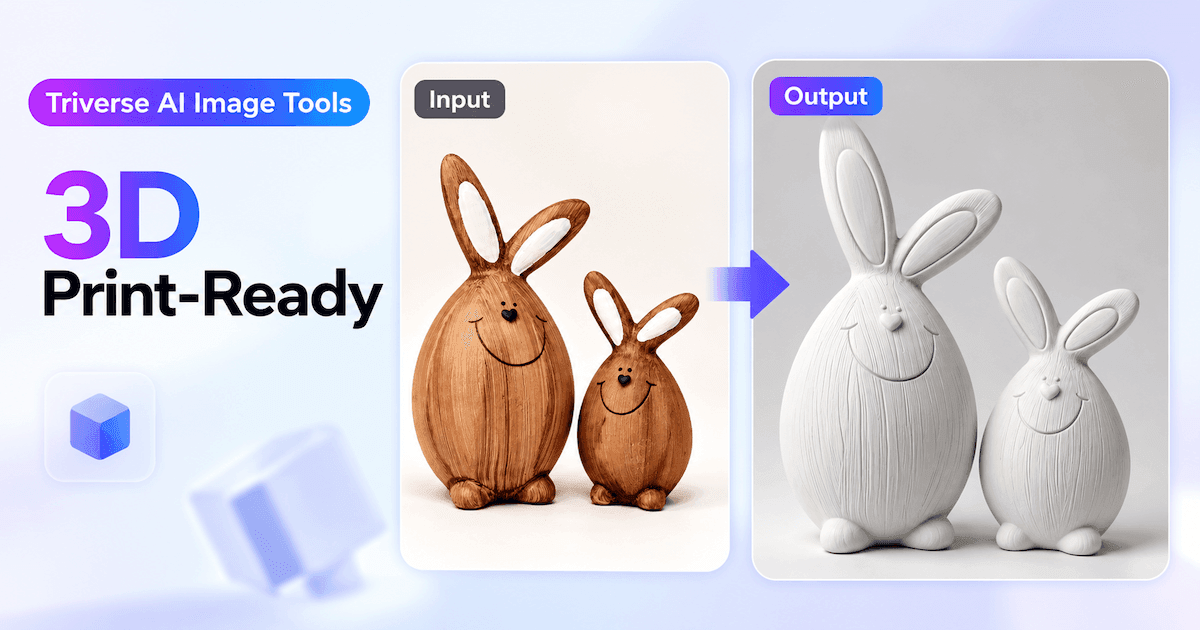
3D Print-Ready does more than simply desaturate the source image. It regenerates the subject, so the number of subjects, silhouette, pose, or major structures may change. Check the result carefully before using it as a 3D reference.
The processed image can then be used with HD Mesh to generate a 3D model. Before actual 3D printing, you will still need to check mesh integrity, scale, wall thickness, supports, and other print-related requirements.
Head Extraction: Generate a Close-Up Head Reference
Head Extraction is useful when the head takes up only a small part of a full-body or half-body character image. It uses the visible head information to generate a new close-up focused on the face and hair, making facial features, hairstyle, and head shape easier to inspect.
Unlike a simple crop, Head Extraction regenerates facial details. Eyes, nose, lips, and hair strands that are very small or partly hidden in the original image may be reinterpreted in the result.
It is useful when:
- You are creating a character head sculpt or portrait.
- The face is too small in the full-body image.
- You want a clearer reference focused only on the head.
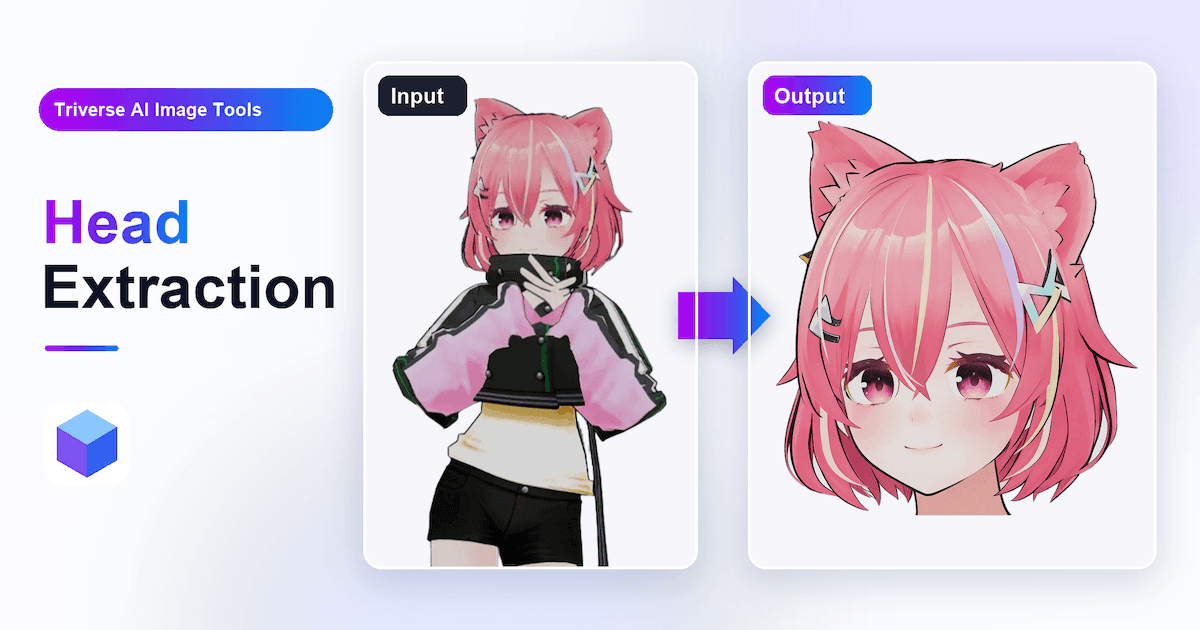
When choosing a result, check whether the face shape, hairstyle, hair color, eye color, and overall character style still match the original.
If the face in the source image is heavily blurred, obstructed, or missing important information, Head Extraction cannot recover the true original details. Missing facial features and hair structure will be regenerated based on the visible information.
Head Extraction is better suited to head, portrait, or bust models. For a full-body character, use a reference that clearly shows the entire body.
Character Completion: Complete Cropped Character Images
Character Completion is designed for images where the body, hands, feet, clothing, wings, tails, or other structures have been cut off by the edge of the frame.
It expands the original composition and generates the missing parts based on the visible character design, turning an incomplete image into a more complete full-body reference. In most cases, it keeps the character's existing pose.
Keep in mind that information outside the original frame cannot be recovered exactly. AI has to infer the missing content, so newly generated limbs, clothing, or accessories may differ from the character's original design.
After generation, check:
- Whether the completed body proportions look natural.
- Whether clothing and materials continue naturally from the visible parts.
- Whether the newly generated areas match the overall design language of the character.
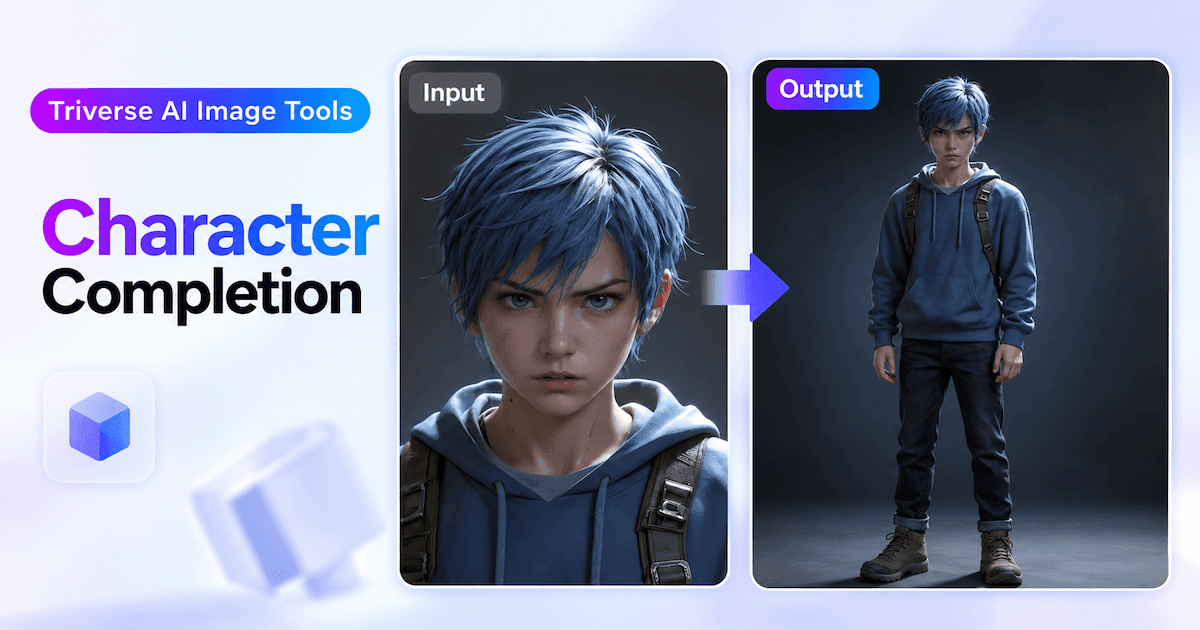
If the completed character still has overlapping limbs or a difficult pose, you can continue with T-Pose.
Use Cases
Image Tools can be combined with Triverse’s 3D generation features to support different production workflows.
A. Indie Game Development: Build Character Assets Faster
For small teams and indie developers, Image Tools can turn 2D character concepts into cleaner references for downstream game asset production.
Workflow:
2D Character Concept → T-Pose → Artist Mesh → Export → Rig in Blender or Mixamo
T-Pose standardizes the character pose before 3D generation, while Artist Mesh creates a lower-poly model that is easier to edit and rig.
Best for: Quickly creating NPC base models that can later be rigged, animated, and integrated into a game development pipeline.
B. 3D Printing and Custom Collectible Figures
Portraits, travel photos, and everyday photos can first be converted into cleaner figure-style references before moving into 3D generation.
Workflow:
Photo → Photo to Figure → 3D Print-Ready → HD Mesh
Photo to Figure isolates the subject and reduces background clutter, giving the image a presentation closer to a collectible figure. 3D Print-Ready can then turn it into a cleaner monochrome sculpt-style reference, while HD Mesh generates the detailed 3D model.
Best for: Turning personal photos into detailed character or figurine models that can be further prepared for 3D printing.
C. Character Customization and Modular Asset Workflows
Customizable or outfit-based characters often need to be broken down into separate assets such as the base body, clothing, and accessories. Image Tools can first complete the character reference, then work with Split to separate it into individual parts before generating the corresponding 3D assets.
Workflow:
Character Image → Character Completion → Split → Separate Body / Clothing /…… → Artist Mesh
Character Completion fills in cropped body parts, clothing, and accessories to provide a more complete reference for the next step. Split then separates the character into individual reference images for the base body, clothing, accessories, and other parts. Each part can then be generated separately with Artist Mesh for easier editing, combination, and outfit swapping.
If you also need a higher-detail head asset, Head Extraction can be used separately to create a clearer head reference.
Best for: Outfit systems, character customization, modular NPCs, and game assets where the body, clothing, and accessories need to be handled separately.
D. Relief Art and Sculpt-Style 3D Generation
For logos, illustrations, and other mostly flat artwork, Image Tools can introduce clearer volume and depth before 3D generation.
Workflow:
2D Logo or Illustration → 3D Enhance → 3D Print-Ready → HD Mesh
3D Enhance strengthens volume, lighting, and depth cues, while 3D Print-Ready converts the result into a cleaner monochrome sculpt-style reference before mesh generation.
Best for: Exploring relief plaques, decorative pieces, medallions, and other sculptural designs derived from 2D artwork.
Frequently Asked Questions About Triverse AI Image Tools
Do Image Tools Generate 3D Models Directly?
No. All seven Image Tools generate new images.
Once the image is ready, use it with HD Mesh or Artist Mesh to generate the 3D model.
Can I Use Multiple Image Tools in Sequence?
Yes, but only when each step solves a clear problem.
For example, if a character is both cropped and shown in a difficult pose, you can use Character Completion first and T-Pose second. Each regeneration may alter facial features, clothing, accessories, or other local details, so check the result after every step.
Should I Use HD Mesh or Artist Mesh?
If you care more about geometric and surface detail, HD Mesh is usually the better place to start.
If the model is intended for games, XR, real-time applications, or further editing, and you want a lower polygon count with more manageable topology, Artist Mesh may be the better fit.
The final choice should still depend on how you plan to use the model and the quality of the actual result.
Will Image Tools Always Improve the 3D Result?
Not necessarily.
Image Tools are most useful when the reference image has a specific issue, such as cropping, pose overlap, a head that is too small in the frame, or a flat illustration with limited depth cues.
If the original image is already well suited for Image-to-3D, regenerating it may introduce unnecessary changes. In that case, try generating from both the original and processed images and compare the results.
Prepare Your 3D Reference Image
Before using Image Tools, identify what actually needs to change. Is the subject cropped? Is the pose hiding important parts of the body? Is the head too small? Or do you want the image to look more like a 3D render, collectible figure, or white model?
Choose the tool that addresses that specific issue, review the generated image for any unwanted changes, and then continue with HD Mesh or Artist Mesh to create the 3D model.
Open Triverse AI Image Tools to get started.